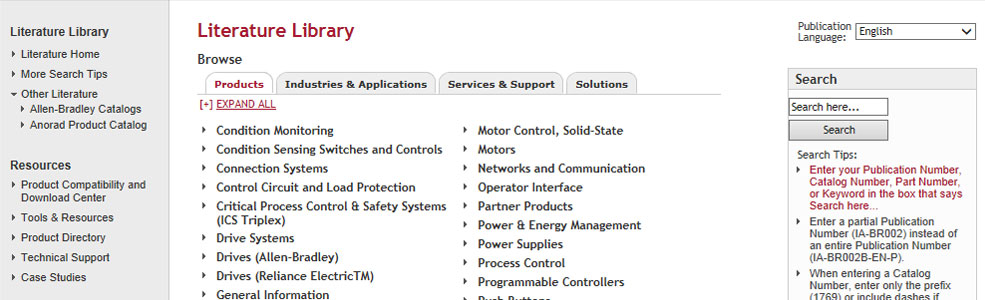
My colleague and I recently had the pleasure of meeting with two of our local Rockwell “Variable Frequency Drive” (VFD) experts. We met so they could show us how to integrate the PowerFlex 750 family of drives into a ControlLogix system.
During this meeting it became apparent if you’re using Allen-Bradley drives there’s one website you need to know, and I’ll share that with you in today’s blog.
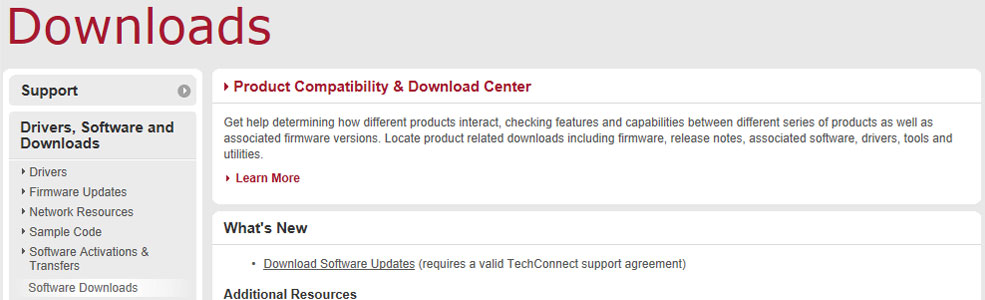
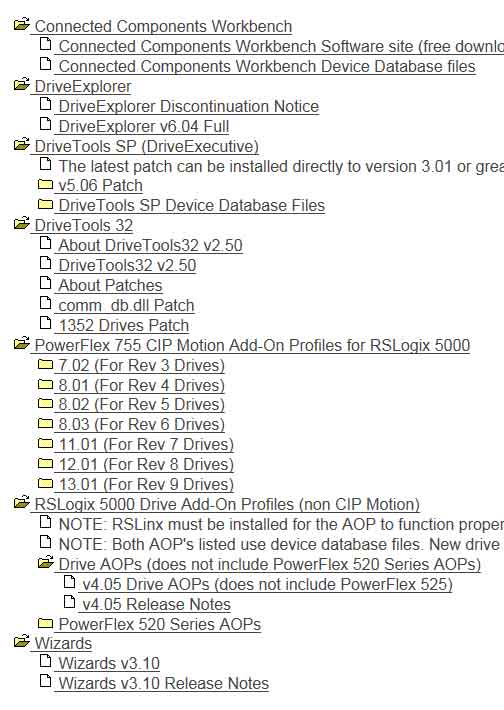
On this site you’ll find flash update files, product helps files, GSD and EDS files, DriveTools, AOPs and much more.
Basically, it’s one stop shopping for A-B VFD files.
Why you may need it:
If you’re going to use Rockwell’s “premier integration” between it’s PowerFlex Drives and ControlLogix, you’re going to need the following updates:
Latest Drive Firmware: Especially for the PowerFlex 750 series, you want the latest version of the drive firmware.
Latest Drive Communicatoin Card Firmware: If you’re going to update your Drive’s firmware, it makes sense to update your communications module at the same time.
Latest RSLogix 5000 Drive Specific Add-on Profile: The AOP is the definition you choose when your add your VFD to the I/O tree. And for everything to work, you’ll want the install the latest version.
Latest Drive Database Files: In addition to the updated AOP, you’ll also want the latest “Drives Database” files installed to enable all the features of the AOP.
I hope the above information about Rockwell drives update website was helpful.
If you have any comments or questions, please feel free to leave them below using the “post a comment or question” link below.
Until next time, Peace ✌️
If you enjoyed this content, please give it a Like, and consider Sharing a link to it as that is the best way for us to grow our audience, which in turn allows us to produce more content 🙂
Support our work and gain access to hundreds members only articles and videos by becoming a member at The Automation Blog or on YouTube. You’ll also find all of my affordable PLC, HMI, and SCADA courses at TheAutomationSchool.com.
Shawn Tierney is a lifelong Technology Enthusiast who began programing in the early 80's on the Apple II and VIC-20 personal computers. After earning a degree in Electronics, he worked as a Certified Controls and Information Automation Specialist for 25 years before launching The Automation Blog and School in 2013.
In The Automation Podcast, Episode 6, we discuss why your ControlLogix or CompactLogix time may be off by a few hours.
Note: You can read more about why your Logix processor time may be off a few hours in our companion blog articleHERE.
Listen to the Podcast:
Until next time, Peace ✌️
If you enjoyed this content, please give it a Like, and consider Sharing a link to it as that is the best way for us to grow our audience, which in turn allows us to produce more content 🙂
Support our work and gain access to hundreds members only articles and videos by becoming a member at The Automation Blog or on YouTube. You’ll also find all of my affordable PLC, HMI, and SCADA courses at TheAutomationSchool.com.
Shawn Tierney is a lifelong Technology Enthusiast who began programing in the early 80's on the Apple II and VIC-20 personal computers. After earning a degree in Electronics, he worked as a Certified Controls and Information Automation Specialist for 25 years before launching The Automation Blog and School in 2013.
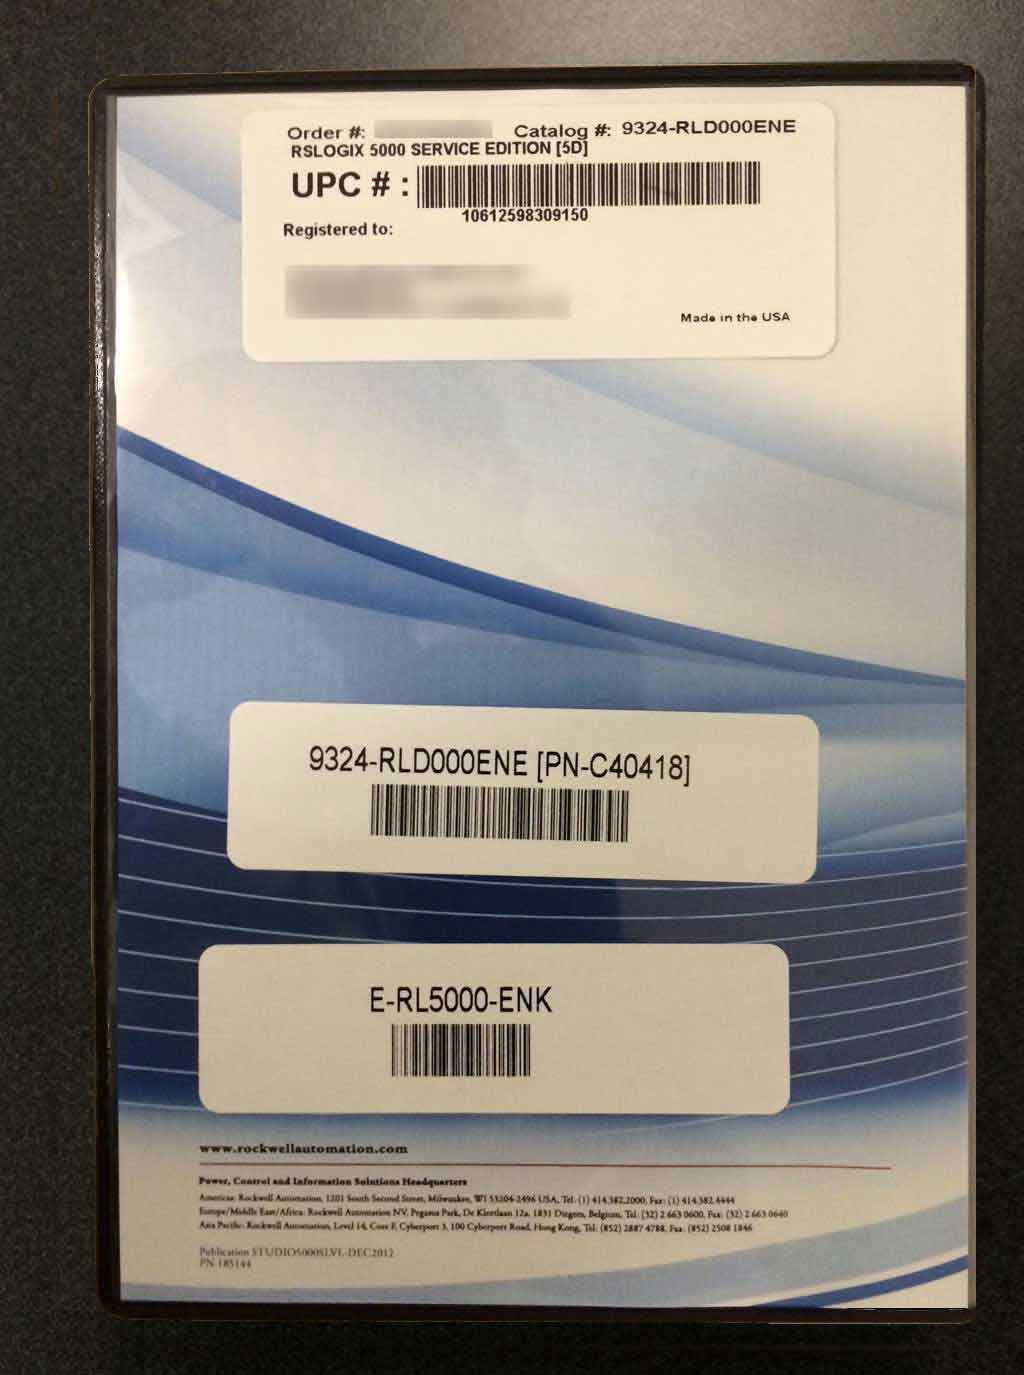
UPDATE 11/06/2017: Most of Rockwell’s existing software product part numbers which end in “ENE” will no longer provide you with a “physical shipment” of software.
So to receive the DVD set as shown in this article, you need to replace the “ENE” in the part/catalog number with “ENM”
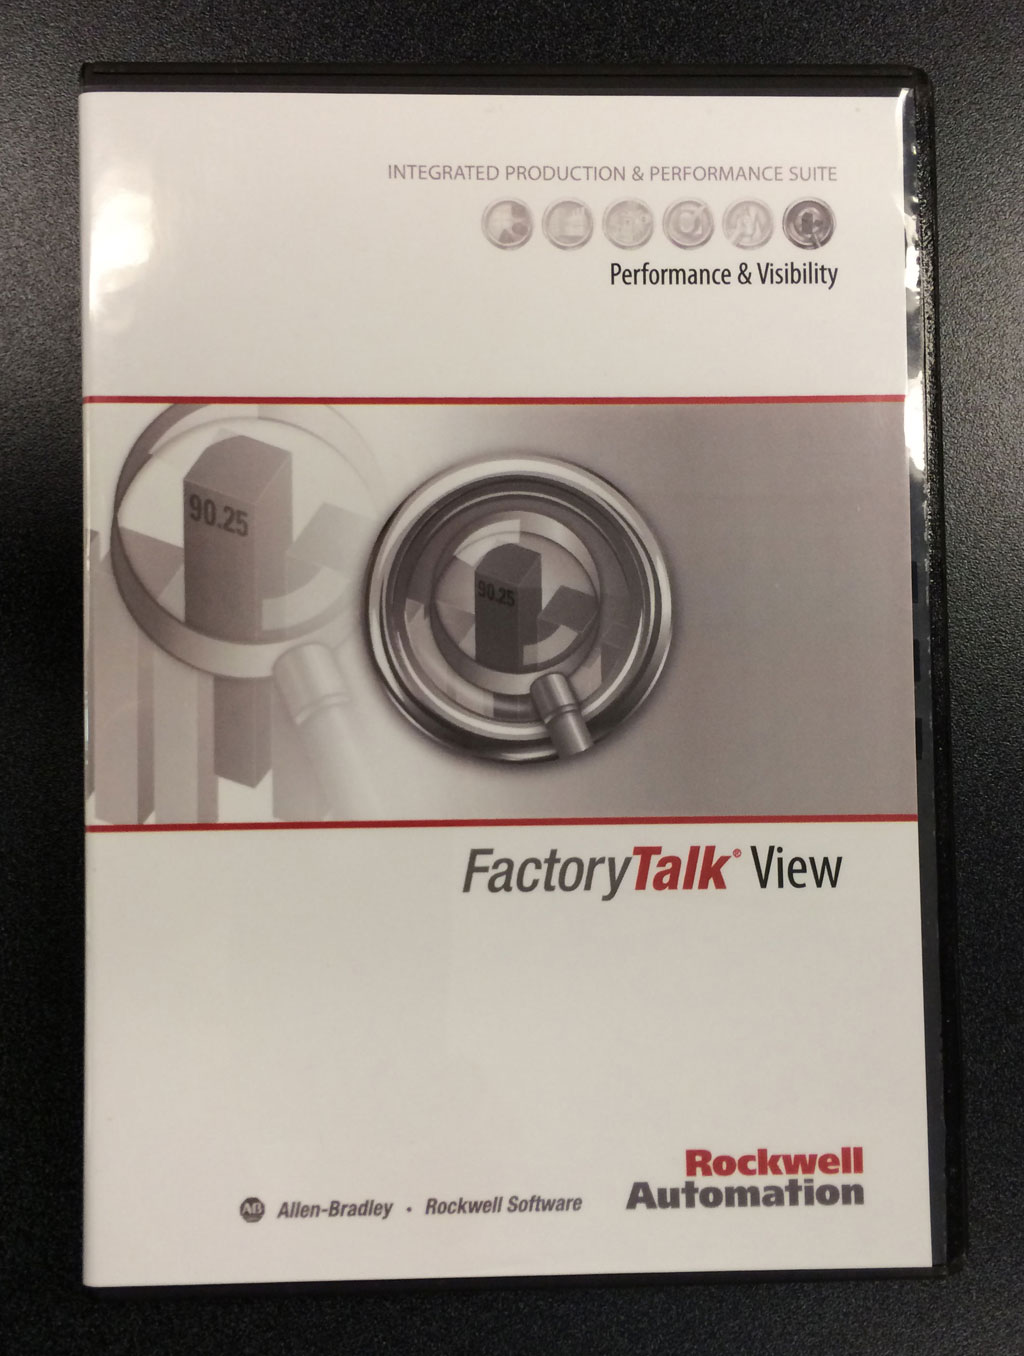
What actually comes in a package of FactoryTalk ViewStudio Machine Edition? We’ll show and explain all the contents in today’s blog.
ViewStudio Machine Edition Packaging
ViewStudio, like most Rockwell Software, comes in a plastic “clam shell” style box. On the front is the product name and logo. On the back is the part number, order number, and customer address.
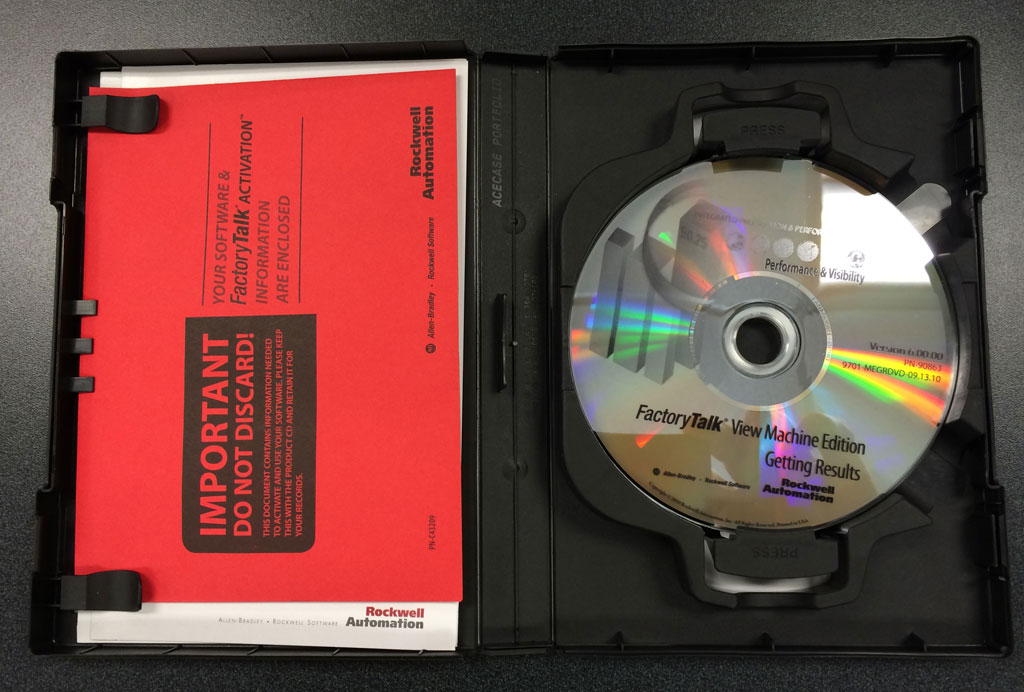
Inside the ViewStudio Package
Inside the software package itself, the two most important items are the software installation DVD, and the red envelope. In addition to the installation DVD, labeled 7.00.00-FTView-DVD, you’ll find three other discs:
9701-MEGRDVD: This is the getting results DVD designed for first time users
2.60.00-FTViewPoint-FTV-DVD: This is the ViewPoint DVD you use to install the ViewPoint Adminsitration Tool (see this blog for more information about ViewPoint)
7.00.00-KepSerEnt-CD: This is the Kepware Server CD which contains 60+ OPC servers included free of change with ViewME Runtimes and PanelView Plus terminals. But the version which ships with ViewStudio only runs for 2 hours at a time.
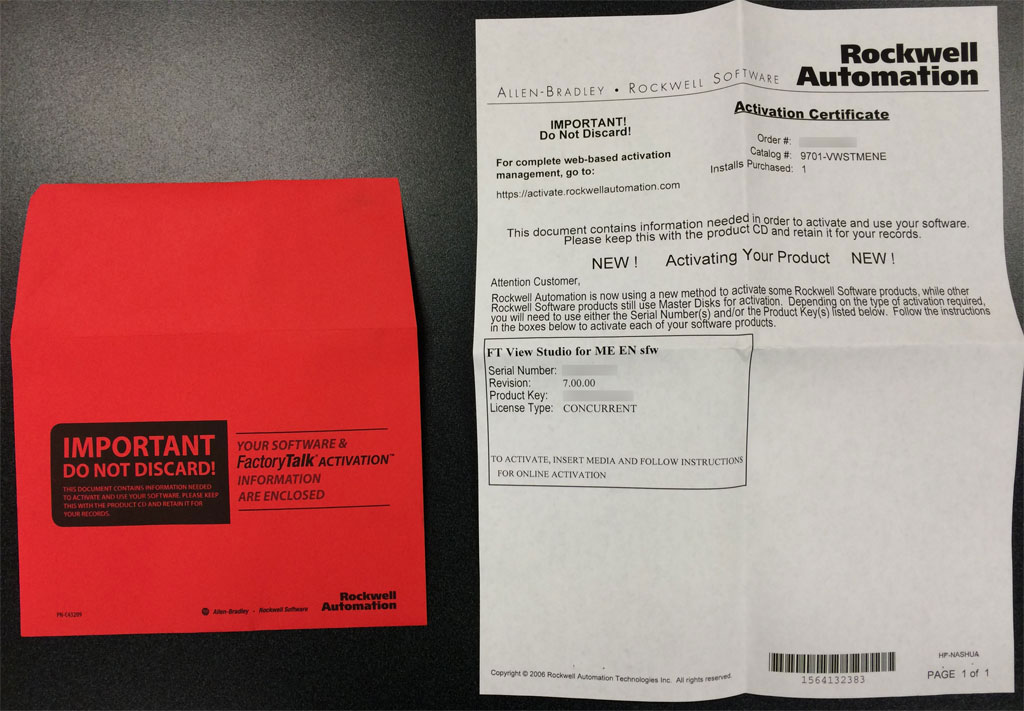
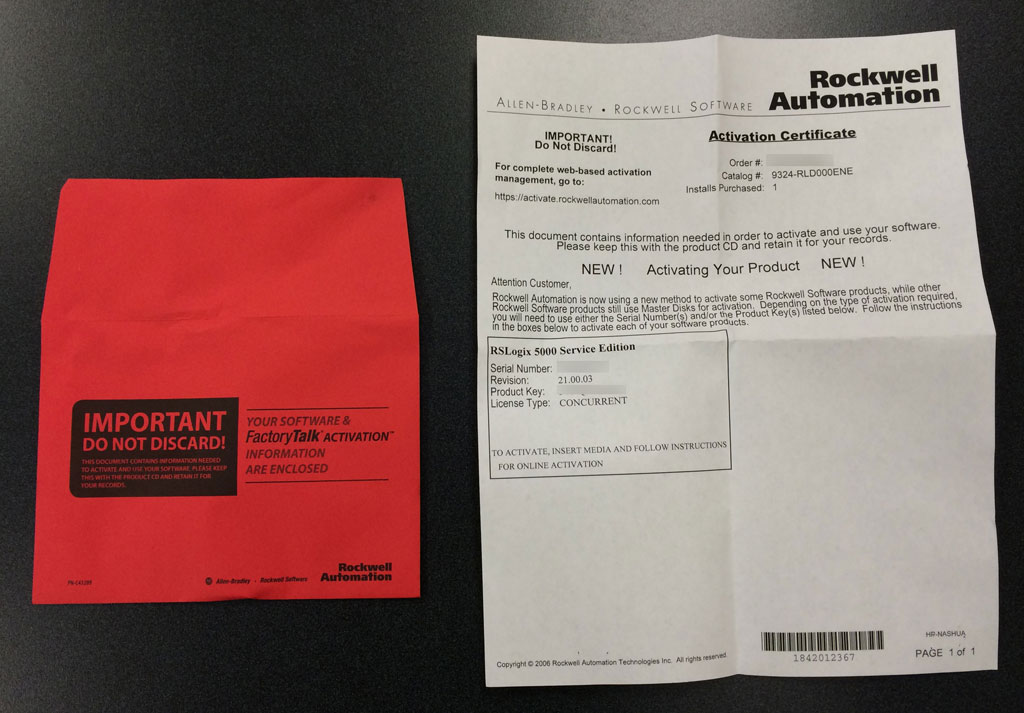
The Red Envelope
This important looking envelope contains the software serial number and product key. You need these two pieces of information to activate your software, which is required for the software to run longer than the 7 day grace period.
If you happen to lose this information, Rockwell’s Activation Support (no contract required) can email you a replacement PDF.
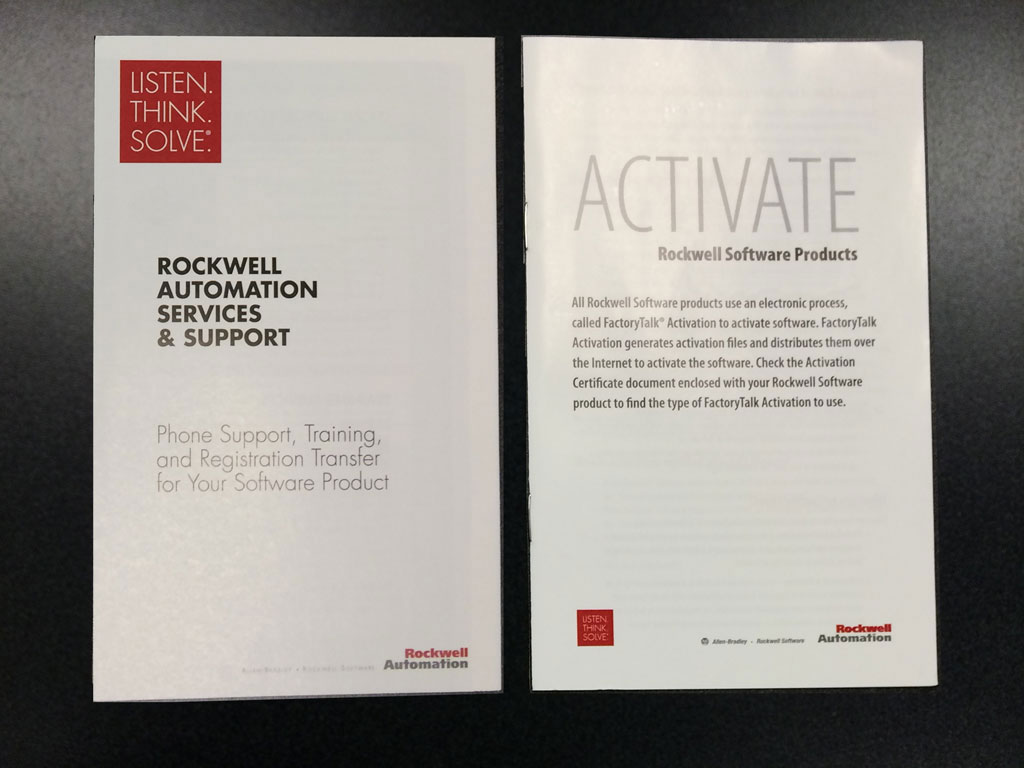
Supporting Documentation
Finally, you also receive three pieces of supporting documentation in the software box:
Instructions on activating your software
Support services information for your software
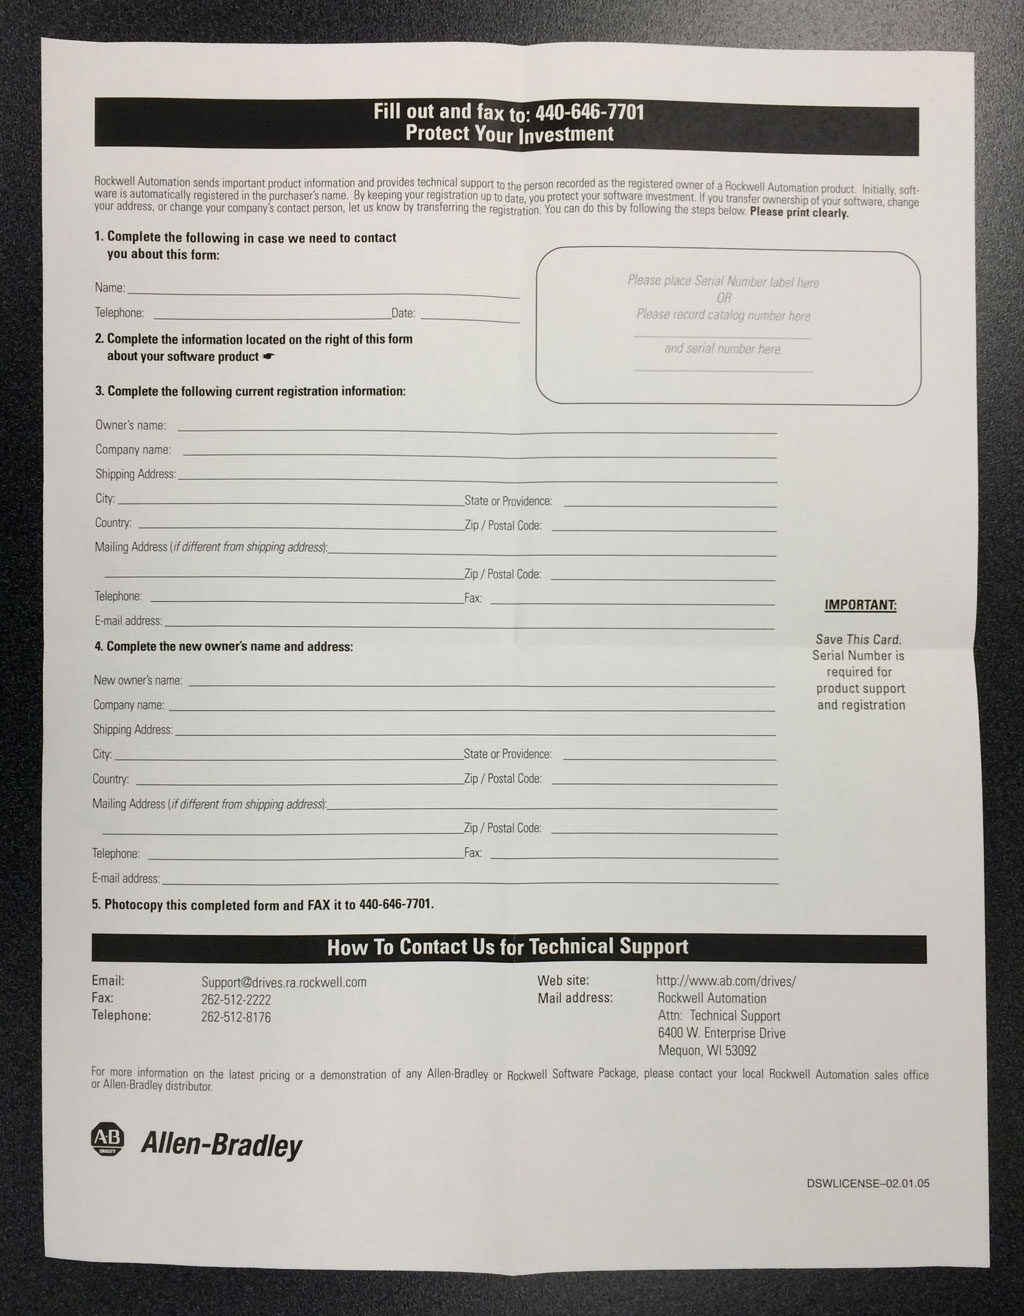
Software registration form (if the information on the box is not correct, be sure to send this form in)
I hope the above information and pictures about the content included with new packages of FactoryTalk View Studio is helpful.
If you have any comments or questions, please feel free to leave them below using the “post a comment or question” link below.
Until next time, Peace ✌️
If you enjoyed this content, please give it a Like, and consider Sharing a link to it as that is the best way for us to grow our audience, which in turn allows us to produce more content 🙂
Support our work and gain access to hundreds members only articles and videos by becoming a member at The Automation Blog or on YouTube. You’ll also find all of my affordable PLC, HMI, and SCADA courses at TheAutomationSchool.com.
Shawn Tierney is a lifelong Technology Enthusiast who began programing in the early 80's on the Apple II and VIC-20 personal computers. After earning a degree in Electronics, he worked as a Certified Controls and Information Automation Specialist for 25 years before launching The Automation Blog and School in 2013.
In The Automation Podcast, Episode 5, we discuss “virtualization.”
Note: You can read more about the case for virtualization in our companion blog articleHERE. You can also watch the first in our video series on VMwareHERE.
Listen to the Podcast:
Until next time, Peace ✌️
If you enjoyed this content, please give it a Like, and consider Sharing a link to it as that is the best way for us to grow our audience, which in turn allows us to produce more content 🙂
Support our work and gain access to hundreds members only articles and videos by becoming a member at The Automation Blog or on YouTube. You’ll also find all of my affordable PLC, HMI, and SCADA courses at TheAutomationSchool.com.
Shawn Tierney is a lifelong Technology Enthusiast who began programing in the early 80's on the Apple II and VIC-20 personal computers. After earning a degree in Electronics, he worked as a Certified Controls and Information Automation Specialist for 25 years before launching The Automation Blog and School in 2013.
UPDATE 7/28/2022: Most of Rockwell’s software has gone electronic delivery and is purchased online right from Rockwell.
There is also an extra cost to get “Legacy Editions” which include the newest versions of Studio 5000 as well as copies of RSLogix 5000.
For details check out Rockwell’s website here (you must login to see details, but creating a website account is free.)
UPDATE 11/06/2017: Most of Rockwell’s existing software product part numbers which end in “ENE” will no longer provide you with a “physical shipment” of software.
So to receive the DVD set as shown in this article, you need to replace the “ENE” in the part number with “ENM”
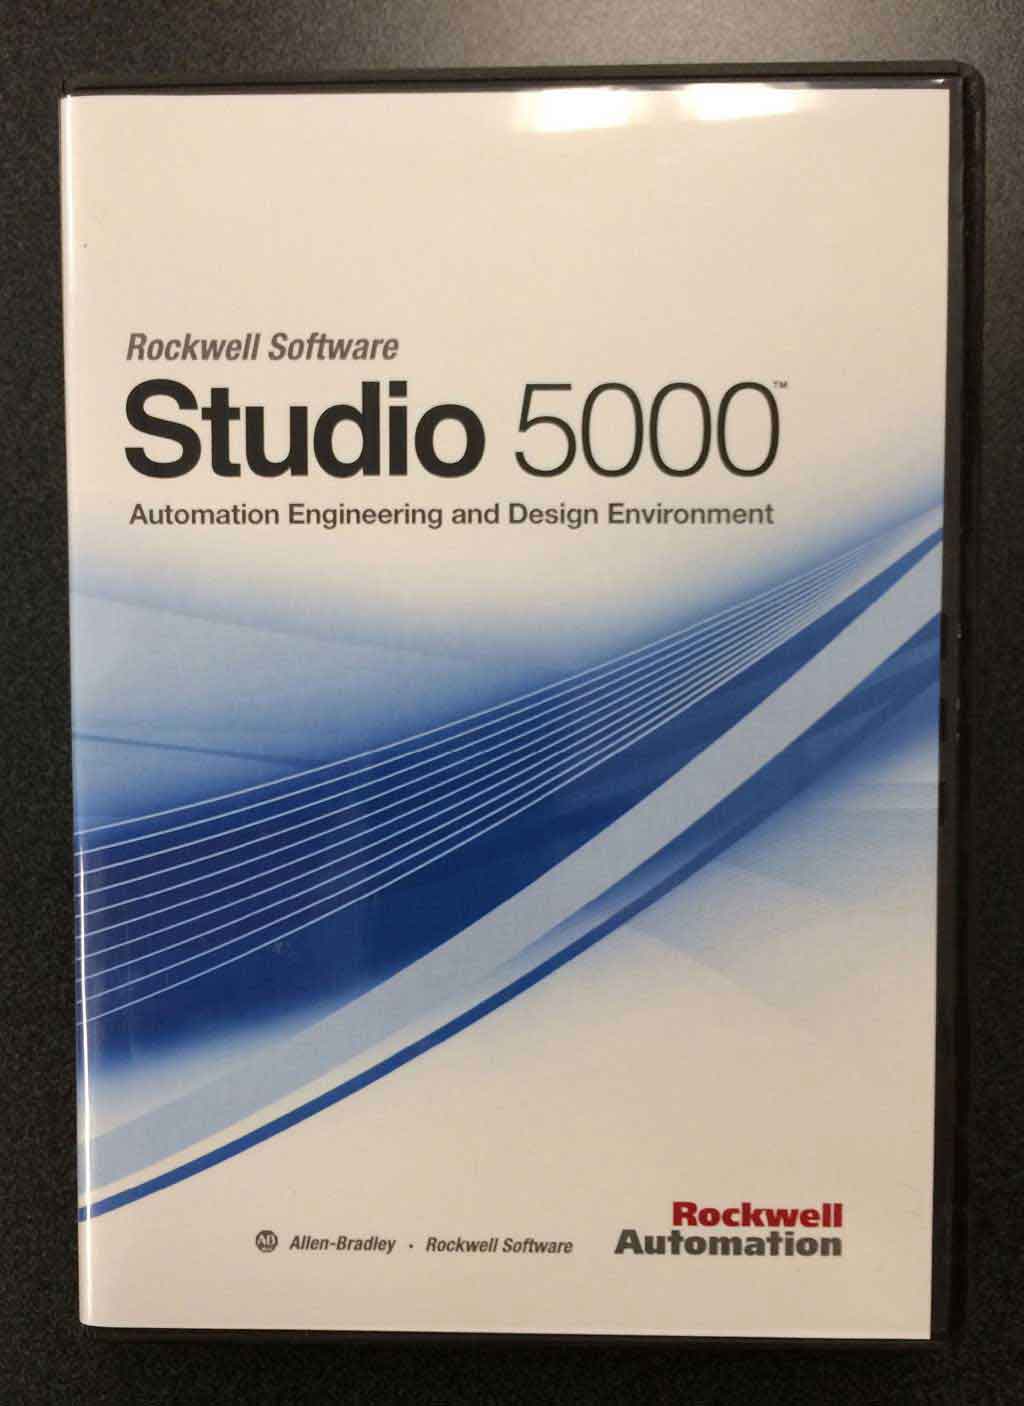
When you order Studio 5000 (formerly known as RSLogix 5000) you may not get what you were expecting.
While the software’s part number hasn’t changed, the contents of the package have. So in today’s blog we’ll review exactly what you now get when you order Studio 5000.
Studio 5000 Packaging
The first thing you’ll notice is the software package doesn’t have the familiar RSLogix 5000 logo. This one change has prompted concerned calls from clients who thought they’ve received the wrong software.
The fact is, when Rockwell released version 21 of the Logix programming software , they re-branded it from “RSLogix 5000” to “Studio 5000 – Logix Designer.” You’ll also find this re-branding on Rockwell’s websites, and in some places the re-branding has even extended to version prior to 21.
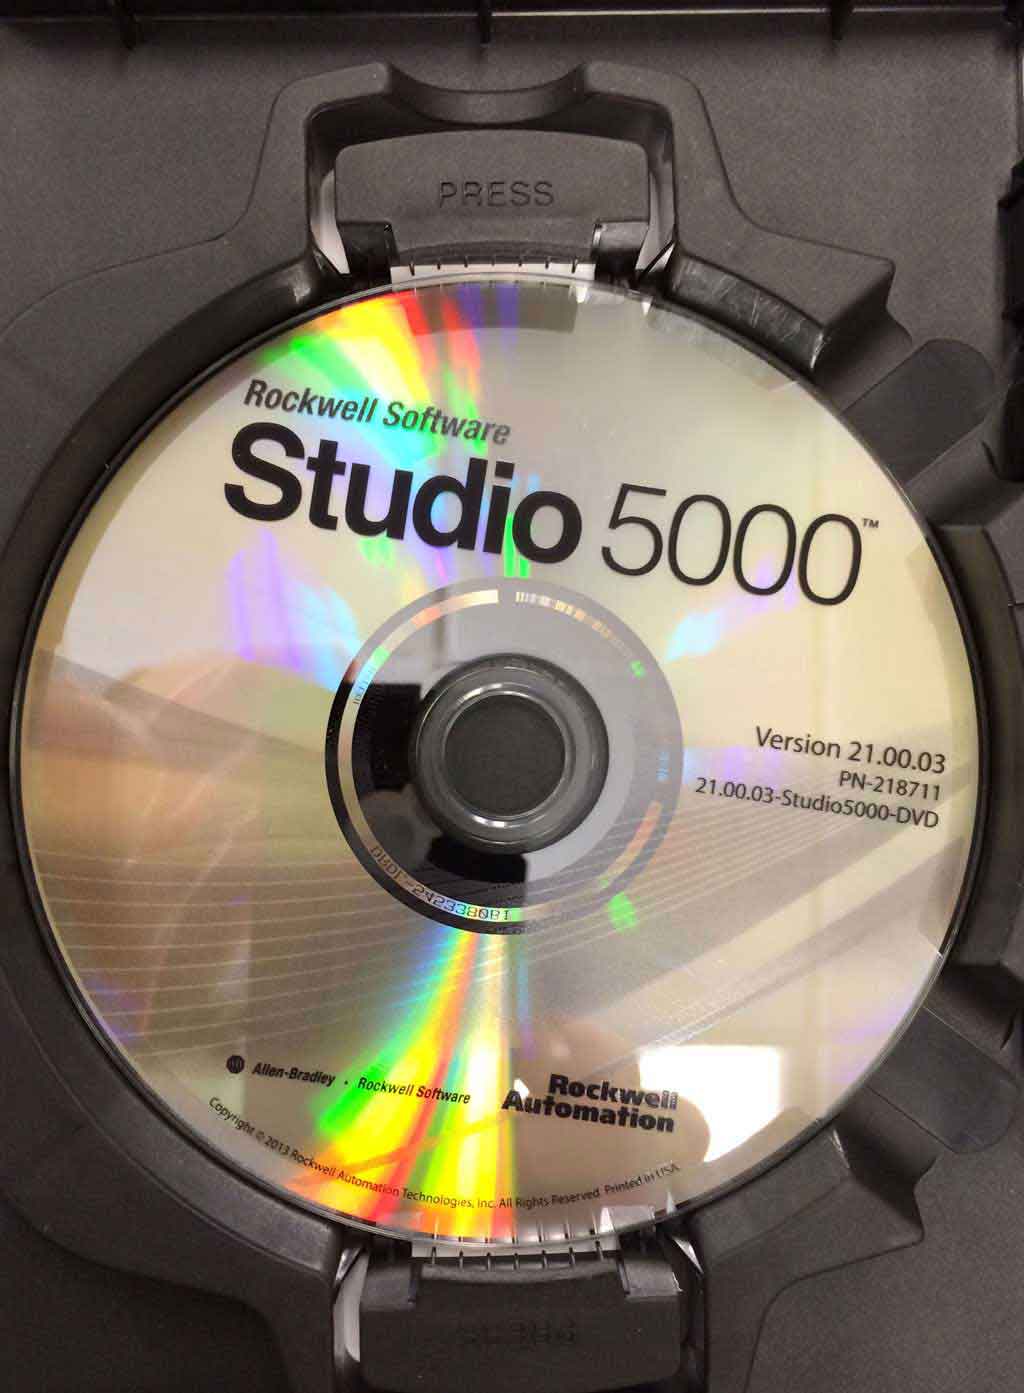
Inside the Studio 5000 Package
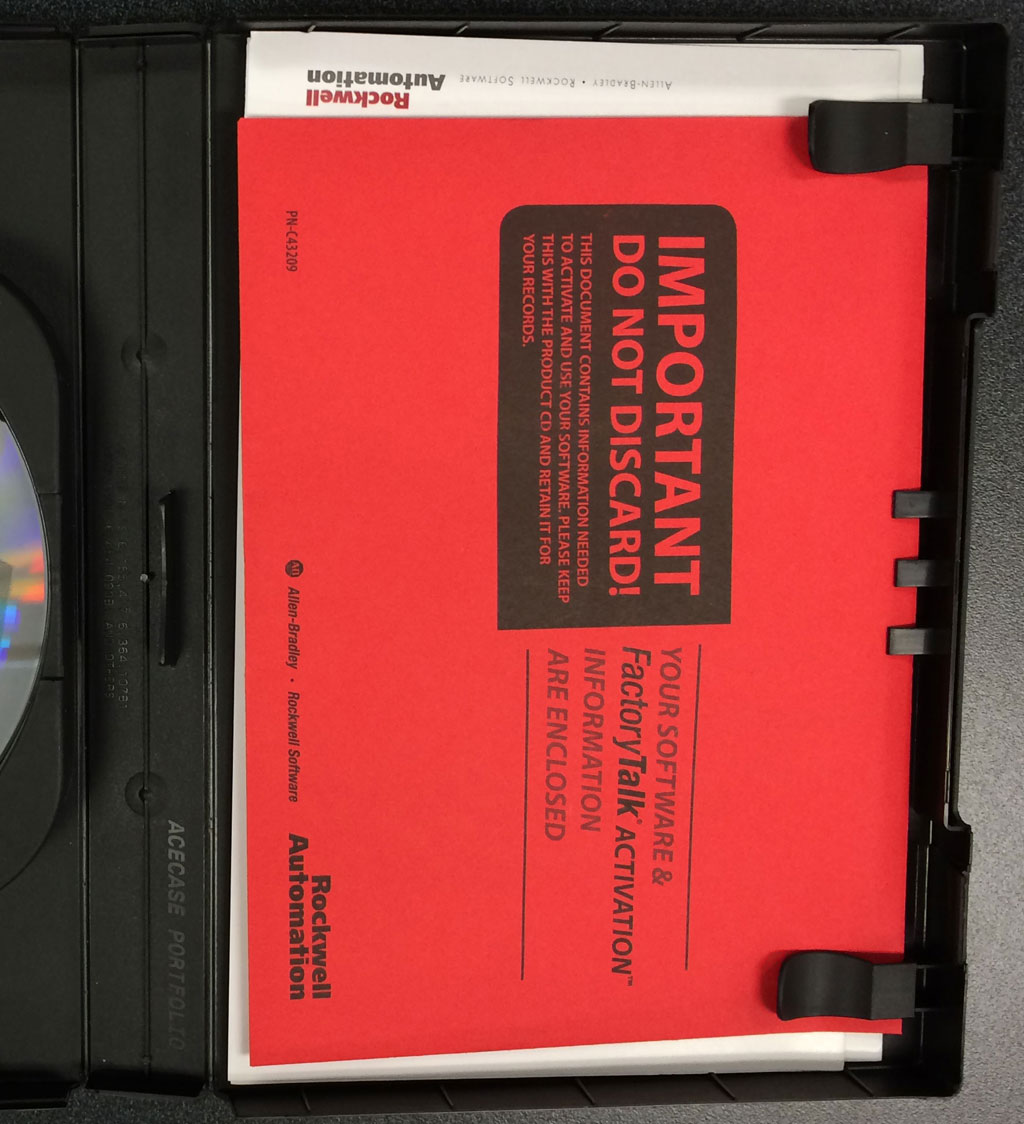
Inside the software package itself, the two most important items are the software installation DVD, and the red envelope. Unfortunately, today you only receive a single DVD with Logix version 21. This hasn’t gone unnoticed by Rockwell customers, and it’s our hope Rockwell will return to including the second “multi-version” DVD in the near future.
This important looking envelope contains the software serial number and product key. You need these two pieces of information to activate your software, which is required for the software to run longer than the 7 day grace period.
If you happen to lose this information, Rockwell’s Activation Support (no contract required) can email you a replacement PDF.
Supporting Documentation
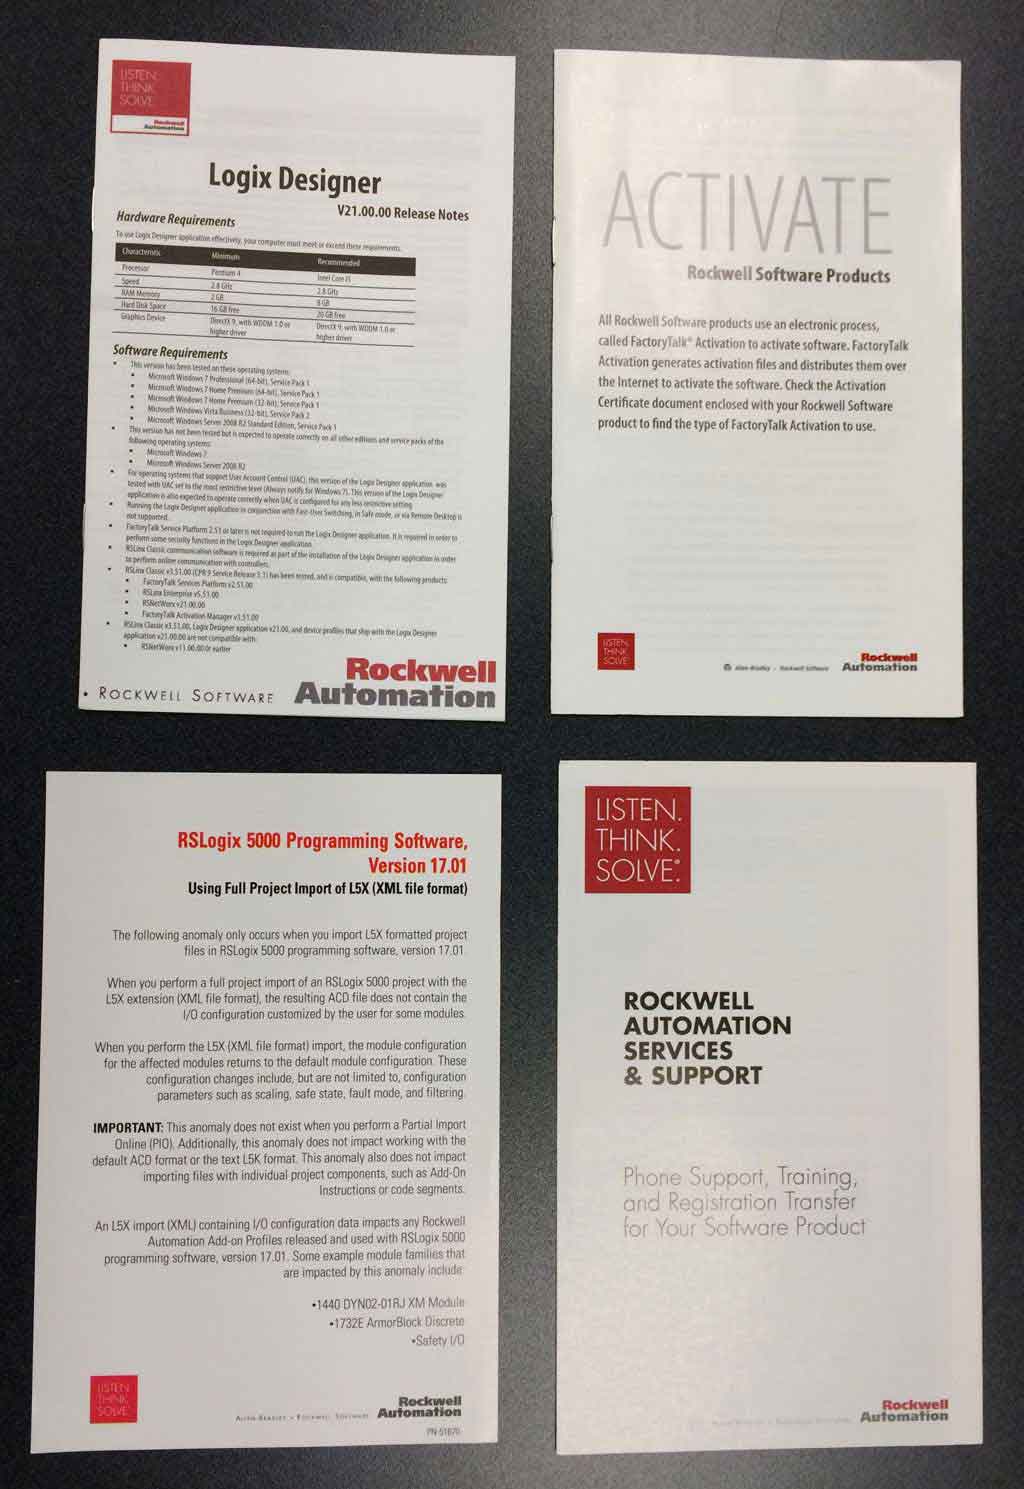
Finally, you also receive several pieces of supporting documentation in the software box. These include the following:
Studio 5000 – Logix Designer version 21 release notes
Instructions on activating your software
Product notice for version 17 of the software (software not included)
Support services information for your software
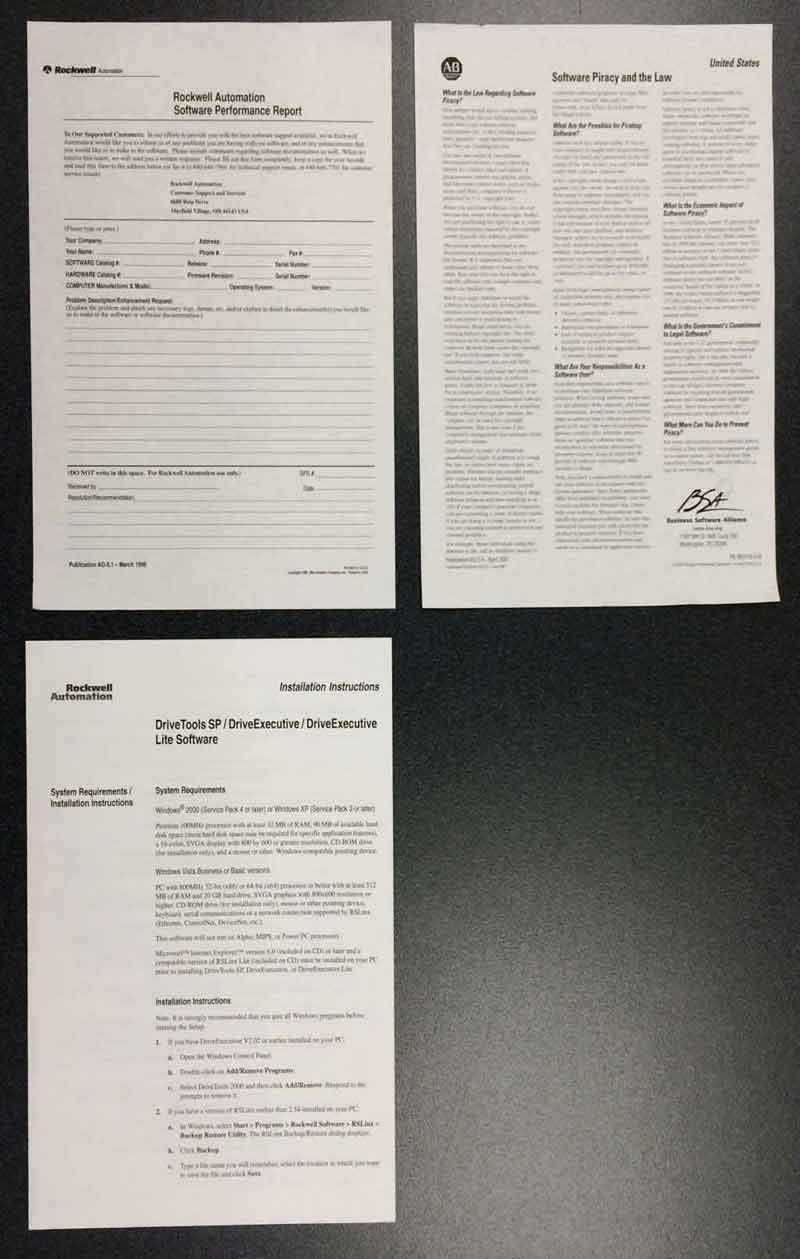
Product issue & feedback form
Drives software installation instructions (included on v21 DVD)
Software piracy information
Software registration form (if the information on the box is not correct, be sure to send this form in)
I hope the above information and snapshots of what comes in new packages of RSLogix 5000, aka Studio 5000, is helpful.
If you have any comments or questions please feel free to leave them below using the “post a comment or question” form.
Until next time, Peace ✌️
If you enjoyed this content, please give it a Like, and consider Sharing a link to it as that is the best way for us to grow our audience, which in turn allows us to produce more content 🙂
Support our work and gain access to hundreds members only articles and videos by becoming a member at The Automation Blog or on YouTube. You’ll also find all of my affordable PLC, HMI, and SCADA courses at TheAutomationSchool.com.
Shawn Tierney is a lifelong Technology Enthusiast who began programing in the early 80's on the Apple II and VIC-20 personal computers. After earning a degree in Electronics, he worked as a Certified Controls and Information Automation Specialist for 25 years before launching The Automation Blog and School in 2013.
In The Automation Podcast, Episode 4, we discuss the Micro820 and CCW6 as shown at Automation Fair 2013.
Note: You can read more about the Micro820 as shown at Automation Fair in our companion blog articleHERE.
Listen to the Podcast:
Until next time, Peace ✌️
If you enjoyed this content, please give it a Like, and consider Sharing a link to it as that is the best way for us to grow our audience, which in turn allows us to produce more content 🙂
Support our work and gain access to hundreds members only articles and videos by becoming a member at The Automation Blog or on YouTube. You’ll also find all of my affordable PLC, HMI, and SCADA courses at TheAutomationSchool.com.
Shawn Tierney is a lifelong Technology Enthusiast who began programing in the early 80's on the Apple II and VIC-20 personal computers. After earning a degree in Electronics, he worked as a Certified Controls and Information Automation Specialist for 25 years before launching The Automation Blog and School in 2013.
In The Automation Podcast, Episode 3, we discuss the 1769-AENTR as shown at Automation Fair 2013.
NOTE: You can read more about the 1769-AENTR as shown at Automation Fair in our companion blog articleHERE.
Listen to the Podcast:
Until next time, Peace ✌️
If you enjoyed this content, please give it a Like, and consider Sharing a link to it as that is the best way for us to grow our audience, which in turn allows us to produce more content 🙂
Support our work and gain access to hundreds members only articles and videos by becoming a member at The Automation Blog or on YouTube. You’ll also find all of my affordable PLC, HMI, and SCADA courses at TheAutomationSchool.com.
Shawn Tierney is a lifelong Technology Enthusiast who began programing in the early 80's on the Apple II and VIC-20 personal computers. After earning a degree in Electronics, he worked as a Certified Controls and Information Automation Specialist for 25 years before launching The Automation Blog and School in 2013.
It’s in there! The manual, that is. Most every product question can be quickly answered by cracking open the user’s manual. And since I’m a road warrior, all my manuals are in PDF format and recently downloaded from Allen-Bradley’s Literature Library.
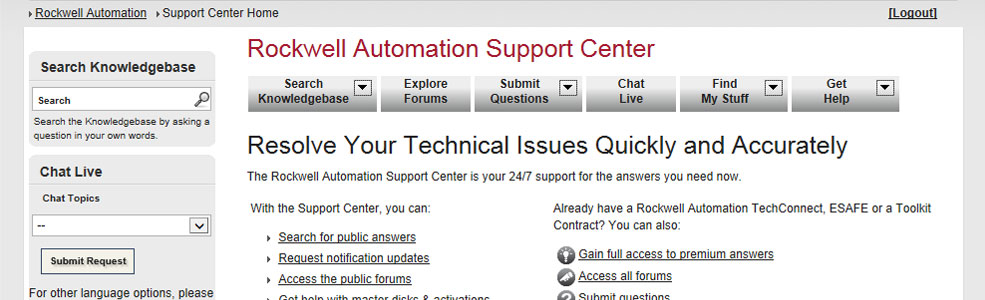
Rockwell has thousands upon thousands of expertly written AID’s (aka Tech Notes.) This is my first stop whenever I hit a wall when troubleshooting a system.
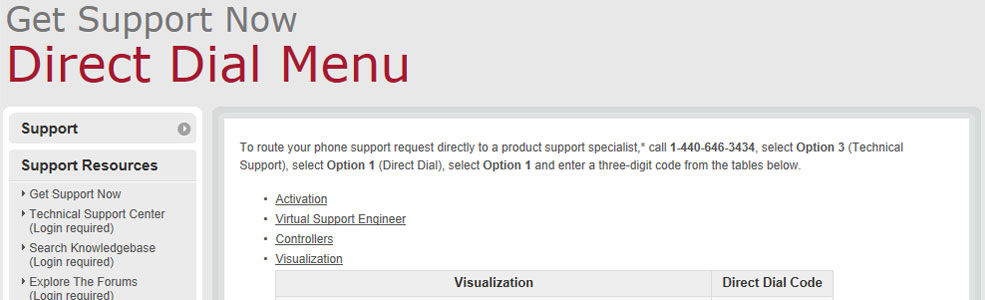
I really don’t like phone trees. Why does it always seem like the least used products are first in the list? “If you’re calling for information about a 30 year old PLC please press 1.” Ugh.
And could those automated attendants talk a little slower? I often find my thoughts wandering as I wait for my choice and the miss my selection… which means I have to hit the repeat button and listen to it all over again.
Well, I use to. That was before I found this link (and associated PDF) that allows you to bypass Rockwell’s Tech Support phone tree and get right to the group you’re looking for.
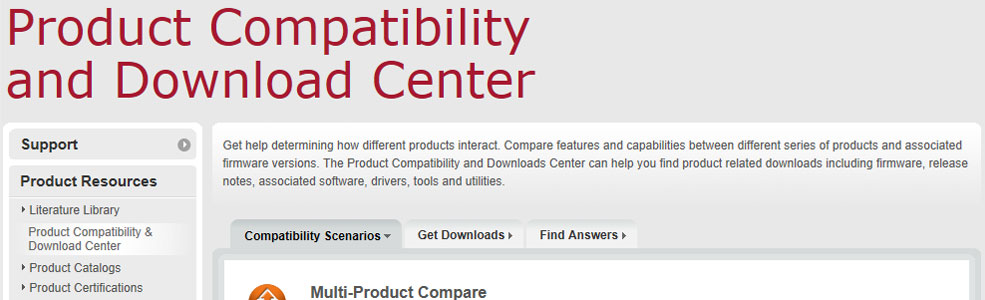
I’m using this site more and more to find which products are supported on what operating systems. It’s also a good starting point for downloading firmware and software updates.
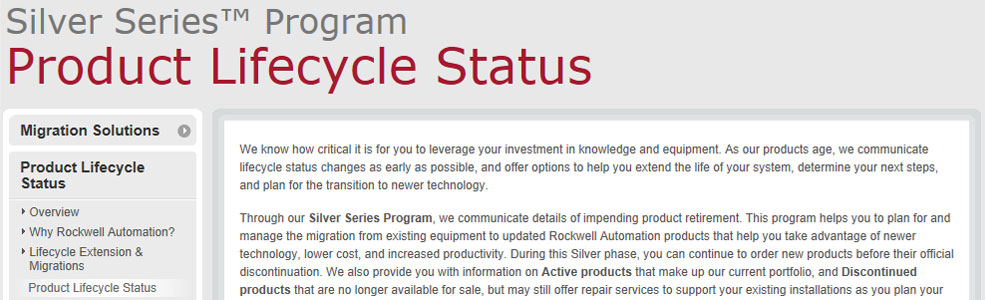
With so many old products seeing their final days, this new and improved “Silver Series” website is a much needed tool to check the expected availability of legacy products.
There are so many resources at this one stop I had to put it on my list.
From IAB, to the Ethernet Capacity Tool, to the System Ferret, to dozens of videos, if you haven’t checked this link out you don’t know what you’re missing!
I hope you find this article about my seven most used Rockwell websites helpful.
If you have a link you use often and it’s not listed above please let us know by using the “post a comment or question” link below.
Until next time, Peace ✌️
If you enjoyed this content, please give it a Like, and consider Sharing a link to it as that is the best way for us to grow our audience, which in turn allows us to produce more content 🙂
Support our work and gain access to hundreds members only articles and videos by becoming a member at The Automation Blog or on YouTube. You’ll also find all of my affordable PLC, HMI, and SCADA courses at TheAutomationSchool.com.
Shawn Tierney is a lifelong Technology Enthusiast who began programing in the early 80's on the Apple II and VIC-20 personal computers. After earning a degree in Electronics, he worked as a Certified Controls and Information Automation Specialist for 25 years before launching The Automation Blog and School in 2013.
NOTE: Check out the new version of this article HERE.
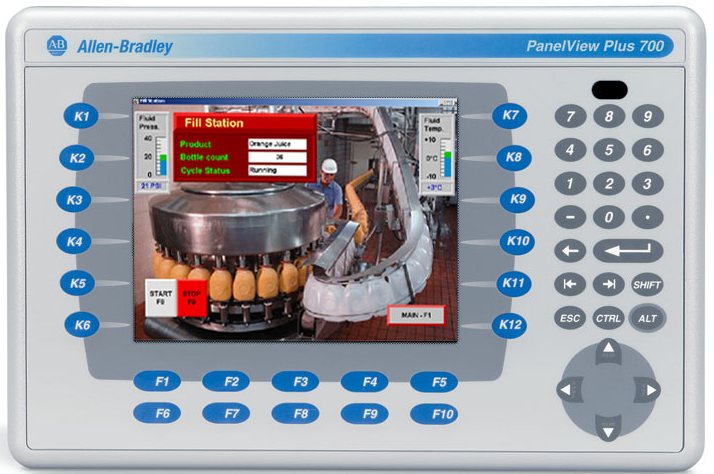
I still run into clients who are just beginning to use the PanelView Plus, even though it was released a decade ago.
So for all everyone out there who is new to the PanelView Plus, here are seven things you need to know:
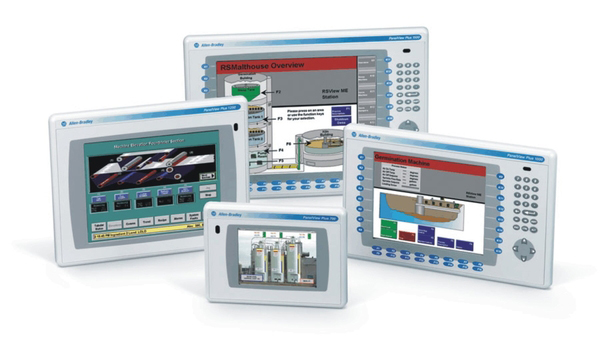
1) PanelView Plus hardware features:
PanelView Plus 700 – 1500
The original PanelView Plus came in four different versions, all of which support upto firmware version 5.1.
Note: PanelView Plus models loaded with newer firmware do support older runtime projects, all the way back to v3.0. This means there is no need to downgrade the panel’s firmware to gain legacy support. In fact, some newer panel can not be downgraded to older firmware.
All terminals include (at a minimum) a CompactFlash Card slot, a USB Port, and a DB9 Serial Port. Most terminals also came in Touchscreen only, Keypad only, and Touchscreen/Keypad combination units.
PanelView Plus 700, 1000, 1250, 1500 (7″ to 15″ displays)
The original and standard PanelView Plus with replaceable bezels and modular construction.
VersaView CE / PanelView Plus CE 700, 1000, 1250, 1500 (7″ to 15″ displays)
Identical to the PanelView Plus, but with more memory and the Windows CE OS exposed
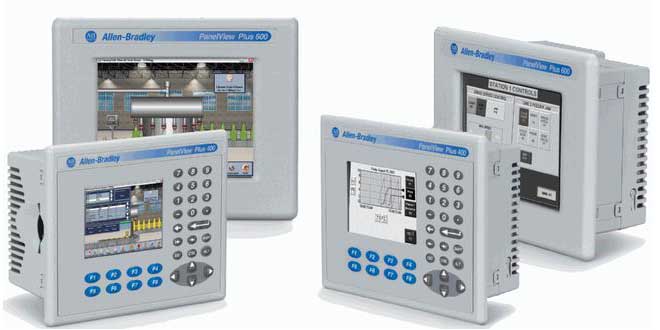
PanelView Plus 400 and 600 (4″ and 6″ displays)
A smaller, all plastic version of the PanelView Plus
PanelView Plus Compact
Lower cost, DC only versions of the 4″, 6″, and 10″ PanelView Plus.
Reduced software functionality includes one PLC, 25 display, and 200 alarm limits.
None of these units support add-on communications modules.
2) PanelView Plus 6 hardware features:
PanelView Plus 6, 400 & 600
The new PanelView Plus 6 comes in four different versions as well, and most support firmware versions 6.0 – 7.0.
However, one big difference is none of these units support IO networks. Specifically, PanelView Plus 6 terminals do not support RIO, DeviceNet, and scheduled ControlNet.
PanelView Plus 6 models do support all runtime file versions back to 3.2. That is, as long as the runtime is using a supported communication path (see note above.)
These units include (at a minimum) an SD Card slot, a USB Port, and a DB9 Serial Port. Most terminals also come in Touchscreen only, Keypad only, and Touchscreen/Keypad combination units.
PanelView Plus 6 (standard) 700, 1000, 1250, 1500 (7″ to 15″)
Like the original, but with more horsepower, memory, and Window CE.
PanelView Plus 6 Enhanced 700, 1000, 1250, 1500 (7″ to 15″)
Identical to the PanelView Plus 6 (standard) but with Windows Media Player, Internet Explorer, and Microsoft Office viewers
PanelView Plus 6 400 and 600 (4″ and 6″)
Similar to the original but with some of the added PanelView Plus 6 features
Unlike the original, none of these units support add-on communications modules.
PanelView Plus 6 Compact
Same restrictions as the PVPlus Compact, but with some of the new features of the PanelView Plus 6.
Currently only available in 4″ and 6″ models.
3) Every PanelView Plus comes preloaded with FactoryTalk View Machine Edition Runtime software and license.
Every PanelView Plus has a licensed copy of the ViewME runtime software pre-installed. This software runs “.mer” runtime project files created on a PC using the FactoryTalk ViewStudio development software (formerly RSViewStudio.)
4) Communications from ViewStudio to the PanelView Plus and Allen-Bradley programmable controllers requires RSLinx Enterprise
Communications from FactoryTalk ViewStudio to the PanelView Plus, and from the PanelViewPlus or ViewStudio to an Allen-Bradley programmable controller, requires RSLinx Enterprise. FactoryTalk ViewStudio comes with RSLinx Enterprise and it’s highly recommended you install it along with ViewStudio.
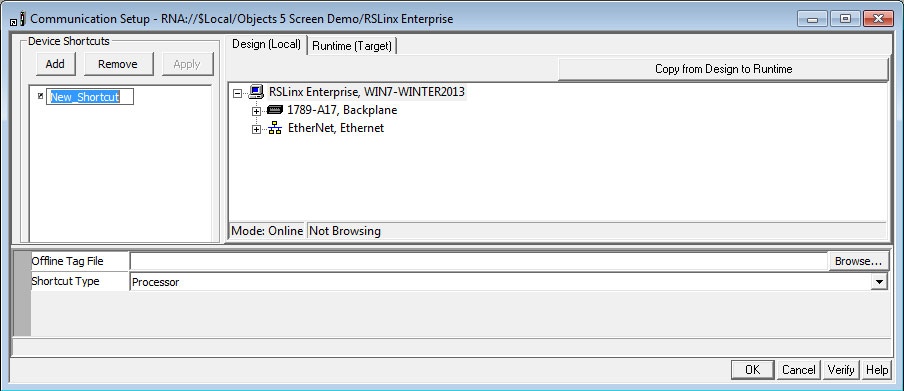
5) RSLinx Communications setup consists of two configurations: Local and Target
For the ViewStudio project components (graphic displays, alarms, trends, etc) to communicate with an A-B programmable controller, you’ll need to configure the RSLinx Enterprise communications setup. This setup consists of two sections:
The Local/Development tab is for the communications from ViewStudio to an A-B programmable controller, as well as from the Transfer Utility to the PanelView Plus.
The Target/Runtime tab is for communications from the PanelView Plus to an A-B programmable controller.
6) After adding or changing tags, be sure to “refresh all folders.”
After you change or add to your HMI tags, programmable controller tags, or RSLinx Enterprise communications setup, be sure to right click in the tag browser and “Refresh all folders” in order to browse for new tags in ViewStudio.
7) Be sure to check “run on startup” and “replace communications” when using the Transfer Utility to download to the PanelView Plus.
You can transfer your ViewStudio ME .mer runtime file through RSLinx Enterprise to your PanelViewPlus using the included Transfer Utility. However, be sure to check the “run on start-up” and “replace communications” checkboxes. This insures your project starts when the PanelView Plus starts, and that your project’s communication settings replace the previous terminal settings.
I hope you’ve found these seven tips for using the PanelView Plus helpful.
If you’d like to add your own tips to this list just reply to this post using the “post a comment or question” link below.
Until next time, Peace ✌️
If you enjoyed this content, please give it a Like, and consider Sharing a link to it as that is the best way for us to grow our audience, which in turn allows us to produce more content 🙂
Support our work and gain access to hundreds members only articles and videos by becoming a member at The Automation Blog or on YouTube. You’ll also find all of my affordable PLC, HMI, and SCADA courses at TheAutomationSchool.com.
Shawn Tierney is a lifelong Technology Enthusiast who began programing in the early 80's on the Apple II and VIC-20 personal computers. After earning a degree in Electronics, he worked as a Certified Controls and Information Automation Specialist for 25 years before launching The Automation Blog and School in 2013.
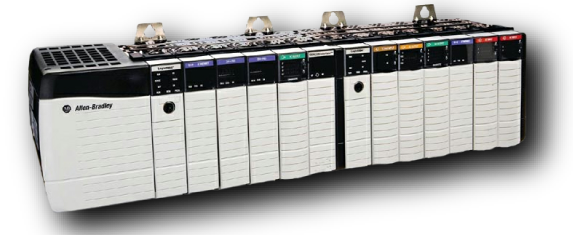
It’s easy to forget that not everyone has used Rockwell’s ControlLogix.
In fact, I was just reminded of this last week when I needed to review the below list of basics with a client:
1) Each new ControlLogix controller needs to have firmware downloaded to it.
Every time you open up a new ControlLogix, you’ll find a controller with essentially no firmware. So your first step should be to fire up Rockwell’s “Control Flash” tool to download firmware to your new controller.
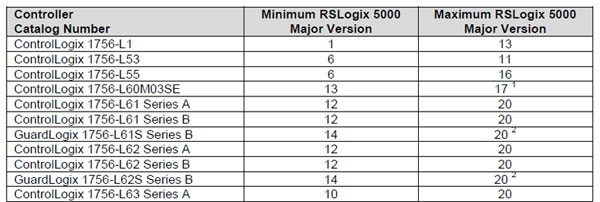
2) Each ControlLogix controller supports multiple firmware versions, but can only be flashed to one version at a time.
Just like most electronics and cell phones, each ControlLogix controller supports a range of different firmware revisions. However, no one controller supports all revisions. Note: The most popular and widely supported version used today is version 20.
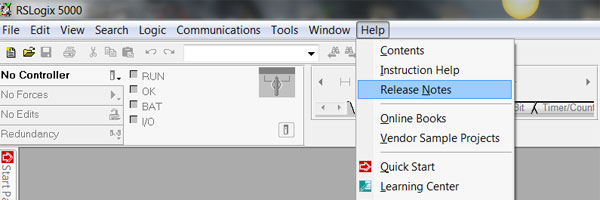
3) To find the firmware your controller supports, open the release notes found in the RSLogix 5000 or Studio 5000 help menu.
UPDATE 08/2022:
Starting with version 20.05, Rockwell stopped including this helpful chart in the software, so now the best place to find which versions your Logix controller supports is by using one of the below links:
There are many places where Rockwell lists hardware and firmware compatibility: AB.com, product manuals, tech notes, etc.
But I’ve found the easiest place to find a compatibility listing is inside RSLogix . Studio 5000, in the “release notes” which are found in the “help” menu.
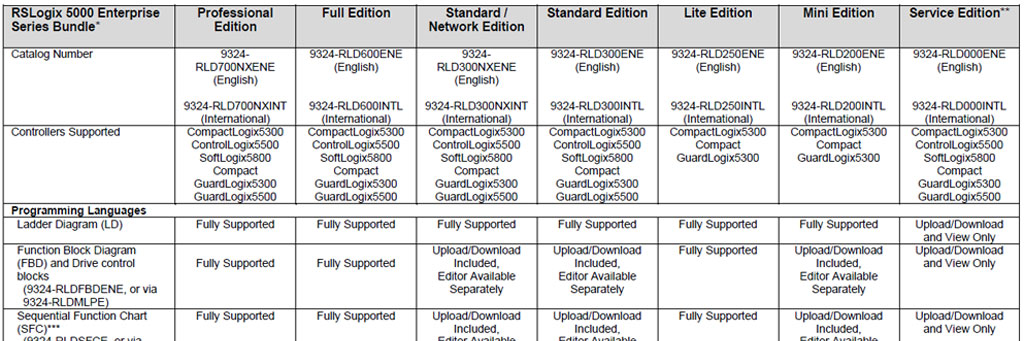
4) RSLogix 5000 or Studio 5000 Standard (or better) is required to program the ControlLogix
The lowest cost programming software Rockwell sells to program the ControlLogix is RSLogix/Studio 5000 Standard. You can also use RSLogix/Studio 5000 Full or Pro. You can not use RSLogix/Studio 5000 Mini or Lite.
5) You can only program your ControlLogix controller with the same major release of software (RSLogix 5000 or Studio 5000) which matches the firmware currently loaded in your ControlLogix controller.
For examples, if you’ve decided to flash your ControlLogix controller to v20.xxx, you will need to install RSLogix 5000 v20.xxx on your PC in order to program your controller. This is often referred to as “lock step.”
But if you have a newer ControlLogix which only supports v21.xxx and greater, you’ll need to install the matching version of Studio 5000 on your PC.
NOTE: In almost all cases the minor revisions of software and hardware do not need to match. For the only exception to this, see this article.
6) Previously, when you purchased RSLogix 5000 you received multiple versions. However, this is not currently the case.
UPDATE 08/2022: To get versions of RSLogix prior to 20.05, customers must now purchase the Legacy option when purchasing Studio 5000.
UPDATE 2014: A few weeks after this article had been written, and several months after the Previous Versions disc had been removed, Rockwell thankfully started including it once more. You can read the full article here:
Because ControlLogix controllers support multiple versions, for years Rockwell shipped several of the latest RSLogix 5000 versions with newly purchased copies of RSLogix 5000.
However, at some point in 2013 Rockwell changed this practice and is now only shipping Studio 5000 version 21 (see updated info above) with new orders of the part number which previously represented RSLogix 5000 packages.
Here at “Insights In Automation” we really hope Rockwell changes this practice ASAP. Most clients we know are not using v21, so unfortunately they are forced to download past versions from AB.com.
Click on the above picture to read this tech note (you’ll need a support contract to access it)
7) You can install multiple versions of RSLogix 5000 and/or Studio 5000 on the same PC.
The nice thing about RSLogix 5000 and Studio 5000 is, since version 10, you’ve been able to install multiple versions of RSLogix 5000 and Studio 5000 on the same PC.
This means you can actually have RSLogix 5000 versions 10, 11, 12, 13, 15, 16, 17, 18, 19, and 20 all installed “side by side.” You can also install Studio 5000 versions 21, 23, 24, 26, 27, 28, 29 and 30 as well (currently only v19-30 support Windows 7)
However, Rockwell does not officially support RSLogix 5000 versions prior to 19 on Windows 7, so you may run into issues with older versions.
Note: You can also install one pre-10 version as well, but just one at a time per OS.
Click on the above picture to see this support matrix at AB.com
I hope you’ve found these seven things you need to know before using ControlLogix helpful!
If you’d like to add your own tips to this list, just reply to this post using the “post a comment or question” link below.
Until next time, Peace ✌️
If you enjoyed this content, please give it a Like, and consider Sharing a link to it as that is the best way for us to grow our audience, which in turn allows us to produce more content 🙂
Support our work and gain access to hundreds members only articles and videos by becoming a member at The Automation Blog or on YouTube. You’ll also find all of my affordable PLC, HMI, and SCADA courses at TheAutomationSchool.com.
Shawn Tierney is a lifelong Technology Enthusiast who began programing in the early 80's on the Apple II and VIC-20 personal computers. After earning a degree in Electronics, he worked as a Certified Controls and Information Automation Specialist for 25 years before launching The Automation Blog and School in 2013.
In my final post about Automation Fair 2013, I’ll include pictures of other products and booths which caught my eye at this years event.
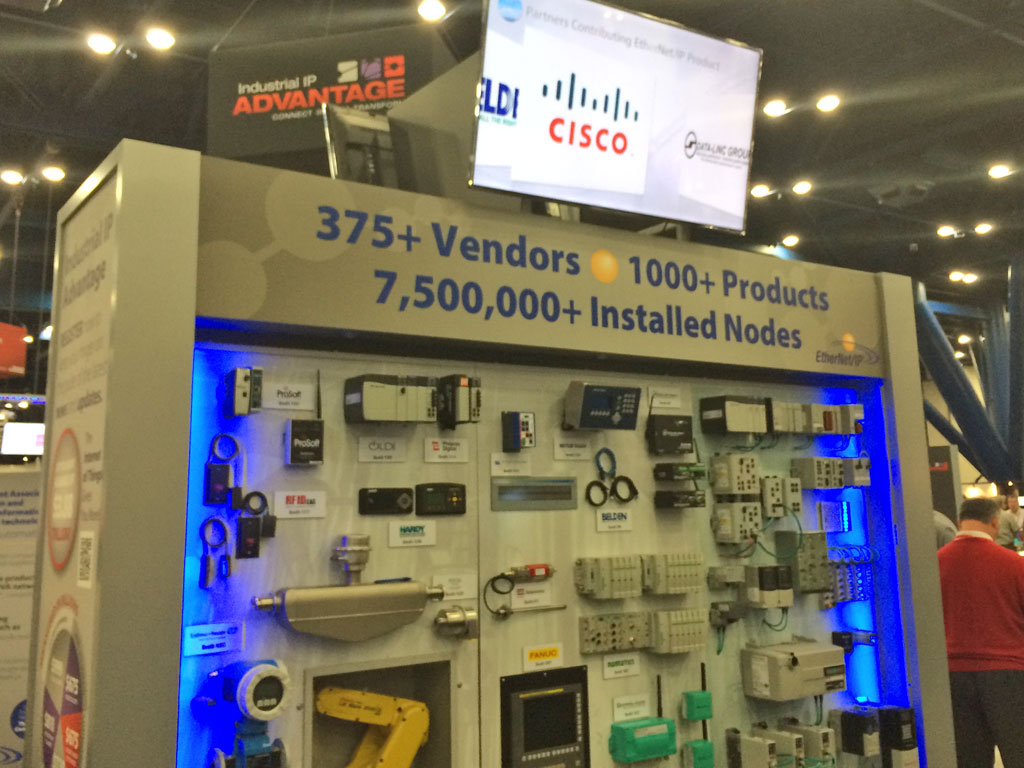
Ethernet/IP had a big presence at this years show, as in previous years. But the EIP booth that caught my eye (shown below) touted the breath and depth of Ethernet/IP’s adoption by industry.
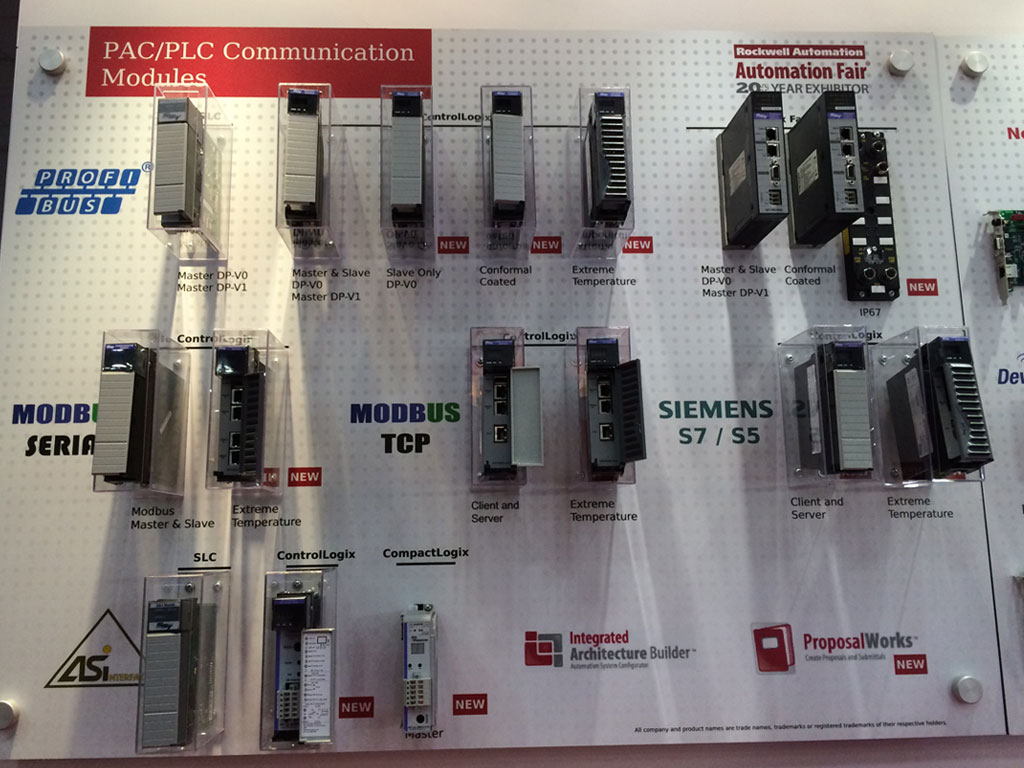
Molex had a large booth close to the entrance of the Fair, and they were showing off an impressive number of communications modules:
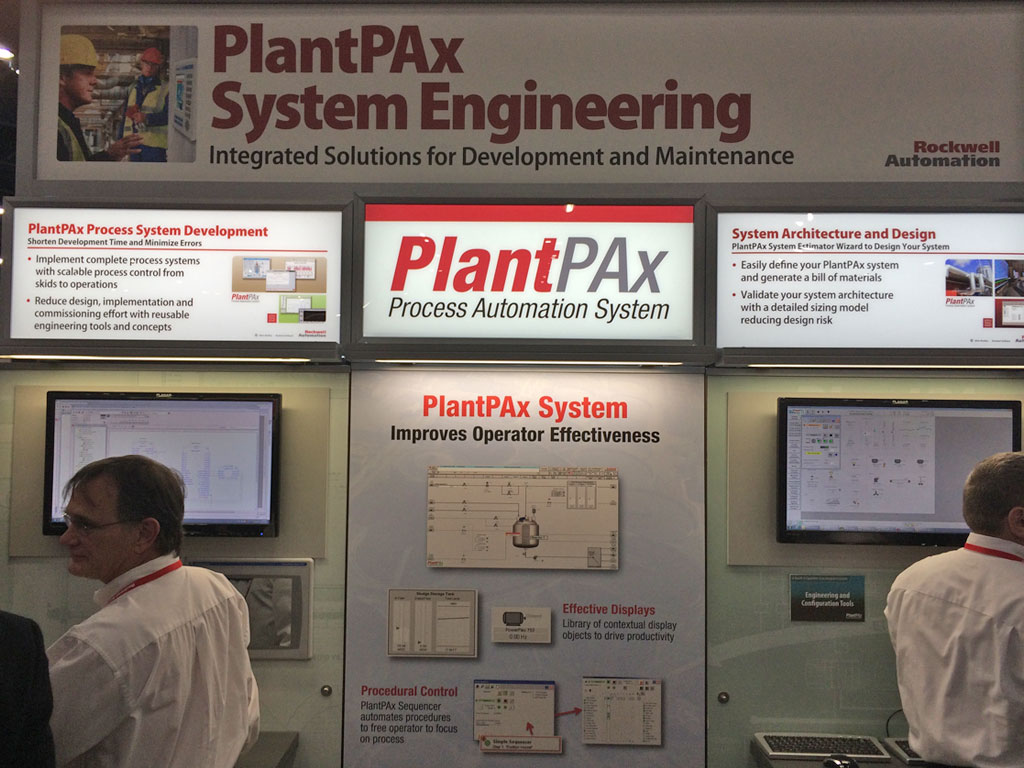
PlantPAx has been gaining momentum of late, and I thought they had a well made booth:
Micro850 on DeviceNet? According to the Rockwell representative, its as easy as 1-2-3 with no RSNetworx or mapping required.
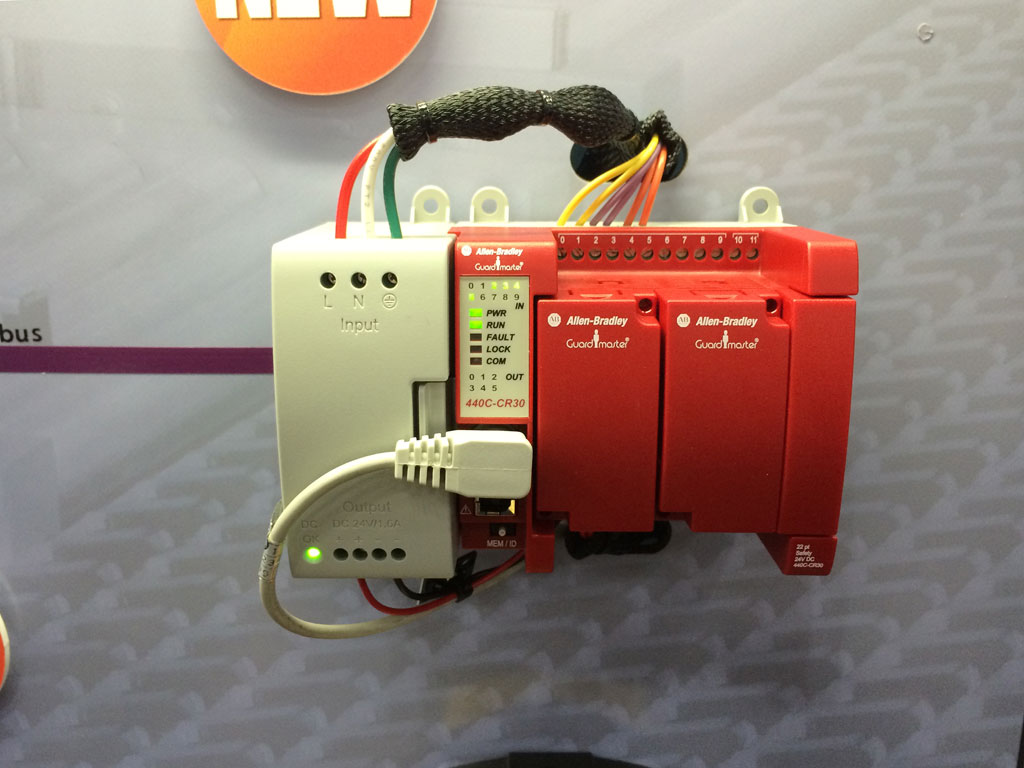
It looks like a Micro830, but don’t be fooled. This isn’t a new Safety PLC, but rather a new Programmable Safety Relay:
Well, that’s it for my Automation Fair 2013 coverage. If you have any question on the above products, or on Automation Fair itself, please click on the “post a comment or question” link below, or contact me directly using the “contact” link in the site’s top menu.
Until next time, Peace ✌️
If you enjoyed this content, please give it a Like, and consider Sharing a link to it as that is the best way for us to grow our audience, which in turn allows us to produce more content 🙂
Support our work and gain access to hundreds members only articles and videos by becoming a member at The Automation Blog or on YouTube. You’ll also find all of my affordable PLC, HMI, and SCADA courses at TheAutomationSchool.com.
Shawn Tierney is a lifelong Technology Enthusiast who began programing in the early 80's on the Apple II and VIC-20 personal computers. After earning a degree in Electronics, he worked as a Certified Controls and Information Automation Specialist for 25 years before launching The Automation Blog and School in 2013.
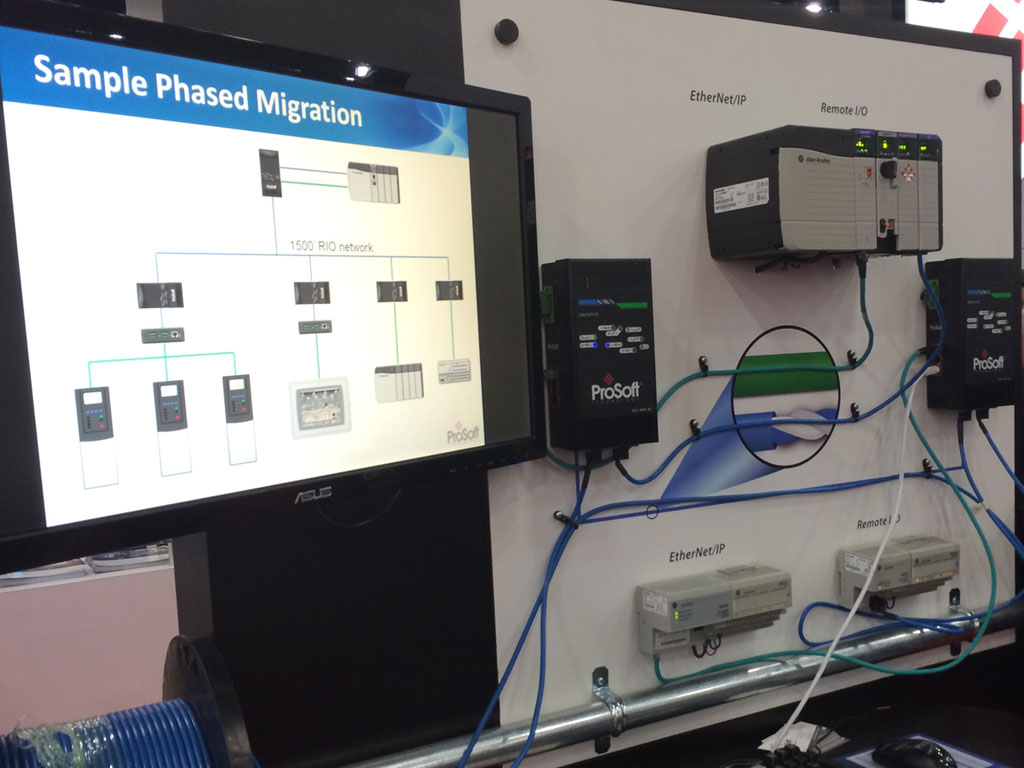
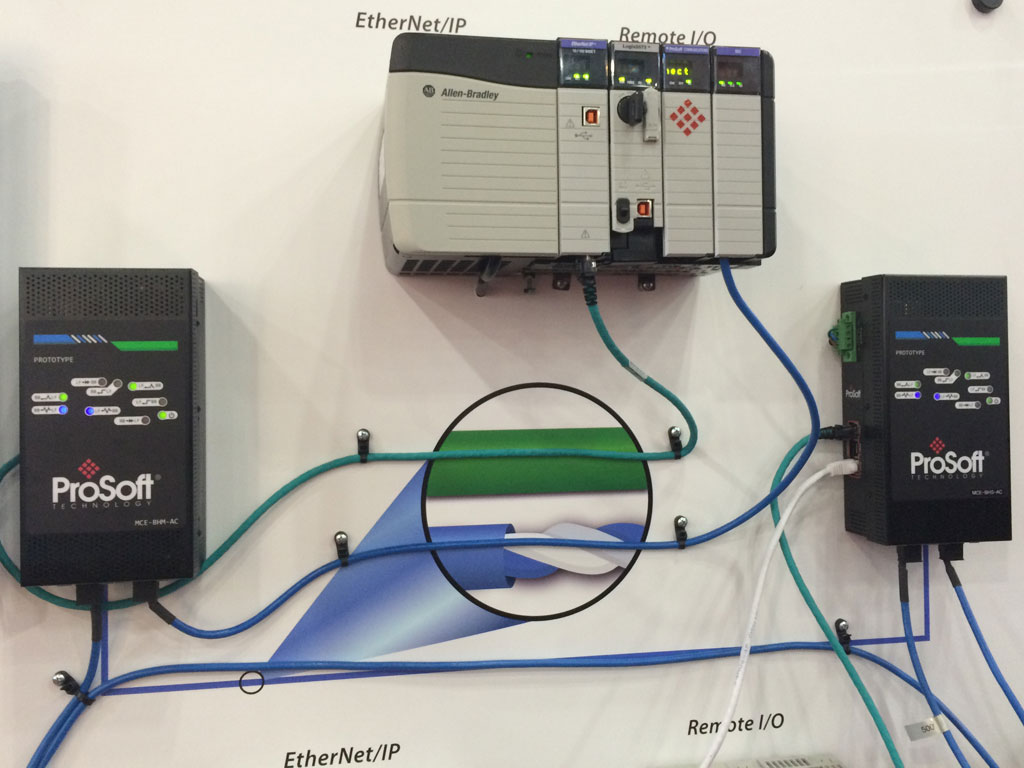
At this year’s Automation Fair, Prosoft showed a new product that allows Ethernet communications to be transmitted over “blue hose,” or more specifically, “Belden 9463.”
The targeted market for this product is legacy migrations of PLC-5 and SLC-500 systems. These older systems often relied on Data Highway Plus (DH+) for peer to peer communications, and RIO for remote I/O communications.
DH+ and RIO both use Belden 9463, a shielded twisted pair cable that allowed for networks up to 10,000 cable feet. And Belden 9463, with it’s blue outer jacket, is affectionately known in plants around the world as “blue hose.”
The Prosoft system (pictured below) relies on two main components: a master device and at least one slave device. Additional slave devices can be added as needed up to 32 devices. However, each device must be within 1500 cable feet of the previous one. This means a network of 10,000 feet would require a minimum of one master and six slaves.
Each device contains three Ethernet ports for use with remote Ethernet devices. In testing, Prosoft found they could easily accommodate remote Ethernet/IP I/O with an RPI as low as 3ms. For most applications that update rate will be more than adequate.
The Prosoft Ethernet over Blue Hose system, consisting of at lease one MCE-BHM-AC and one MCE-BHS-AC, should be available early next year. The target price for one master and one slave is just under $3,000.
If you have any questions or comments please click on the “post a comment or question” link below,
Until next time, Peace ✌️
If you enjoyed this content, please give it a Like, and consider Sharing a link to it as that is the best way for us to grow our audience, which in turn allows us to produce more content 🙂
Support our work and gain access to hundreds members only articles and videos by becoming a member at The Automation Blog or on YouTube. You’ll also find all of my affordable PLC, HMI, and SCADA courses at TheAutomationSchool.com.
Shawn Tierney is a lifelong Technology Enthusiast who began programing in the early 80's on the Apple II and VIC-20 personal computers. After earning a degree in Electronics, he worked as a Certified Controls and Information Automation Specialist for 25 years before launching The Automation Blog and School in 2013.
In The Automation Podcast, Episode 2, we discuss what makes version 20.03 of RSLogix 5000 different for all previous minor revisions.
NOTE: You can read more about RSLogix 5000 v20.03 in our companion blog HERE.
Listen to the Podcast:
Until next time, Peace ✌️
If you enjoyed this content, please give it a Like, and consider Sharing a link to it as that is the best way for us to grow our audience, which in turn allows us to produce more content 🙂
Support our work and gain access to hundreds members only articles and videos by becoming a member at The Automation Blog or on YouTube. You’ll also find all of my affordable PLC, HMI, and SCADA courses at TheAutomationSchool.com.
Shawn Tierney is a lifelong Technology Enthusiast who began programing in the early 80's on the Apple II and VIC-20 personal computers. After earning a degree in Electronics, he worked as a Certified Controls and Information Automation Specialist for 25 years before launching The Automation Blog and School in 2013.
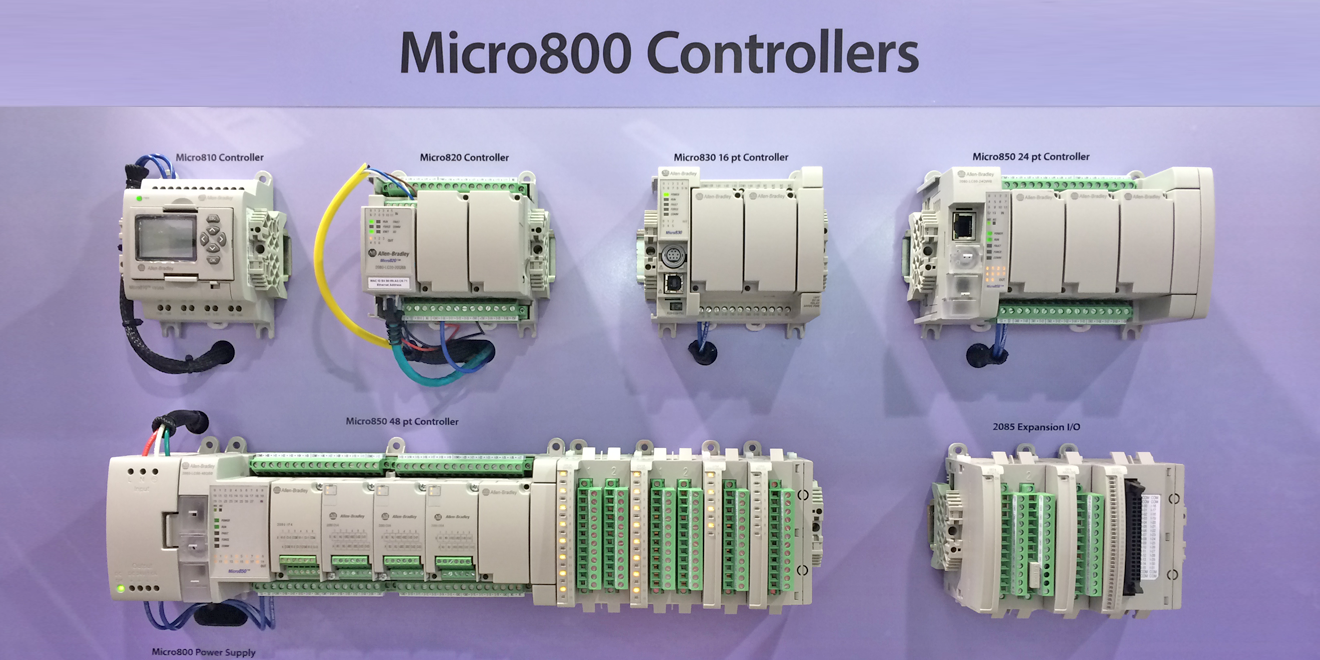
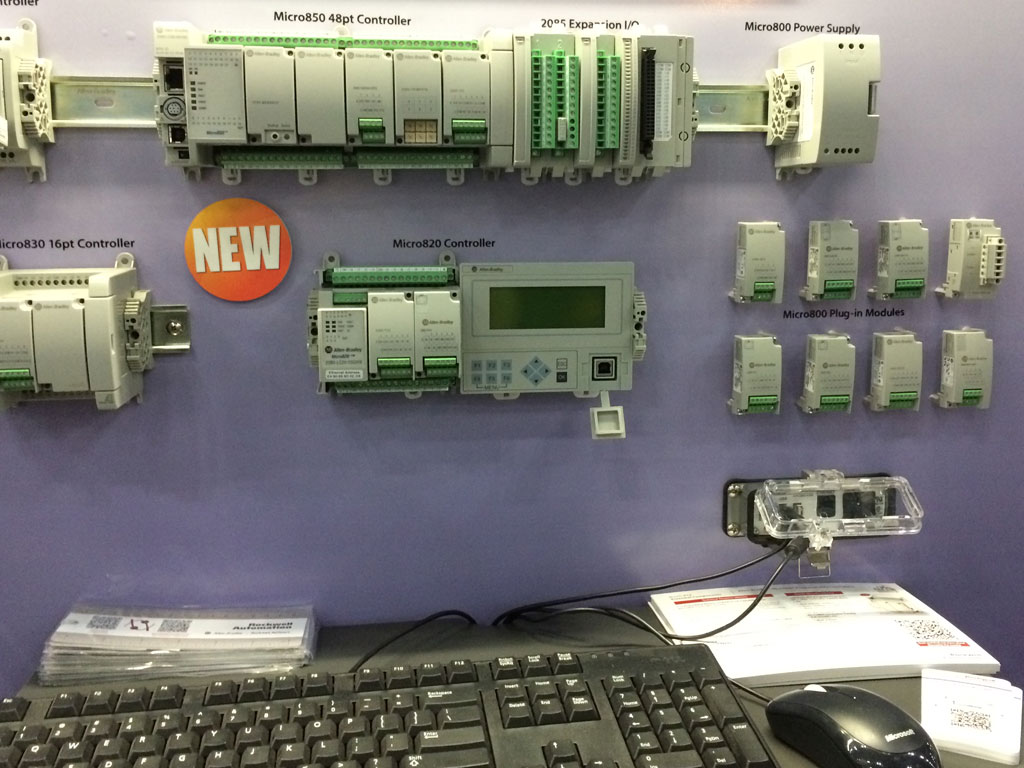
The soon to be released Micro820 on display at Automation Fair 2013:
The Micro820 is the newest entry in Rockwell’s Micro800 family. The unit is outfitted with two communication ports. The first is Serial communications accessible via a terminal block connection. The second is a standard Ethernet port. Unlike the Micro830 and Micro850, this unit does not have a built-in USB port.
Note: You can listen to our companion podcast about the Micro820 HERE.
The 820 also has a built-in real time clock (RTC) and accepts Micro-SD cards for program back-up and datalogging. But, because of the Micro-SD card support we are told this unit does not support the plug memory module used on the 830 and 850. Also unlike the Micro830 and 850, this unit does not support Micro Motion control. Specifically, we were told it does not support PWM outputs, and only supports low speed PTO outputs.
In the below picture to the right of the Micro820 you’ll see a new four line text display being release for use with the 820. This unit connects to the Micro via serial, and displays four lines of text. This unit is more “Text display” than HMI as the text is transmitted to the display via ASCII commands. The unit also sports a handful of function keys, a four color backlight, and a USB port for programming the Micro820.
Coming out with the Micro820 is the latest version of Connected Components Workbench, CCW 6.0. This new version includes support for the new Micro as well as two new features that have been highly requested.
First, CCW 6.0 will have the ability to change the processor type of a Micro program. In the past, if you had written a program for a Micro830 and wanted to use it in a Micro850, your only option was to copy and paste the code from one project to another. But with CCW 6.0 we were told this is now a simple selection in the software.
The second highly requested feature is the ability to upload and download to the PanelView Component from CCW. Previously, the PVc project would have to be exported from CCW and then transferred using the PVc’s dashboard. However, we were told CCW 6.0 now includes an upload / download utility to automate this process.
Well, that’s all the information I was able to get about the new Micro820. At the time of Automation Fair Rockwell hadn’t yet released prices on these items, but we should see them announced before they end of the year.
If you have any comments or questions about this post please feel free to use the below “post a comment or question” link below.
Until next time, Peace ✌️
If you enjoyed this content, please give it a Like, and consider Sharing a link to it as that is the best way for us to grow our audience, which in turn allows us to produce more content 🙂
Support our work and gain access to hundreds members only articles and videos by becoming a member at The Automation Blog or on YouTube. You’ll also find all of my affordable PLC, HMI, and SCADA courses at TheAutomationSchool.com.
Shawn Tierney is a lifelong Technology Enthusiast who began programing in the early 80's on the Apple II and VIC-20 personal computers. After earning a degree in Electronics, he worked as a Certified Controls and Information Automation Specialist for 25 years before launching The Automation Blog and School in 2013.
The Automation Podcast, Episode 1, is the first episode of The Automation Podcast and introduces the host, Shawn Tierney as well as the “Insights In Automation” family of websites.
If you enjoyed this content, please give it a Like, and consider Sharing a link to it as that is the best way for us to grow our audience, which in turn allows us to produce more content 🙂
Support our work and gain access to hundreds members only articles and videos by becoming a member at The Automation Blog or on YouTube. You’ll also find all of my affordable PLC, HMI, and SCADA courses at TheAutomationSchool.com.
Shawn Tierney is a lifelong Technology Enthusiast who began programing in the early 80's on the Apple II and VIC-20 personal computers. After earning a degree in Electronics, he worked as a Certified Controls and Information Automation Specialist for 25 years before launching The Automation Blog and School in 2013.
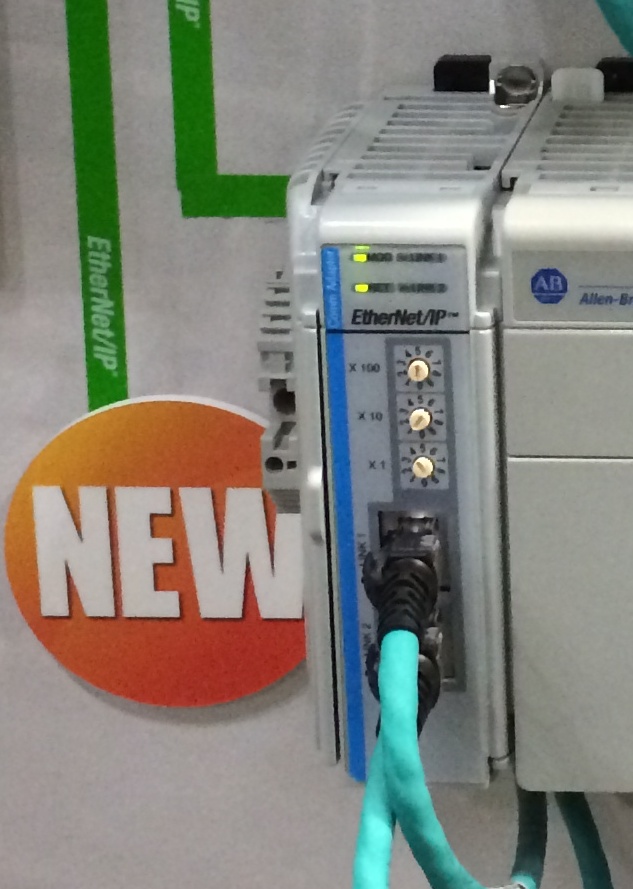
Mid-morning of the first day of Automation Fair 2013, I had the fortune of participating in a show floor meeting with Dexter Long, the CompactLogix product manager for Rockwell Automation. The meeting was to discuss the newly announced (and long desired) 1769-AENTR. As the part number implies, this is an Ethernet/IP adapter for the 1769 line of I/O modules.
Note: You can listen to our companion podcast about the 1769-AENTR HERE.
On the front of the unit you can see the reason for the trailing “R” in the part number: dual Ethernet/IP ports. These ports make up a two port Device Level Ring (DLR) switch sharing a single IP address. Also on the front of the unit you’ll notice three rotary switches for setting the IP address manually, similar to other A-B Ethernet devices.
According to Dexter, the unit supports all A-B 1769 I/O modules. He also mentioned that Rockwell has also successfully tested several encompass partner 1769 products as well.
Unlike the unfortunate launch of the 1747-AENTR, this unit is being launched with support for the largest 1769 I/O systems: thirty I/O modules across three I/O banks. The unit also comes with an Add-On profile with support for version 20 and 21 of RSLogix 5000.
One important note that came out of our meeting is that the 1769-AENTR does not support rack optimized I/O. This seems to imply that each module will require it’s own connection. This is not an issue for the connection rich 5370 multi-core CompactLogix processors (L1xER, L2xER, L3xER.) But, owners of the older connection limited processors (L23E, L32E, L35E) need to take note: with their limited connection count you could easily run out of connections with even a medium sized 1769-AENTR system.
The 1769-AENTR is expected to ship this January (2014) and come at a list price of $980. While more expensive that a similar Point I/O adapter (the 1734-AENTR) it is less than the aforementioned 1747-AENTR, and substantially less than purchasing a 1769 Ethernet/IP Processor.
Well that’s it for my impressions of the 1769-AENTR. at Automation Fair 2013. Check back in he coming days for more impressions of products from this years show. In the mean time, if you have any comments or questions please feel free to use the “post a comment or question” comment section at the bottom of this page.
Update: You can hear Shawn’s thoughts on the 1769-AENTR in Episode 2 of “The Automation Podcast” HERE
Until next time, Peace ✌️
If you enjoyed this content, please give it a Like, and consider Sharing a link to it as that is the best way for us to grow our audience, which in turn allows us to produce more content 🙂
Support our work and gain access to hundreds members only articles and videos by becoming a member at The Automation Blog or on YouTube. You’ll also find all of my affordable PLC, HMI, and SCADA courses at TheAutomationSchool.com.
Shawn Tierney is a lifelong Technology Enthusiast who began programing in the early 80's on the Apple II and VIC-20 personal computers. After earning a degree in Electronics, he worked as a Certified Controls and Information Automation Specialist for 25 years before launching The Automation Blog and School in 2013.
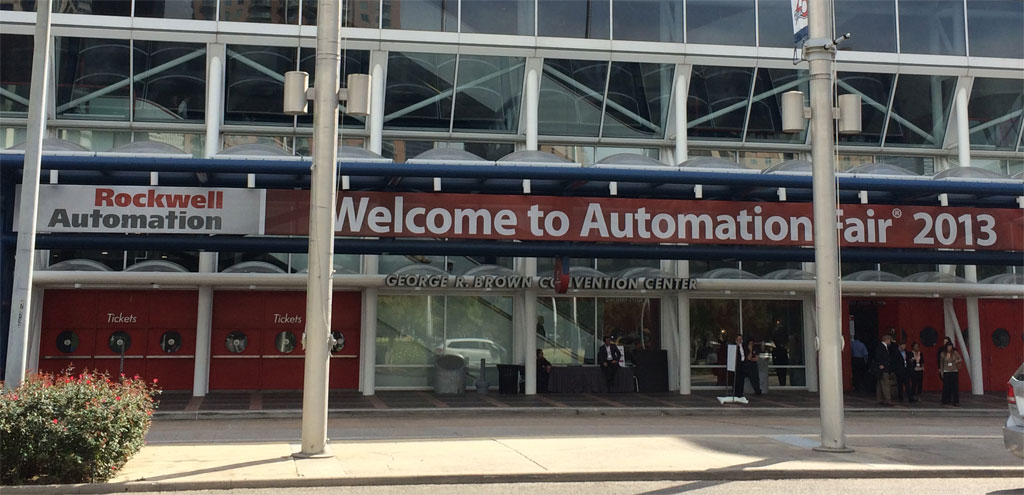
Day one of Automation Fair 2013 was full of impromptu meetings with old acquaintances, and learning details of new and soon to be released automation products.
NOTE: Information about the 1769-AENTR has been moved to this post here.
Day One begins:
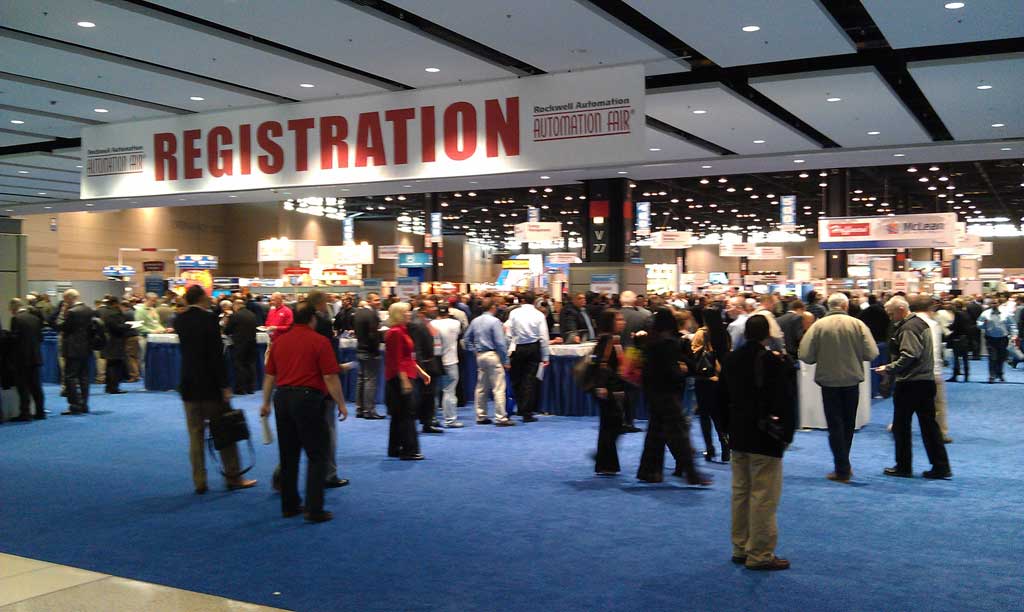
As we walked into the convention center we encountered a huge line of show attendee’s waiting to pick up their Automation Fair show badges. However, our “Horizon Solutions” group of 140 attendees had all received our badges the night before due to the expertise of Horizon’s marketing department. So thankfully we were able bypass the long registration and badge pickup line and proceed directly to the show floor (thanks Chuck and Emily!)
Note: In the picture on the right you can see the registration and badge pick-up area later in the day after the initial opening crowd had passed through.
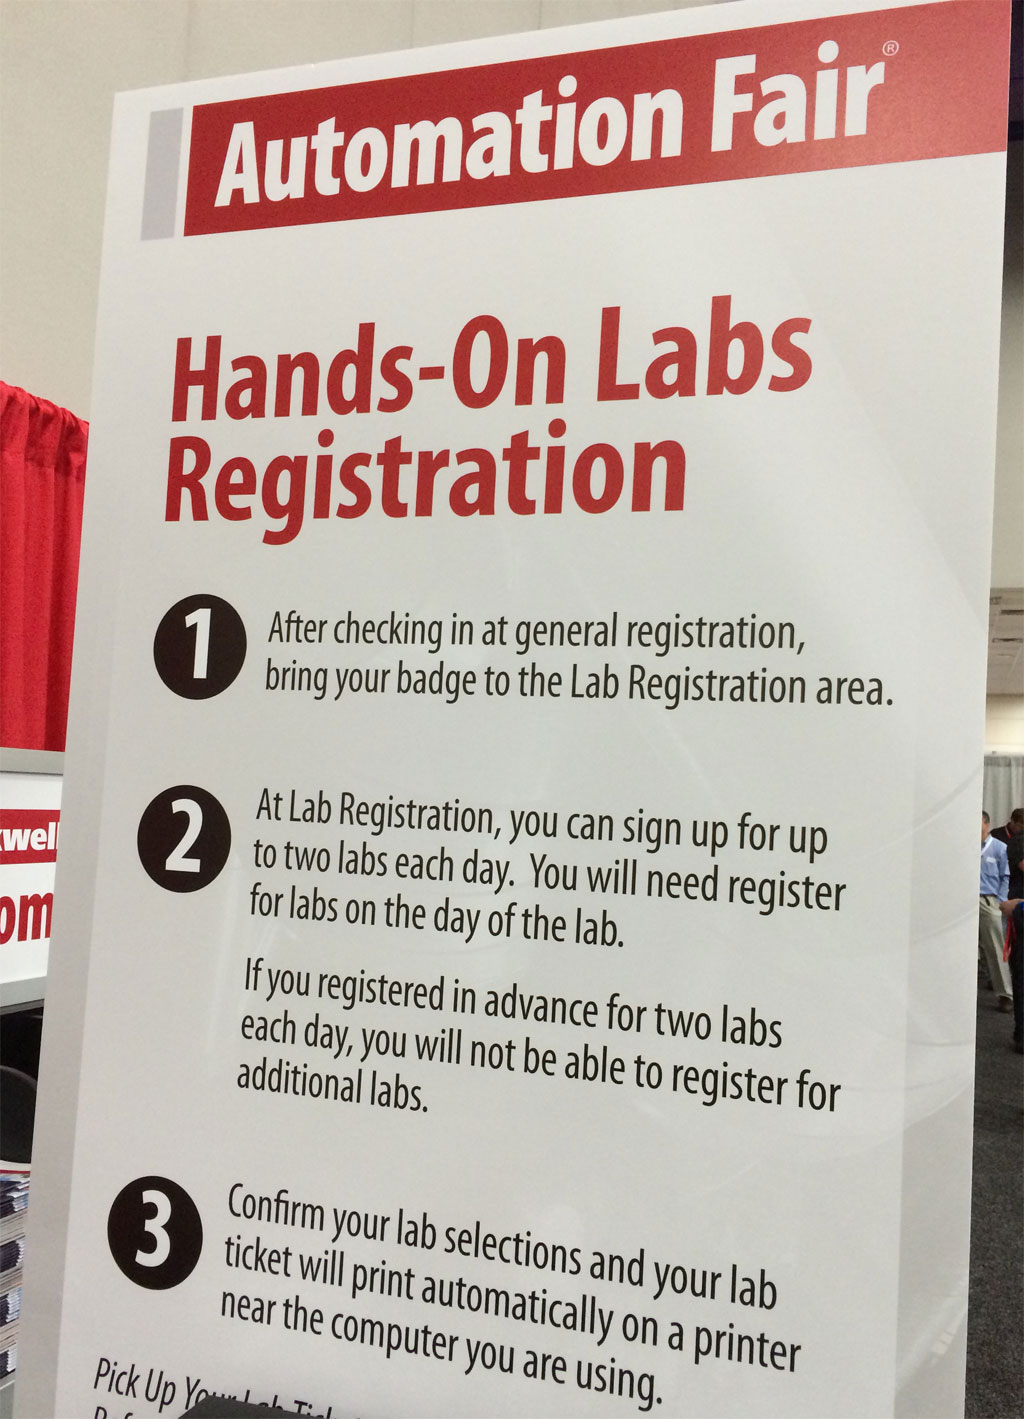
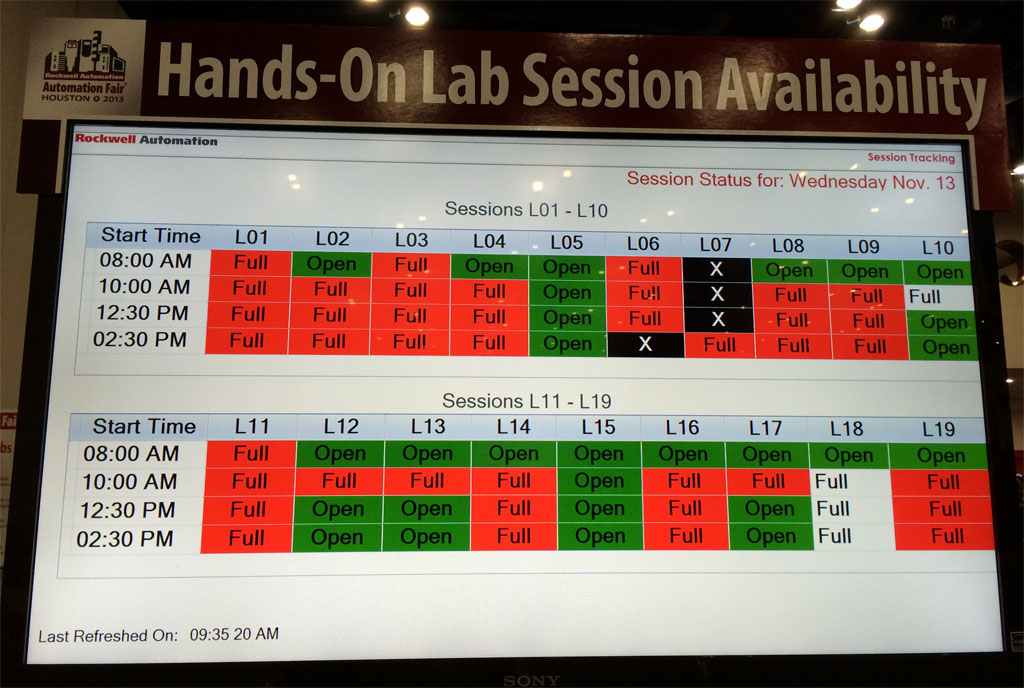
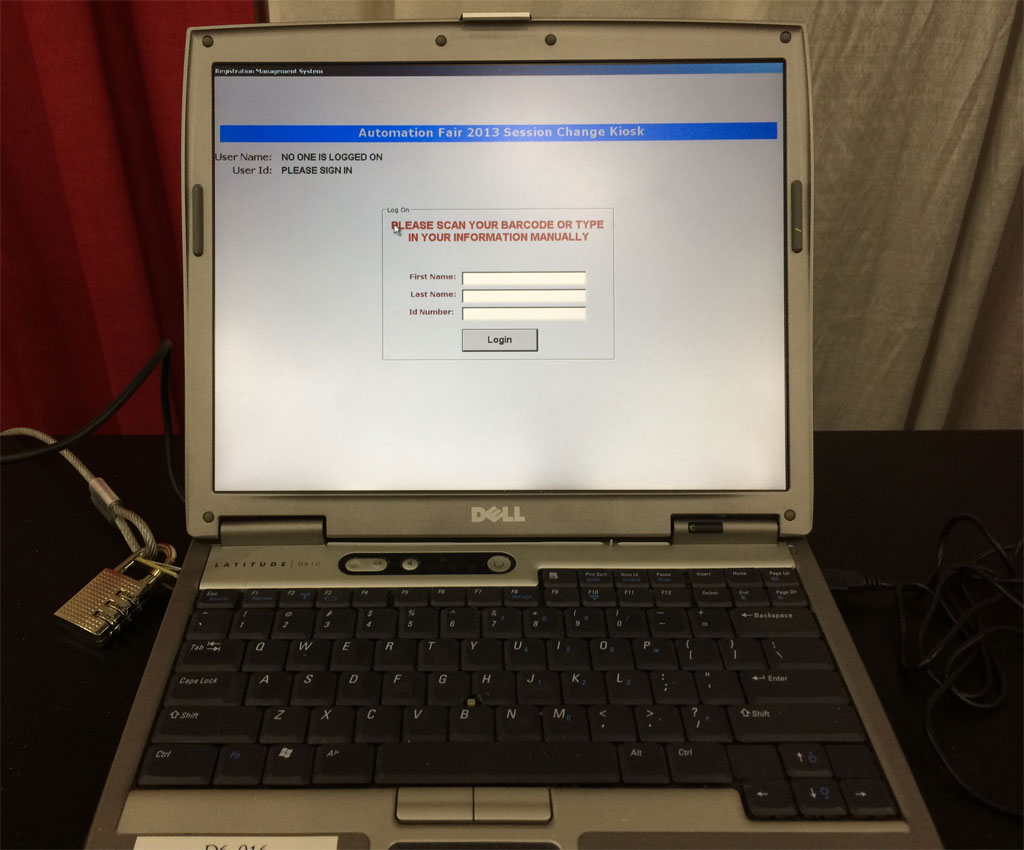
Hands-on Lab Registration:
An improvement over years past, modern Automation Fair lab registration can be done online prior to the actual event. To do so is a three step process of registering for the show, choosing hands-on labs, and later confirming your choices.
But for those who miss the early bird sign-ups prior to Automation Fair, onsite registration is also available. When the show doors open between 6:30 and 7am, computer kiosks are made available for attendees to register for any openings in the hands-on sessions. Seats in these sessions are first come first serve, so the earlier you arrive the more likely you’ll get an open spot.
Below you can see my snapshots of this years Hands-on Registration area. From left to right: Registration instructions, large display showing current class availability, and registration kiosk / laptop:
Lunch
Lunch at Automation Fair always amazes me. This year I watched for nearly an hour as hundreds of people poured into the gigantic lunch area to eat. The efficiency of the whole operation is really quite good, as is the food served.
Below you can see a panoramic of the lunch room I took well after the lunch crowd had dissipated:
Show Floor
This years show floor seemed larger than last year. Not everyone thought so, but I wasn’t alone in this observation. All the major vendors were present, along with dozens of minor ones.
Below is a panoramic I took on the floor during the after lunch slowdown as many where attending the afternoon hands-on labs and technical sessions:
Well that’s it for my Automation Day One update. Tune in over the coming days for more of my pictures and reflections on Automation Fair 2013.
Until next time, Peace ✌️
If you enjoyed this content, please give it a Like, and consider Sharing a link to it as that is the best way for us to grow our audience, which in turn allows us to produce more content 🙂
Support our work and gain access to hundreds members only articles and videos by becoming a member at The Automation Blog or on YouTube. You’ll also find all of my affordable PLC, HMI, and SCADA courses at TheAutomationSchool.com.
Shawn Tierney is a lifelong Technology Enthusiast who began programing in the early 80's on the Apple II and VIC-20 personal computers. After earning a degree in Electronics, he worked as a Certified Controls and Information Automation Specialist for 25 years before launching The Automation Blog and School in 2013.
Rockwell’s Automation Fair 2013 is almost upon us, and I was one of the lucky few at my company chosen to attend this year’s event.
With that in mind, I wanted to ask YOU our loyal readers if there are any questions you’d like me to ask, or products you’d like me to look into, while I’m at the show this week?
Or perhaps you would like me to grab some pictures of particular products, booths, or people while I’m at the show?
Well, if you have either questions or picture requests please click on the “post a comment or question” link below to submit them to me, and I promise to do my best to get to all your requests while I’m at this week’s event in Houston!
Until next time, Peace ✌️
If you enjoyed this content, please give it a Like, and consider Sharing a link to it as that is the best way for us to grow our audience, which in turn allows us to produce more content 🙂
Support our work and gain access to hundreds members only articles and videos by becoming a member at The Automation Blog or on YouTube. You’ll also find all of my affordable PLC, HMI, and SCADA courses at TheAutomationSchool.com.
Shawn Tierney is a lifelong Technology Enthusiast who began programing in the early 80's on the Apple II and VIC-20 personal computers. After earning a degree in Electronics, he worked as a Certified Controls and Information Automation Specialist for 25 years before launching The Automation Blog and School in 2013.
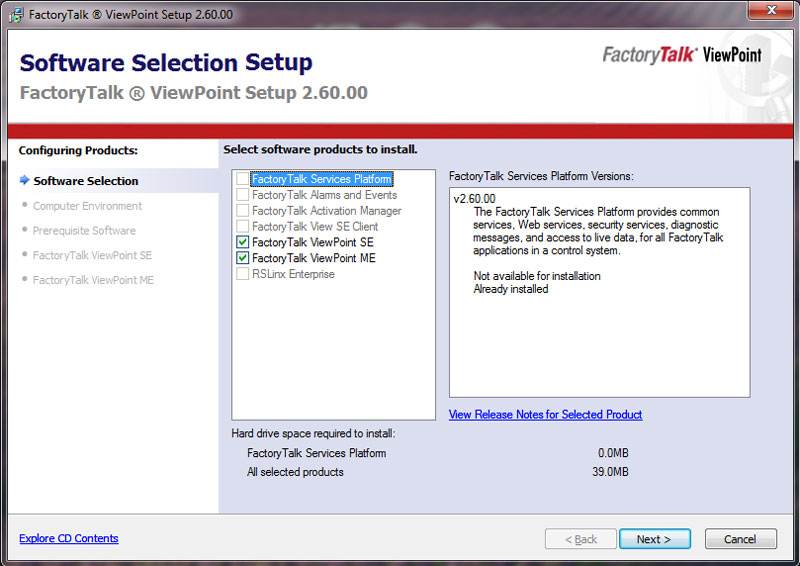
Yesterday in this article I described how to download and install FactoryTalk ViewPoint.
Today I’ll walk you through how to use FactoryTalk ViewPoint to publish content for a FTView Machine Edition application destined to run on a PanelView Plus.
NOTE: ViewPoint supports running on the PanelView Plus and ViewSE, but does not support ViewME station runtimes on a PC. For more detailed information on ViewPoint see this post from last week.
Publishing ViewPoint content to run on a PanelView Plus.
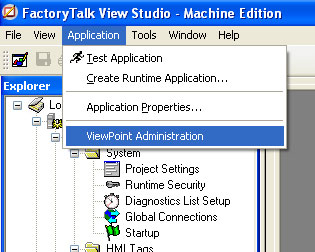
When you’ve finished your ViewStudio for Machine Edition project and wish to enable ViewPoint support, the first thing you’ll need to do is install the ViewPoint Administration Tool which we covered in yesterday’s article here.
Once installed, you’ll find a new option under the “Application” menu. Select it to start the ViewPoint Administration Tool:
After selecting it you will see the ViewPoint splash screen…
…followed by the FactoryTalk ViewPoint Administration Tool Wizard, as seen below:
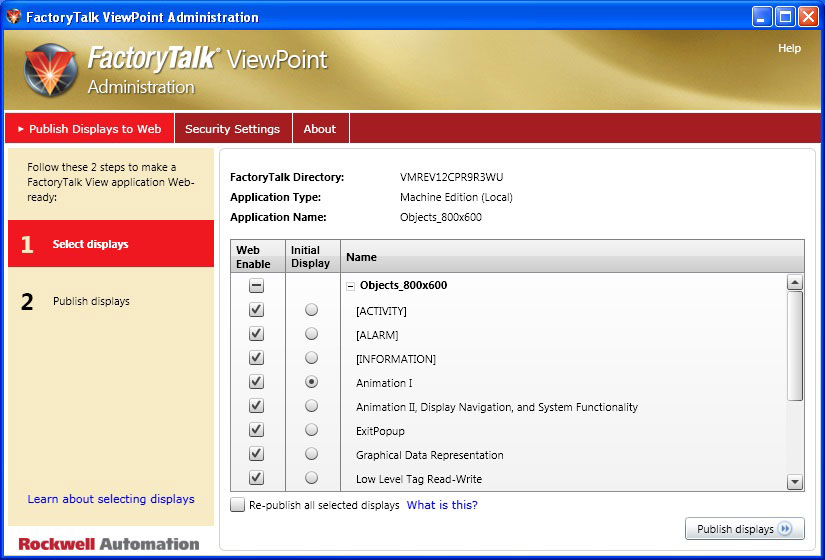
To successfully publish your content to ViewPoint, you’ll start here on the default page by selecting which screens you wish to be published. You’ll also need to select an initial display which will be the first display users see when they log in to ViewPoint from their browser.
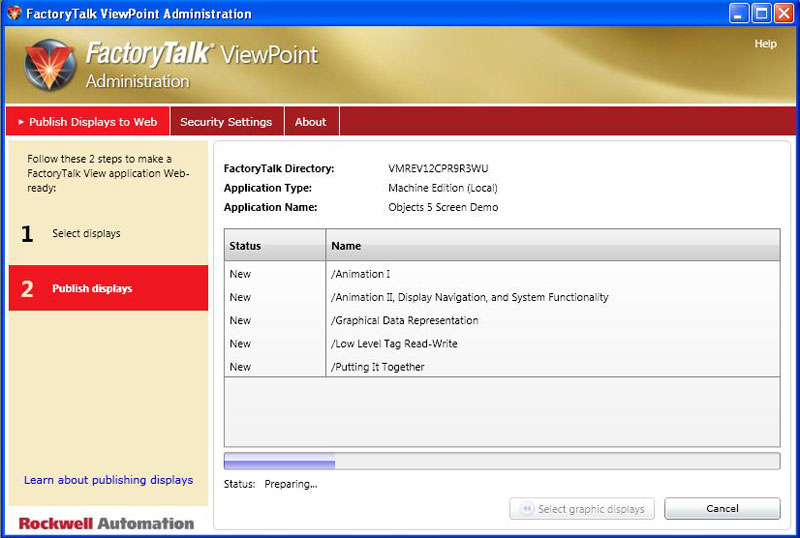
Once you’ve made those selections, select the “publish displays” button in the bottom right corner.
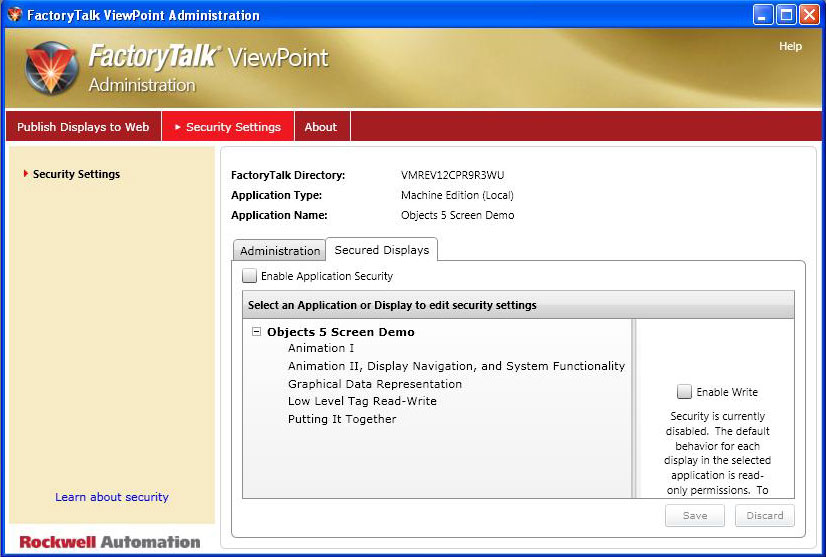
Once all the selected displays have been published, click on the “security settings” option in the top red menu bar.
This reveals two new security tabs as shown in the following two screenshots:
NOTE: I recommend “view only” access (i.e. no control) in most situations as it would typically be improper to control a manufacturing system remotely.
Once you’ve setup the security to your system’s requirements, you’ll need to press the “save” button on the bottom right.
Now you’re finished with the ViewPoint setup and can close the ViewPoint Administration Tool Wizard.
Creating a PanelView Plus runtime with ViewPoint content
To transfer our newly published ViewPoint displays and security settings to our PanelView Plus we need to create a new Runtime File.
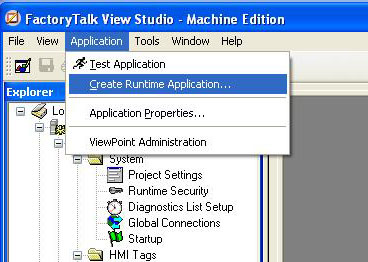
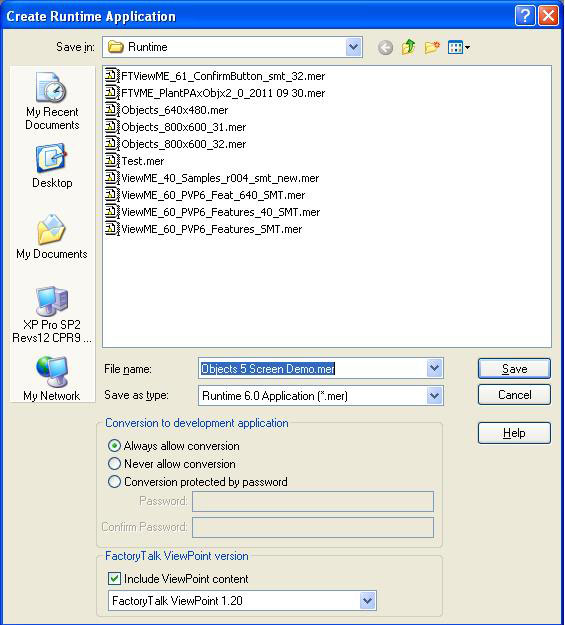
First, select “Application” and “Create Runtime” from the ViewStudio menu as you would normally do:
Next, at the very bottom of the “Create Runtime Application” pop-up window insure you have the “include ViewPoint content” checkbox checked, and that the version selected matches the version installed on your PanelView Plus:
Once the runtime file is created, download it like any other runtime file. Note: it may take longer to download as in now includes the additional ViewPoint content.
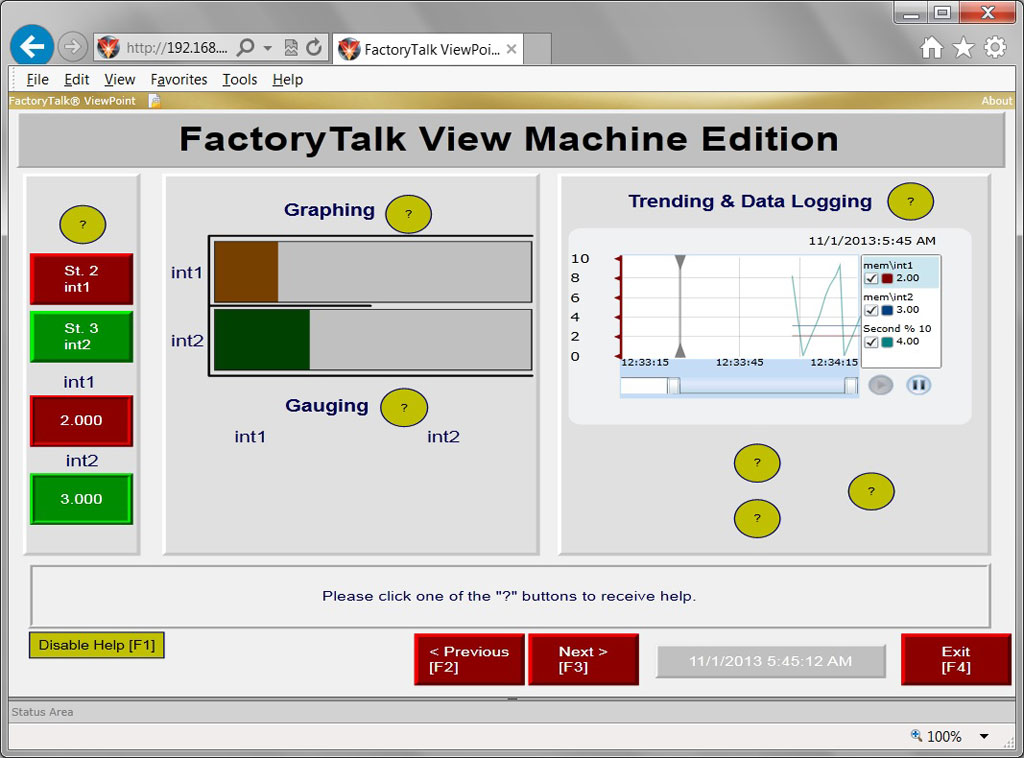
When the project runs on the PanelView Plus you should be able to connect to it using your PC’s web browser. When you do you should see the default display of your running project as in the example below:
I hope this post about how to use the ViewPoint Administration Tool to publish ViewPoint content to a PanelView Plus was helpful. If you have any comments or questions please don’t hesitate to click on the “post a comment or question” link below.
Until next time, Peace ✌️
If you enjoyed this content, please give it a Like, and consider Sharing a link to it as that is the best way for us to grow our audience, which in turn allows us to produce more content 🙂
Support our work and gain access to hundreds members only articles and videos by becoming a member at The Automation Blog or on YouTube. You’ll also find all of my affordable PLC, HMI, and SCADA courses at TheAutomationSchool.com.
Shawn Tierney is a lifelong Technology Enthusiast who began programing in the early 80's on the Apple II and VIC-20 personal computers. After earning a degree in Electronics, he worked as a Certified Controls and Information Automation Specialist for 25 years before launching The Automation Blog and School in 2013.
In a blog post last week I described ViewPoint as a software package which adds webserver capabilities to the PanelView Plus and FactoryTalk View Site Edition (aka Supervisory Edition.)
However, before you can publish your FactoryTalk View Studio graphic displays using ViewPoint, you’ll need to download and install it first. In today’s article I’ll show you where to get ViewPoint, and how to install it.
Downloading the ViewPoint Administration Tool.
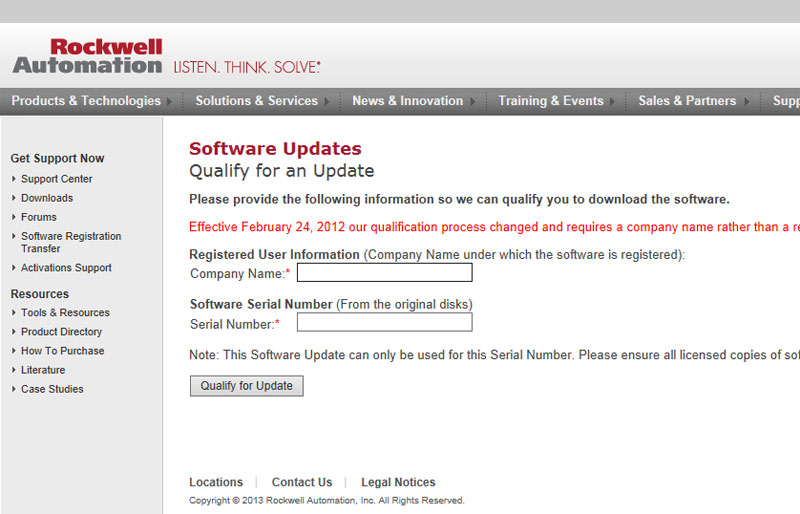
To start, we need to download a copy of the FactoryTalk ViewPoint Administration Tool. To do this we start by visiting this Rockwell website:
Once there, you’ll need to enter the serial number of your FactoryTalk View Studio development software, as well as your company name:
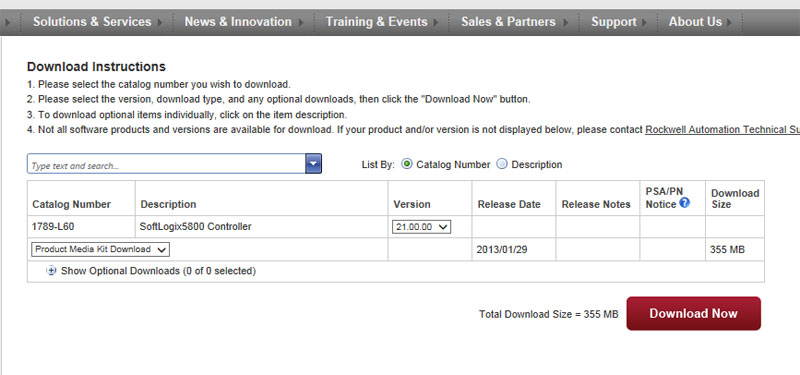
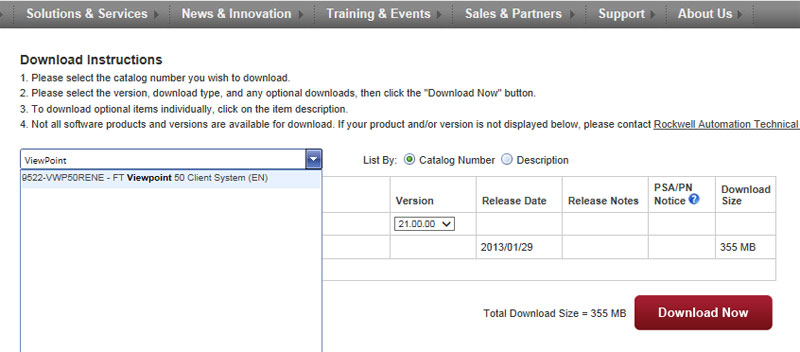
Once your company name and serial number is accepted, you’ll be brought to the software download page. Type “ViewPoint” into the search box and press enter:
You’ll now see ViewPoint show up in the list below the search box (as seen below.) Select it, and then press the red “Download Now” button:
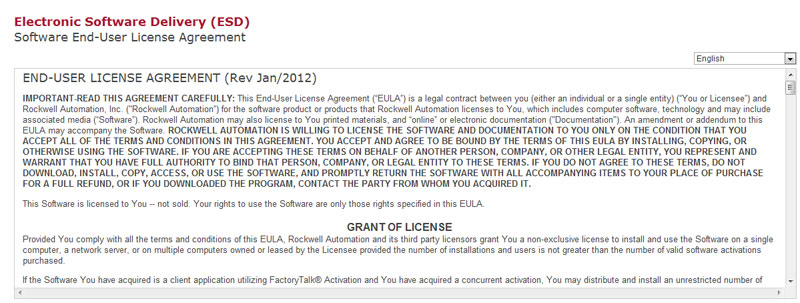
Accept the license agreement to continue:
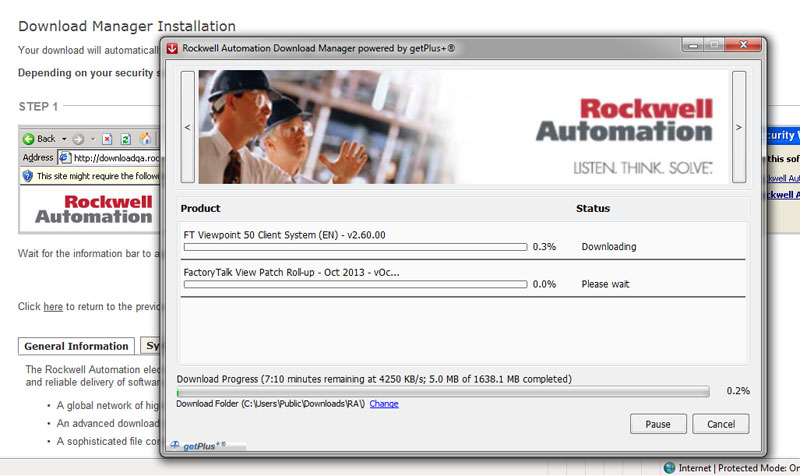
If you’ve downloaded software from Rockwell before, you’ll already have their download manager installed. If that’s the case, you’ll be taken directly to downloading the software as pictured below:
However, if you don’t have Rockwell’s downloader software installed, you’ll be prompted to walk through downloading and installing it before you can download ViewPoint.
Installing the ViewPoint Administration Tool.
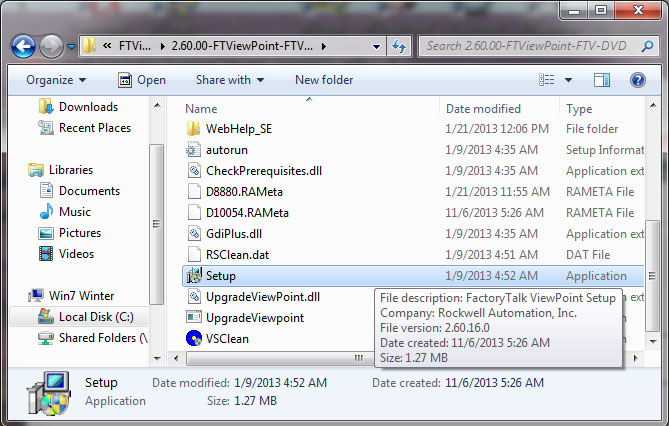
Once the ViewPoint Installer is downloaded, you’ll need to drill down through the folders until you find the ViewPoint “setup” program shown below:
Now double click on the “setup” program to launch the installation wizard.
This wizard is fairly straight forward and depending on your version of ViewStudio you’ll either have the option to install ViewPoint for ViewME, or ViewPoint for both ViewME and ViewSE (as seen below:)
Additional installation notes:
– If Windows IIS is required but not installed, you’ll be prompted to install it and a link will be provided to do so (this is a handy link – thanks RA!)
– If you’ve downloaded a version of ViewPoint which is incompatible with the version of ViewStudio you have installed, you won’t be able to proceed with the installation and there will be a note pointing out the version incompatibility.
Well I hope the above explanation of how to download and install ViewPoint is helpful. Now that we have ViewPoint installed, for the next blog I plan to walk you through publishing your ViewME project using this software. Until then, if you have a comment or question please don’t hesitate to click on the “post a comment or question” link below to post them.
Until next time, Peace ✌️
If you enjoyed this content, please give it a Like, and consider Sharing a link to it as that is the best way for us to grow our audience, which in turn allows us to produce more content 🙂
Support our work and gain access to hundreds members only articles and videos by becoming a member at The Automation Blog or on YouTube. You’ll also find all of my affordable PLC, HMI, and SCADA courses at TheAutomationSchool.com.
Shawn Tierney is a lifelong Technology Enthusiast who began programing in the early 80's on the Apple II and VIC-20 personal computers. After earning a degree in Electronics, he worked as a Certified Controls and Information Automation Specialist for 25 years before launching The Automation Blog and School in 2013.


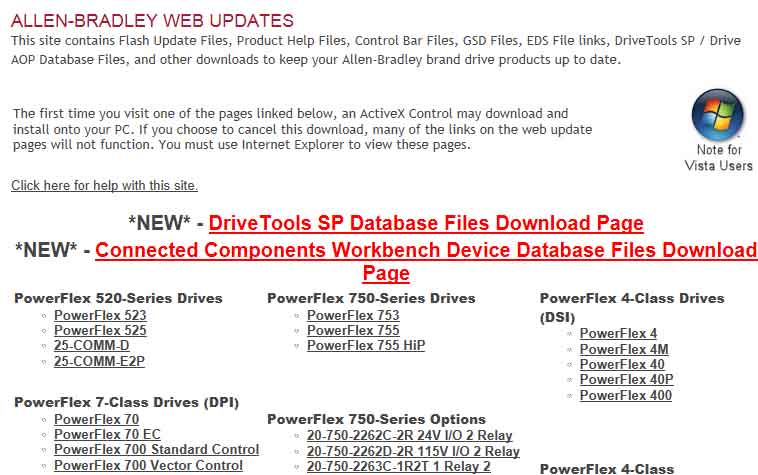 My colleague and I recently had the pleasure of meeting with two of our local Rockwell “Variable Frequency Drive” (VFD) experts. We met so they could show us how to integrate the PowerFlex 750 family of drives into a ControlLogix system.
 If you’re going to use Rockwell’s “premier integration” between it’s PowerFlex Drives and ControlLogix, you’re going to need the following updates: