Support Shawn’s work on TheAutomationBlog.com/join!
You can now support Shawn’s work on The Automation Blog and Show with a small monthly pledge! To become a Patron, visit us at https:// TheAutomationBlog.com/join.
Eliminate commercials and gain access to my weekly full length hands-on, news, and Q&A sessions by becoming a member at The Automation Blog or on YouTube. You'll also find all of my affordable PLC, HMI, and SCADA courses at TheAutomationSchool.com.
I'm a lifelong Technology Enthusiast who began programing in the early 80's on the Apple II and VIC-20 personal computers. After earning a degree in Electronics, I worked as a Certified Controls and Information Automation Specialist for 25 years before leaving to become a full time Industrial Automation instructor and mentor at TheAutomationSchool, as well as publishing industry interviews, news, and product how-to’s at TheAutomationBlog.com. If you're interested in my training, mentoring, or becoming a sponsor, please schedule a teams meeting with me via https://calendly.com/shawntierney/business-meeting
As I was filming new lessons for my CompactLogix course yesterday, I ran into an issue with version 15.01 of ControlFlash that I’m sure many other programmers have or will run into as well.
Note: If you’ve never used ControlFlash but need to, I’ve previously published step-by-step guides to flashing A-B Programmable Controllers over Ethernet (here) and USB (here.) I also have a guide on how to download Allen-Bradley Firmware here.
That said, you may find that when you download firmware files from Rockwell’s website that ControlFlash just seems to ignore them.
Why? Well, in today’s article I’ll cover three reasons this might happen.
First, you need to be sure you copy any downloaded Firmware files into the directories ControlFlash is set to use.
To see which directories your particular ControlFlash installation is monitoring, launch the software, then click on next, and then click on browse:
Second, you need to make sure the files you’ve downloaded have the “.dmk” extension. If your Firmware files have a “.zip” extension, you’ll need to rename them to “.dmk”.
Update for 2022: With ControlFlash 15.04, I’ve found you now need to open any zip files you download from Rockwell, and then run the .MSI install file inside.
In my case I downloaded every firmware available for my L73S, from v34 all the way back to v20. What I got was several .DMK files and several .Zip files in a subdirectory:
Just renaming the Zip files no longer worked for me, so I opened each one and ran the .MSI install file inside (after closing ControlFlash first:)
To do so, first check that you have File Explorer set to display “File Name Extensions” (that setting is found under the “View” tab, as shown below.) Then rename your downloaded Firmware file’s extension from “.zip” to “.dmk”:
Previously you could just rename Zip files to DMK files, but this did not work for me recently with ControlFlash 15.04.
Third, when you select the catalog number of your Controller, you may find that no matter what you do ControlFlash just won’t show any version higher than 30.011 (the workaround / solution is covered in the next paragraph):
The reason for this issue seems to be that versions after 30.011 are now “bundled” together under a family or controller line.
So in order to access those newer versions, you’ll want to scroll down below all the catalog numbers and then select the entire line or family like I do below:
I hope the above article helps those of you who ran into this issue like I did while filming my Compact Basics course.
If you have any questions or comments about this issue, you can post them in our free forum by clicking on the “post a comment or question” link below.
Until next time, Peace ✌️
If you enjoy this episode please give it a Like, and consider Sharing as this is the best way for us to find new guests to come on the show.
Eliminate commercials and gain access to my weekly full length hands-on, news, and Q&A sessions by becoming a member at The Automation Blog or on YouTube. You'll also find all of my affordable PLC, HMI, and SCADA courses at TheAutomationSchool.com.
I'm a lifelong Technology Enthusiast who began programing in the early 80's on the Apple II and VIC-20 personal computers. After earning a degree in Electronics, I worked as a Certified Controls and Information Automation Specialist for 25 years before leaving to become a full time Industrial Automation instructor and mentor at TheAutomationSchool, as well as publishing industry interviews, news, and product how-to’s at TheAutomationBlog.com. If you're interested in my training, mentoring, or becoming a sponsor, please schedule a teams meeting with me via https://calendly.com/shawntierney/business-meeting
Support Shawn’s work on TheAutomationBlog.com/join!
You can now support Shawn’s work on The Automation Blog and Show with a small monthly pledge! To become a Patron, visit us at https:// TheAutomationBlog.com/join.
Eliminate commercials and gain access to my weekly full length hands-on, news, and Q&A sessions by becoming a member at The Automation Blog or on YouTube. You'll also find all of my affordable PLC, HMI, and SCADA courses at TheAutomationSchool.com.
I'm a lifelong Technology Enthusiast who began programing in the early 80's on the Apple II and VIC-20 personal computers. After earning a degree in Electronics, I worked as a Certified Controls and Information Automation Specialist for 25 years before leaving to become a full time Industrial Automation instructor and mentor at TheAutomationSchool, as well as publishing industry interviews, news, and product how-to’s at TheAutomationBlog.com. If you're interested in my training, mentoring, or becoming a sponsor, please schedule a teams meeting with me via https://calendly.com/shawntierney/business-meeting
If your copy of TIA Portal Step 7 came with USB Memory Stick Floating License, you’ll need to move that license to your hard drive before you’ll be able to use Step 7.
If you don’t, even with the USB stick installed you’ll get the following error when trying to open an existing project, or add a device to a new one:
To move your license from the USB memory stick to your hard drive, just follow these steps:
Step 01) Start by plugging your USB Memory Stick License into your computer. Then open the “Automation License Manager” application that is installed with TIA Portal:
Step 02) Next, select the USB Memory Stick License drive from the list (in this case my USB License is drive “E”.) Next choose the license on the the right, and then choose “Transfer” under the “License Key” menu :
Step 03) In the pop-up hat appears, choose the hard drive you’d like to transfer the license to (in this example my hard drive is “C”.) Then click on OK:
Step 05) Now select the hard drive you just moved the license too, and you should find that your license now resides there:
With the above steps done, you should be able to open or create a Step 7 project without getting a license error:
While the above procedure worked for me, I’m still new to Siemens. So if you have any insight or comments to share, I invite you to do so by clicking on the “post a comment” link below.
Until next time, Peace ✌️
If you enjoy this episode please give it a Like, and consider Sharing as this is the best way for us to find new guests to come on the show.
Eliminate commercials and gain access to my weekly full length hands-on, news, and Q&A sessions by becoming a member at The Automation Blog or on YouTube. You'll also find all of my affordable PLC, HMI, and SCADA courses at TheAutomationSchool.com.
I'm a lifelong Technology Enthusiast who began programing in the early 80's on the Apple II and VIC-20 personal computers. After earning a degree in Electronics, I worked as a Certified Controls and Information Automation Specialist for 25 years before leaving to become a full time Industrial Automation instructor and mentor at TheAutomationSchool, as well as publishing industry interviews, news, and product how-to’s at TheAutomationBlog.com. If you're interested in my training, mentoring, or becoming a sponsor, please schedule a teams meeting with me via https://calendly.com/shawntierney/business-meeting
Support Shawn’s work on TheAutomationBlog.com/join!
You can now support Shawn’s work on The Automation Blog and Show with a small monthly pledge! To become a Patron, visit us at https:// TheAutomationBlog.com/join.
Eliminate commercials and gain access to my weekly full length hands-on, news, and Q&A sessions by becoming a member at The Automation Blog or on YouTube. You'll also find all of my affordable PLC, HMI, and SCADA courses at TheAutomationSchool.com.
I'm a lifelong Technology Enthusiast who began programing in the early 80's on the Apple II and VIC-20 personal computers. After earning a degree in Electronics, I worked as a Certified Controls and Information Automation Specialist for 25 years before leaving to become a full time Industrial Automation instructor and mentor at TheAutomationSchool, as well as publishing industry interviews, news, and product how-to’s at TheAutomationBlog.com. If you're interested in my training, mentoring, or becoming a sponsor, please schedule a teams meeting with me via https://calendly.com/shawntierney/business-meeting
If you’re trying to install TIA Portal Step 7 and you’re seeing a “.Net 3.5 SP1” required error, today I’ll walk you through how to install .Net 3.5, as well as what to do if the .Net installation hangs.
Step 01) The easiest way to install .Net is through the “Programs and Features” applet in Windows Control Panel:
Step 02) In “Programs and Features,” click on “Turn Windows features on or off”:
Step 03) Then when the popup appears, find and select “.Net Framework 3.5” and click on OK:
Step 04) If you’re prompted to download the files from Windows update, go ahead and do so (you can also get the files off of your Windows 10 Install Disc):
Step 05) Once done, restart the TIA Portal Step 7 installation, and you should no longer get a .Net prerequisite error.
Note: If your installation or download hangs, check out the Offline Installer option below.
Offline Installer:
If for some reason the files never download, or if your PC is not connected to the internet and/or you don’t have access to your Windows 10 Installation DVD, there is another way to install .Net 3.5.
While Microsoft doesn’t provide a “true” offline installation file for .NET 3.5 SP1, a kind soul in the community has made one available, and below I’ll show you how to download and use it:
Step B) Then unzip the download, open the folder, and run the utility. When the installer appears, just click on “Start Installation”:
Note: To monitor the progress of the install, open the .txt file in the program’s folder (to refresh the progress, close and reopen the text file.)
If you’ve found another way around this issue, or you’d like to share your thoughts or questions, please do so by clicking on the “post a comment” link below.
Until next time, Peace ✌️
If you enjoy this episode please give it a Like, and consider Sharing as this is the best way for us to find new guests to come on the show.
Eliminate commercials and gain access to my weekly full length hands-on, news, and Q&A sessions by becoming a member at The Automation Blog or on YouTube. You'll also find all of my affordable PLC, HMI, and SCADA courses at TheAutomationSchool.com.
I'm a lifelong Technology Enthusiast who began programing in the early 80's on the Apple II and VIC-20 personal computers. After earning a degree in Electronics, I worked as a Certified Controls and Information Automation Specialist for 25 years before leaving to become a full time Industrial Automation instructor and mentor at TheAutomationSchool, as well as publishing industry interviews, news, and product how-to’s at TheAutomationBlog.com. If you're interested in my training, mentoring, or becoming a sponsor, please schedule a teams meeting with me via https://calendly.com/shawntierney/business-meeting
One of my connections recently shared how he was able to connect FactoryTalk View Studio to the new Micro800 Simulator (thanks Floyd!)
After reviewing his email, I thought it would be a great opportunity share with everyone how you setup communications between FactoryTalk View, Linx, and any Micro800 that supports communications, including the new Simulator that comes with CCW v12.
Note: While today’s procedure will focus on the Micro820, 850, and Simulator using Ethernet, it should also work with the Micro830 and Serial Connections if you first configure a serial communications driver in FactoryTalk Linx.
Requirements:
On the software side you’ll need FactoryTalk Linx / RSLinx Enterprise version 5.60 or later, as well as FactoryTalk View Studio.
On the hardware side you’ll need a Micro820, 830, or 850 with firmware version 7 or greater, as well as CCW v7 or later. You can also use the new Micro800 Simulator that comes with CCW v12.
How to setup communications between FactoryTalk View, Linx and any Micro800:
Step 1) Inside of a FactoryTalk View Studio application, expand FactoryTalk Linx / RSLinx Enterprise and double click on “Communications Setup:”
Step 2) If prompted, select “Create a new configuration” and click on “Finish”:
Step 3) Now under the “Design (Local)” tab, expand “Linx.”
If you are connecting to a Micro 820 or 850 via Ethernet, or to the new Micro800 Simulator, expand the Ethernet driver and the select it to trigger a network browse.
If you are connecting to a Micro830, or other Micro800 via serial, you will first need to right click on “Linx” and add a new serial driver matching your Micro800’s serial configuration (not shown.)
After “Linx” finds your Micro800, select it before moving on to the next step.
Note: For information on how to setup the Micro800 Sim shown above, check out this article.
Step 4) Now under “Device Shortcuts” click on “Add,” and then name your new shortcut:
Step 5) After naming your shortcut, change the “Shortcut Type” to “Symbolic,” and then click on “Apply”:
Step 6) Then if prompted click on “Yes” to apply your changes:
Step 7) And if you receive the below notice, click on “OK” after reading it:
Step 8) Now that your shortcut is setup, click on “OK” to save your configuration:
Step 9) With your shortcut configuration saved, you can now select tags (see note below on supported types) from your Micro800 for use in your View Studio project:
Note: If your new Shortcut does not appear as a folder, click on the “Refresh All Folders” button.
A Note About Supported Tag Types: As of today, Rockwell states it is only possible to browse and select Micro800 Global Variables of the INT, DINT, REAL, and BOOL types.
So, do you think you’ll ever use FactoryTalk View Studio with the Micro800 line of PLCs? Or perhaps you’ve already been doing so?
You can share your comments or questions with us by using the “post a comment” link below.
Until next time, Peace ✌️
If you enjoy this episode please give it a Like, and consider Sharing as this is the best way for us to find new guests to come on the show.
Eliminate commercials and gain access to my weekly full length hands-on, news, and Q&A sessions by becoming a member at The Automation Blog or on YouTube. You'll also find all of my affordable PLC, HMI, and SCADA courses at TheAutomationSchool.com.
I'm a lifelong Technology Enthusiast who began programing in the early 80's on the Apple II and VIC-20 personal computers. After earning a degree in Electronics, I worked as a Certified Controls and Information Automation Specialist for 25 years before leaving to become a full time Industrial Automation instructor and mentor at TheAutomationSchool, as well as publishing industry interviews, news, and product how-to’s at TheAutomationBlog.com. If you're interested in my training, mentoring, or becoming a sponsor, please schedule a teams meeting with me via https://calendly.com/shawntierney/business-meeting
In today’s article we’ll cover how to use the new Micro800 Simulator that comes with CCW 12, including how to work around a few common issues you may run into:
First, what is the Micro800 Sim?
Below is the official description of the Micro800 Simulator from the CCW release notes :
Step 1) To get started, first open up CCW v12:
Step 2) Next, open a CCW project you’d like to download to the Micro800 Simulated PLC:
Step 3) Once your existing application is open, I suggest you save it with a new name prior to making the changes needed to use it with the Micro800 Sim:
Step 4) In your newly re-named and re-saved project, right click on the Micro in the project tree and select “Change Controller”:
Step 5) Then select the new “2080-LC50-48QWB-SIM” as the controller to change it to:
Step 6) Once the conversion is done, you’ll hopefully see a success message at the bottom of CCW:
Step 7) At this point, it’s important to “build” your project and fix any issues that crop up.
In my case, since I’m using the program from my Nano Basics course which uses both the 2080-IF4U and 2080-SERIALISOL modules (for use with Modbus and VFDs), I had to resolve errors related to both of those modules:
NOTE: The below excerpt from the CCW release notes shows the many differences between a physical Micro850 and the Simulated one, including the Sim’s lack of support for Modbus, third party I/O modules, and communication modules:
Step 8) Once you’re program builds without errors you’re ready to launch the Micro800 Simulator located under the “Tools” menu:
Step 9) When it launches, it should look like this:
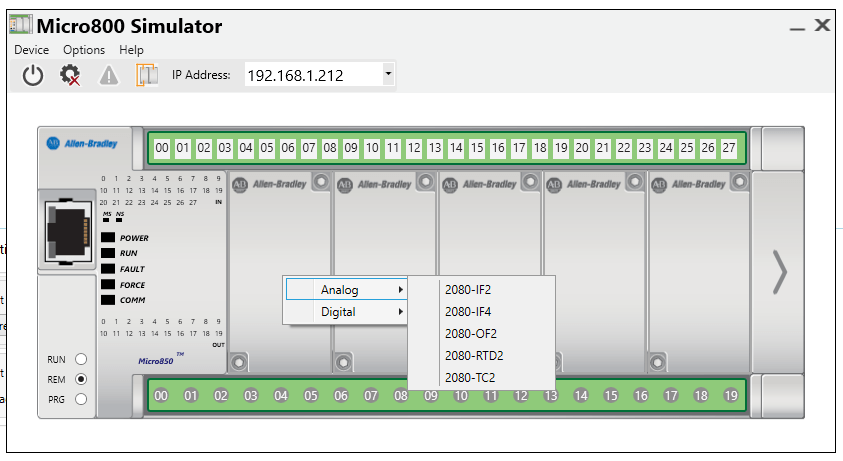
Step 10) If you’re program uses any of the supported Digital or Analog modules, now is the time to add them to your simulated Micro by right clicking on the appropriate slot and selecting the module from the list:
* Below you can see I’ve added the 2080-IF2 to my system as it’s also used in my Nano Basics course:
Step 11) With the simulated hardware configured, it’s time to turn on the Micro800 Sim. When you do, you may get the following “Windows Defender” popup in which you want to “Allow” access:
Note: If you do not allow access, you may not see your Micro850 Sim in RSLinx or FTLinx.
Step 12) With the Micro850 Sim running, your next step is to set the path to your Micro850 Sim in your CCW project.
To do so, click on “Connection Path,” then “Browse,” and then select your simulated Micro850 from the Connection Browser (it should show up with the same IP Address as your PC):
Note: You need to have RSLinx or FTLinx selected and configured for Ethernet/IP. Here I’m using the default RSLinx Classic with the Ethernet/IP driver that I show how to setup in this article.
Also note that if you try to use an old version of RSLinx or FTLinx it may not work, so be sure to read the CCW release notes and documentation if you run into any issues:
If you’re still having issues, I’d suggest contacting Rockwell’s freeMicro800 Tech Support
Step 13) With your unique connection path set, you can now proceed to download your program to the Micro800 Sim:
Note: The Micro850 Sim running on my PC (shown above) has an IP Address of 192.168.1.212 since that is the IP Address of my PC. Your should show up with the IP Address of your PC.
Step 14) At which point you’ll be prompted to select “Download” or “Download with Project Values”:
Step 15) Once the download is complete, you’ll see this prompt:
Step 16) And if you’re using the free version of CCW, you’ll also find that after 10 minutes in Run, the simulator will switch back to program:
NOTE: If you forget to add your I/O modules to your Micro800 Sim prior to downloading, you’ll see an error message like shown below:
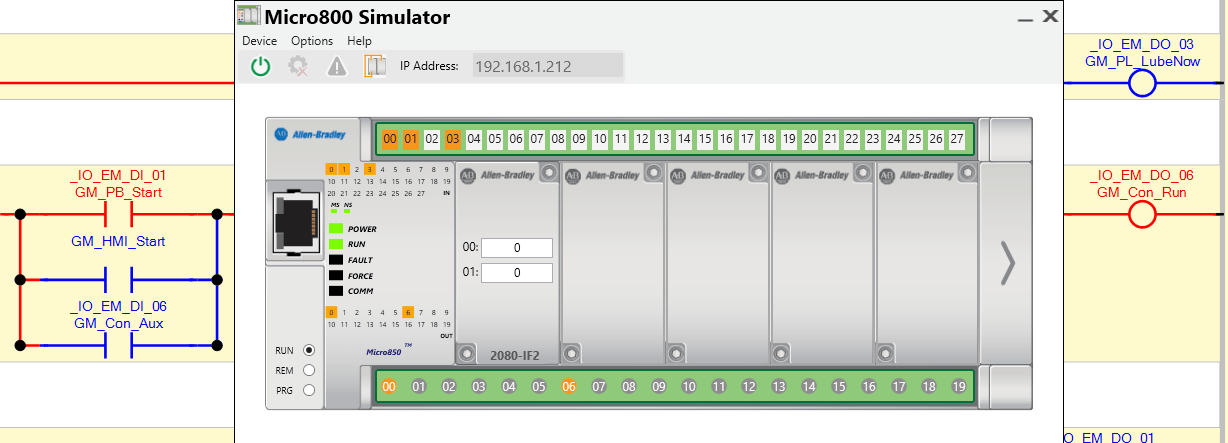
Step 17) Once downloaded, you can put your Sim into run mode and click on the Input Terminals to turn the Inputs on and off (below, CCW is shown online behind the Micro800 Sim):
Step 18) One final note: As the Micro800 Sim is a simulator, you will find some subtle differences in how it operates, which is detailed in the CCW release notes:
I hope you found today’s article on how to use the Micro800 Sim helpful!
And if you’re enrolled in my Nano Basics course, note than I am planning on adding additional lessons (including how to use the Micro800 Sim) completely free of charge 😉
If you have any comments or questions on this article, please don’t hesitate to post it using the “comment” link found below my signature.
Until next time, Peace ✌️
If you enjoy this episode please give it a Like, and consider Sharing as this is the best way for us to find new guests to come on the show.
Eliminate commercials and gain access to my weekly full length hands-on, news, and Q&A sessions by becoming a member at The Automation Blog or on YouTube. You'll also find all of my affordable PLC, HMI, and SCADA courses at TheAutomationSchool.com.
I'm a lifelong Technology Enthusiast who began programing in the early 80's on the Apple II and VIC-20 personal computers. After earning a degree in Electronics, I worked as a Certified Controls and Information Automation Specialist for 25 years before leaving to become a full time Industrial Automation instructor and mentor at TheAutomationSchool, as well as publishing industry interviews, news, and product how-to’s at TheAutomationBlog.com. If you're interested in my training, mentoring, or becoming a sponsor, please schedule a teams meeting with me via https://calendly.com/shawntierney/business-meeting
Rockwell Tech Note mentioned in video (currently requires paid contract to read): 878568
Support Shawn’s work on TheAutomationBlog.com/join!
You can now support Shawn’s work on The Automation Blog and Show with a small monthly pledge! To become a Patron, visit us at https:// TheAutomationBlog.com/join.
Eliminate commercials and gain access to my weekly full length hands-on, news, and Q&A sessions by becoming a member at The Automation Blog or on YouTube. You'll also find all of my affordable PLC, HMI, and SCADA courses at TheAutomationSchool.com.
I'm a lifelong Technology Enthusiast who began programing in the early 80's on the Apple II and VIC-20 personal computers. After earning a degree in Electronics, I worked as a Certified Controls and Information Automation Specialist for 25 years before leaving to become a full time Industrial Automation instructor and mentor at TheAutomationSchool, as well as publishing industry interviews, news, and product how-to’s at TheAutomationBlog.com. If you're interested in my training, mentoring, or becoming a sponsor, please schedule a teams meeting with me via https://calendly.com/shawntierney/business-meeting
Over the last few weeks I’ve received many helpful messages recommending webpages and videos to help me get started using the S7-1200, and in today’s article I’ll share those I found to be the most helpful.
Note: If you’d like to suggest additional links be added to the list, please use the links at end of the article to share them!
To start we have links to the S7-1200 product webpage, PDF brochure, and TIA programming software webpage:
For even more technical details, the next two links provide a complete list of S7-1200 user manuals, as well as a list of all the available application samples:
Finally, when it comes time to actually begin programming the S7-1200, these videos covering creating your first PLC program, HMI project, and adding distributed I/O, were the ones that I found to be the most helpful:
If you know of other great links or videos to help users get started with the S7-1200,please let me know by either contacting me HERE, or by using the “post a comment” link below.
Until next time, Peace ✌️
If you enjoy this episode please give it a Like, and consider Sharing as this is the best way for us to find new guests to come on the show.
Eliminate commercials and gain access to my weekly full length hands-on, news, and Q&A sessions by becoming a member at The Automation Blog or on YouTube. You'll also find all of my affordable PLC, HMI, and SCADA courses at TheAutomationSchool.com.
I'm a lifelong Technology Enthusiast who began programing in the early 80's on the Apple II and VIC-20 personal computers. After earning a degree in Electronics, I worked as a Certified Controls and Information Automation Specialist for 25 years before leaving to become a full time Industrial Automation instructor and mentor at TheAutomationSchool, as well as publishing industry interviews, news, and product how-to’s at TheAutomationBlog.com. If you're interested in my training, mentoring, or becoming a sponsor, please schedule a teams meeting with me via https://calendly.com/shawntierney/business-meeting
In today’s article I’ll share the best video tutorials I’ve found covering how metal stamp presses work, what common functions are automated, and the processes used to make aluminum beverage cans.
The Why: New Lessons
So you may be asking why the sudden interest in metal stamping and can making?
Well, late last year as I began the process of scripting lessons for my new CompactLogix video course, Compact Basics, I wanted to base them on a new control scenario so students who had already taken my ControlLogix course would get to write new programs based on a completely different process.
And thinking ahead to the next course, I also wanted the final program created in Compact Basics to be the code I could also use in the HMI application students would be creating in my next course, PVP (PanelView Plus) Basics, Second Edition.
That, and as I already had a plant full of blow molding machines in my FactoryTalk ViewSE Basics course, I thought it made sense to create the code and graphics for making Aluminum Cans which I could later use in my expanded version of this course.
Metal Stamping 101
Even though I’ve visited dozens of metal stamping facilities, those visits focused on troubleshooting automation and not on learning the metal stamping process.
So in order to create realistic programming scenarios and graphics, I first needed a refresher on the metal stamping and can making process.
That in mind, I turned to the internet and began wading through tons of content until assembling the below examples.
First up we have “Sheet Metal Stamping Presses” from SME.org, which does an excellent job covering the different types of Stamp Press Drives, including Direct, Single Gear Reduction, Double Gear Reduction, and Eccentric Gear systems:
Next is another video from SME, “Sheet Metal Stamping Dies and Processes,” that covers Compound and Combination Dies, as well as multi-station systems which either Progressive or Transfer Dies:
Additional examples of stamping machines in action can be seen in the first half of the below video from Wisconsin Metal Parts:
Automated Stamping Presses
After watching the above videos, you get a basic idea of how Metal Stamping Machines work, so next is understanding how today’s automation products can be used with them.
For that, I turned to a pair of videos from Sutherland Presses.
In the first video we get a tour of their I-Press basic, which has an HMI that displays Stroke Position, Direction, Angle, RPM and Mode.
Navigating to their CAM screen, operators can set parameters to control the operation of the part Ejector, Feed Advance system, Pilot Release, Coil Lube, and Scrap Cutter.
They also include a Monitor or history screen which shows past faults, as well as a counter screen with batch and scrap counters,
In addition to the HMI, the control panel also includes control inputs such as Power and Mode key switches, Start and Stop Buttons, RPM Potentiometer, and Estop.
Towards the end of the video we also get a look at the T stand in front of the press, and even get a walk-through of the steps required to put the system in continuous mode:
Then in a follow-up video we get a tour of the more advanced I-Press Plus system running on an Allen-Bradley PanelView Plus 7:
The process of making beverage cans
With a basic understanding of Metal Stamping Presses and how they can be automated, the final step was to understand the process of making aluminum cans.
His excellent video addresses why a beverage can is shaped the way it is, as well as explains the steps in the process from the initial “blank” through finished product:
And the last video I’ll share is “How it’s made – Aluminium cans,” which is an entertaining five minute video showing the actual process of “can making” from multiple angles while sharing interesting facts about the process:
After viewing these videos, you should feel fairly well informed about how Metal Stamp Presses and Aluminum Can making works.
If you have your own favorite links about either, I invite you to share them with us by clicking on the Leave a Comment link below.
Until next time, Peace ✌️
If you enjoy this episode please give it a Like, and consider Sharing as this is the best way for us to find new guests to come on the show.
Eliminate commercials and gain access to my weekly full length hands-on, news, and Q&A sessions by becoming a member at The Automation Blog or on YouTube. You'll also find all of my affordable PLC, HMI, and SCADA courses at TheAutomationSchool.com.
I'm a lifelong Technology Enthusiast who began programing in the early 80's on the Apple II and VIC-20 personal computers. After earning a degree in Electronics, I worked as a Certified Controls and Information Automation Specialist for 25 years before leaving to become a full time Industrial Automation instructor and mentor at TheAutomationSchool, as well as publishing industry interviews, news, and product how-to’s at TheAutomationBlog.com. If you're interested in my training, mentoring, or becoming a sponsor, please schedule a teams meeting with me via https://calendly.com/shawntierney/business-meeting
Five years ago this month, on May 2nd, 2014, my Kickstarter campaign to create an affordable PLC video course was successfully funded thanks to forty five awesome people who believed in my vision to produce affordable PLC training for the masses.
Why PLC Basics?
At that time I was an automation specialist, a job I had been doing for well over twenty years.
The job required that I attend factory training a few times each year, and then shared what I learned with local users through demonstrations, training, and troubleshooting.
During my years in that role it wasn’t uncommon for Technicians, Electricians, and even Engineers to ask me if we offered affordable training options they could purchase on their own to learn how to program and troubleshoot the PLC, HMI, and SCADA products I specialized in.
In almost every instance the only honest answer I had was no, since the factory training options weren’t what most individuals would consider “affordable.”
That’s not to say there wasn’t the occasional exception.
Once such exception was the “MicroLogix 1000 Starter Kit” which included a MicroLogix PLC, programming software, a programming cable, and CD of hands-on labs bundled together for just $125.
But aside for the occasional offering, most of the time I didn’t have any affordable training materials to offer individuals to purchase.
That’s what lead me to the idea of launching a Kickstarter campaign to produce my own affordable PLC video training course.
And with the backing of forty five friends, family, colleagues and philanthropists, I received the funding needed to produce my initial course.
Since then, I’ve released several more courses, many of which still cost less than the price of average video game:
So on the anniversary of my successful Kickstarter campaign, I want to extend a heartfelt “thank you” to those forty five people who helped me bring PLC Basics to life.
Eliminate commercials and gain access to my weekly full length hands-on, news, and Q&A sessions by becoming a member at The Automation Blog or on YouTube. You'll also find all of my affordable PLC, HMI, and SCADA courses at TheAutomationSchool.com.
I'm a lifelong Technology Enthusiast who began programing in the early 80's on the Apple II and VIC-20 personal computers. After earning a degree in Electronics, I worked as a Certified Controls and Information Automation Specialist for 25 years before leaving to become a full time Industrial Automation instructor and mentor at TheAutomationSchool, as well as publishing industry interviews, news, and product how-to’s at TheAutomationBlog.com. If you're interested in my training, mentoring, or becoming a sponsor, please schedule a teams meeting with me via https://calendly.com/shawntierney/business-meeting
A reader recently asked what the difference was between Point I/O and Flex I/O, and in today’s article I’ll share my thoughts on the subject.
Note: Those not familiar with Rockwell’s I/O products may also want to consider 1756 I/O, 1769 Compact I/O, 5069 Compact I/O, and 5094 Flex 5000 I/O, all of which also support being used as distributed I/O.
How Point I/O and Flex I/O are similar
Let’s start by comparing features common to both lines.
Distributed I/O Focus
Both Flex I/O and Point I/O are modular, in-cabinet distributed I/O systems that are designed to be used as distributed I/O.
Flex I/O System with Ethernet AdapterPoint I/O System with Ethernet Adapter
While in years past up to sixteen local Flex I/O modules could be controlled by a local FlexLogix controller, those controllers have long been obsolete.
And while it’s also true that 5371 CompactLogix controllers can use Point I/O for local expansion, that support tops out at eight modules with the L18.
In contrast, 1769 and 5069 Compact I/O not only supports being used as distributed I/O, but can also be used as local I/O modules in CompactLogix systems with up to thirty modules.
So today it’s safe to say that both Flex I/O and Point I/O are predominately used in distributed I/O applications, as neither has it’s own dedicated controller supporting large numbers of local modules.
Plug-In Modules
While Flex I/O and Point I/O physically look quite different, each line consists of I/O modules which plug into terminal block bases.
This design allows modules to be removed and replaced without disturbing field wiring, and many panel designers have taken advantage of this design to eliminate interposing terminal blocks commonly used with standard “rack based” PLC modules.
Flex I/O and Point I/O modules also support “Removal and Insertion Under Power” (RIUP,) a must have feature in continue process applications.
Mounting
Flex I/O and Point I/O both support being mounted either horizontally or vertically, while most of Rockwell’s other I/O Modules (aside from the Flex 5000) only support being mounted horizontally.
Networking
Today, both the Flex I/O and Point I/O support Ethernet, ControlNet, DeviceNet, and Profibus DP distributed I/O networks.
Flex I/O DeviceNet, ControlNet, and Ethernet AdaptersPoint I/O DeviceNet, ControlNet, and Ethernet Adapters
How Point I/O and Flex I/O are different
Modules and Bases of a Flex I/O System:
The first thing you’ll notice when you compare Point I/O and Flex I/O are how different they look.
Flex I/O modules are wide and rectangular, and plug into a terminal base that looks very similar to a standard three level terminal block.
Flex I/O Modules
Before I/O modules can be installed, the module bases must be connected from right to left, starting with the right most terminal base and ending with the adapter.
Flex I/O Module Terminal Bases
These terminal bases support being mounted directly to a back-panel, or being installed on din-rail.
Once mounted, to connect each terminal base a bus connector must be slid from right to left, which is actually one of the weak points of the Flex I/O design.
If not lined up correctly (which typically happens when the bases are not mounted on a flat surface,) the pins in the connecting socket bend quite easily.
In addition to bent pins, the little plastic “hooks” on the top left of the terminal bases also break off quite easily.
As far as the total number of Flex I/O modules supported by the above mentioned netowrk adapters, each supports up to eight modules which can be split into two rows with the use of a Flex I/O bus extension cable (right to right) as shown below:
Keep in mind that if you do split your Flex I/O modules in two, unlike 1769 systems the slot numbering of the modules follows the physical path.
This means that while the first bank of I/O has slot numbers which increment from left to right, the second back of I/O has slot numbers that increment from right to left.
Modules and Bases of a Point I/O System:
In contrast to Flex I/O, Point I/O modules (sometimes referred to as “Slice I/O,”) are tall and narrow.
To assemble a system, users start by sliding the first module’s terminal base in down into groves on the right side of the network adapter.
Then subsequent terminal bases are added to the right of the preceding base, with the last terminal base’s bus connections being covered with a cover that comes with the network adapter.
Compared to Flex I/O, Point I/O systems are much easier to assemble, however Point I/O only supports din-rail mounting.
And while Point I/O also supports bus extension cables (right to left,) they are extremely bulky and not nearly as popular as the Flex I/O versions.
More Modules, but Less Terminals
Unlike Flex I/O’s limit of eight modules per adapter, Point I/O supports up to sixty three modules per adapter.
That said, once you get above thirteen modules an Expansion Power Module (1734-EP24DC) is required to allow additional power to be provided to the module power bus.
Additionally, since the terminal bases also carry field power, if you change from DC to AC modules (or need to isolate module power from one set of modules to another) you’ll need a Field Power Distributor Module (1734-FPD) to break the field power bus to the left of the FPD, as well as provide terminals for the new field power bus to the right of the FPD.
And while Point I/O supports many more modules per Adapter, each module typically has less I/O points per module with less terminals per point.
With Flex I/O, it’s common to have sixteen point modules sitting on top of three level terminal block bases with fifty two terminals.
Flex I/O Module Terminal Bases
With Point I/O, the largest input module only has eight points, and the standard terminal base also only has eight unique terminals.
This leaves users with either having to add an additional terminal strip to wire the remaining connections of his two and three wire devices, or requires the addition of the relatively expensive 1734-CTM (Common) and/or 1734-VTM (Voltage) Point I/O modules to provide additional terminals.
To Hold (Or Not To Hold) Last State
The final topic I’ll cover is how the two platforms differ when it comes to holding last state.
In many mission critical applications it’s important for remote I/O modules to maintain their last state if they lose connection with the Programmable Controller.
This includes applications where the outputs are controlling fans that remove toxic or flammable gases from an area.
In those applications, even if the connection to the PLC is lost, any outputs that were on may need to hold their last state and remain on to continue to remove the unwanted gasses from the area.
And while Flex I/O will always maintain last state when set to do so, oddly enough Point I/O will not hold last stateif a user downloads a program to the programmable controller that is controlling the Point I/O even when the Point I/O is set to maintain it’s last state.
Because of this, Point I/O is typically not considered for applications that require holding of last state, including most systems designed to utilize ControlLogix redundancy.
So, do you have a preference between Point I/O, Flex I/O, or some other distributed I/O system?
Let us know along with any thoughts, questions, or opinions you have by clicking on the “post a comment or question” link below.
Until next time, Peace ✌️
If you enjoy this episode please give it a Like, and consider Sharing as this is the best way for us to find new guests to come on the show.
Eliminate commercials and gain access to my weekly full length hands-on, news, and Q&A sessions by becoming a member at The Automation Blog or on YouTube. You'll also find all of my affordable PLC, HMI, and SCADA courses at TheAutomationSchool.com.
I'm a lifelong Technology Enthusiast who began programing in the early 80's on the Apple II and VIC-20 personal computers. After earning a degree in Electronics, I worked as a Certified Controls and Information Automation Specialist for 25 years before leaving to become a full time Industrial Automation instructor and mentor at TheAutomationSchool, as well as publishing industry interviews, news, and product how-to’s at TheAutomationBlog.com. If you're interested in my training, mentoring, or becoming a sponsor, please schedule a teams meeting with me via https://calendly.com/shawntierney/business-meeting
The Simatic S7-1200 is Siemens’s programmable controller aimed at stand-alone and basic automation applications, and is often referred to as their Basic or Compact controller.
From my perspective as a long time Rockwell user, the S7-1200 seems to be most similar to the Allen-Bradley CompactLogix 5372 (L2) controllers as they both share an all-in-one design, include an SD/MicroSD Card slot, support multiple programming languages, and can be programmed with a lower cost version of the family’s programming software.
The S7-1200 can also be ordered as a standard or fail-safe controller, and consists of an expandable base that houses the CPU, Power Supply, Communications, and I/O.
All S7-1200s include a built-in Profinet port, as well as a single front facing slot which can accommodate One Signal Expansion Board.
Those Signal Expansion Boards come in four single analog point versions: 1 AI 0-10VDC, 1 AI RTD, 1 AI TC, or 1 AQ 0-10VDC.
Depending on the S7-1200 selected, the right side of the controller can be expanded with up to Eight Signal Modules, which include both I/O and Technology options.
I/O Signal Modules include 8 and 16 Point DC Input, Output, and Relay Modules, as well as 4 and 8 Point Analog, RTD, and Thermocouple Modules.
Various Combination Input and Output Modules are also available, as well as 2 and 4 Point Analog Output Modules.
The left side of the S7-1200 can be expanded to include up to Three Specialty Modules, consisting of Switch, Power, and Communication options.
Communication Module options include RS232, RS422/485, AS-i, Profibus DP, GPRS, LTE, and OpenCan.
Currently there are 17 variants of the S7-1200 which come in five different I/O sizes.
While all models have DC Inputs, most DC powered 1200’s can be ordered with either DC or Relay Outputs, while all AC powered models come with Relay Outputs:
CPU 1211C
CPU 1212C
CPU 1214C
CPU 1215C
50KB
75KB
100KB
125KB
DC
6 DI, 4 DQ, 2 AI
8 DI, 6 DQ, 2 AI
14 DI, 10 DQ, 2 AI
14 DI, 10 DQ, 2 AI, 2 AQ
DC
6 DI, 4 RL, 2 AI
8 DI, 6 RL, 2 AI
14 DI, 10 RL, 2 AI
14 DI, 10 RL, 2 AI, 2 AQ
AC
6 DI, 4 RL, 2 AI
8 DI, 6 RL, 2 AI
14 DI, 10 RL, 2 AI
14 DI, 10 RL, 2 AI, 2 AQ
*Note: For simplicity, the CPU1217C is not show in the above table.
The S7-1200 is programmed with Siemens’s Simatic Step 7 (TIA Portal) software.
The “Basic” version of Simatic Step 7 supports just the S7-1200 line, much like Studio 5000 Mini supports the CompactLogix but not the ControlLogix.
But unlike Studio 5000 Mini, Step 7 Basic also includes support for the LAD, FBD, and SCL languages, however it doesn’t include support for Failsafe versions of the S7-1200 without upgrading to the FailSafe version of the software.
Those users who also have the S7-300, 400, and 1500 controllers will want to purchase Step 7 Professional to gain support for those models, as well as support for the STL language and S7-Graph.
And much like Rockwell’s Studio 5000 now includes the “View Designer” development software for PanelView 5000 HMIs, both Step 7 Basic and Professional include WinCC Basic software inside of TIA portal to enable programming of Siemens’s Basic HMI Panels.
If you’d like to learn more about the Siemens S7-1200, I’d recommend grabbing a copy of their PDF brochure HERE, and visiting the product’s homepage at: siemens.com/s7-1200
And if you’ve used the S7-1200, I’d love to hear your thoughts about it as well as any important information you think I might of left out.
You can do so by clicking on the “post a comment or question” link below.
Editors Note: In order to cover a wider selection of products here on The Automation Blog, I recently reached out to several industrial automation vendors about covering their newest products.
While I’ve yet to hear back from many of those companies, Siemens responded almost immediately, and over the coming weeks I’ll be covering the information they shared as well as the product samples they’ve sent in.
That said, if there are other products you’d like to see covered here on the blog, please let your vendors know they can contact me directly HERE.
Until next time, Peace ✌️
If you enjoy this episode please give it a Like, and consider Sharing as this is the best way for us to find new guests to come on the show.
Eliminate commercials and gain access to my weekly full length hands-on, news, and Q&A sessions by becoming a member at The Automation Blog or on YouTube. You'll also find all of my affordable PLC, HMI, and SCADA courses at TheAutomationSchool.com.
I'm a lifelong Technology Enthusiast who began programing in the early 80's on the Apple II and VIC-20 personal computers. After earning a degree in Electronics, I worked as a Certified Controls and Information Automation Specialist for 25 years before leaving to become a full time Industrial Automation instructor and mentor at TheAutomationSchool, as well as publishing industry interviews, news, and product how-to’s at TheAutomationBlog.com. If you're interested in my training, mentoring, or becoming a sponsor, please schedule a teams meeting with me via https://calendly.com/shawntierney/business-meeting
As I was prepping to film additional lessons for my CompactLogix course yesterday, I ran into a completely new Studio 5000 Logix Designer “Fatal Error” that I hadn’t run into before.
After I duplicated the issue on two different PCs, each running two different Windows 10 VMs, I was convinced something was wrong with the software and not just my installation.
NOTE: For those who are having this issue and need to fix it asap, use this LINK to scroll down to the details about the fix I implemented.
In fact, over the last few months I’ve been spending a lot of time in RSLogix 5000 v20, and Studio 5000 Logix Designer v30, creating and refining the code and scenarios for my Compact Basics course’s new programming lessons.
Not having run into any issues with either v20 or v30, you can probably imagine that I was a little frustrated during rehearsals for my “Studio 5000 First Look” lesson, when every time I tried to create a v21 project Studio 5000 crashed.
And since I was able to easily duplicate the issue on multiple VMs, I figured it had to be a known bug, so I pointed my browser at Rockwell’s Knowledgebase to search for a solution.
Sadly, while I did find two tech notes covering this error, it appears that just being a customer who purchased this expensive software wasn’t enough to unlock the solutions to this bug:
Note: While our blog does not have permission to share the contents of locked tech notes, the good news is your local Rockwell distributor or rep should be able to share them with you 🙂
Off Topic:After submitting many and varied messages to Rockwell about how tech notes like these (you know, the ones with information you need to actually get the product you purchased to work) should not be locked, I’ve come to the conclusion either they don’t read customer feedback, or they just don’t agree with these sentiments.
Since I had purchased a support contract last summer to gain access to the latest software updates (albeit with delayed access to Studio 5000 updates as I don’t own the most expensive editions,) I logged with my account in order to unlock them (links below:)
To summarize what I learned, it appears that installing newer versions of Studio 5000 can break older versions, something software vendors have been struggling with since the introduction of the personal computer.
That said, after reading through the fixes detailed in those tech notes, I found that none of them were too appealing.
But by reading between the lines, and with a little experimentation, I found that I could resolve the issue with a simple change I’ll detail below:
How to stop Studio 5000 Logix Designer from causing a Fatal Application Error:
Step 1: Navigate to the “Launcher” directory in your “Studio 5000” installation directory.
On my VM it was: C:\Program Files (x86)\Rockwell Software\Studio 5000\Launcher
Step 2: Next, right click on the Launcher application, then select Properties, and then click on the compatibility tab:
Step 3: Here, set the Launcher to run “as an Administrator,” and then click on Ok:
Step 4: Now when you run Studio 5000, you’ll see a “User Account Control” confirmation popup as shown below. I’ll leave it up to you if you’d like to make changes to your UAC settings to disable this message:
Select YES to continue and run Studio 5000
Step 5: After you’re done with Studio 5000, you’ll probably notice this window asking if the issue has been resolved (I clicked on “Yes” which seemed to stop this message reappearing:)
Now while I’ve just run into this issue myself, I’m sure some of you ran into it months or even years ago.
That being the case, it’s likely one of you have come up with a newer or better fix, and if you have we’d all love to hear it!
You can share it with us along with any thoughts, questions, or opinions you have by clicking on the “post a comment or question” link below.
Until next time, Peace ✌️
If you enjoy this episode please give it a Like, and consider Sharing as this is the best way for us to find new guests to come on the show.
Eliminate commercials and gain access to my weekly full length hands-on, news, and Q&A sessions by becoming a member at The Automation Blog or on YouTube. You'll also find all of my affordable PLC, HMI, and SCADA courses at TheAutomationSchool.com.
I'm a lifelong Technology Enthusiast who began programing in the early 80's on the Apple II and VIC-20 personal computers. After earning a degree in Electronics, I worked as a Certified Controls and Information Automation Specialist for 25 years before leaving to become a full time Industrial Automation instructor and mentor at TheAutomationSchool, as well as publishing industry interviews, news, and product how-to’s at TheAutomationBlog.com. If you're interested in my training, mentoring, or becoming a sponsor, please schedule a teams meeting with me via https://calendly.com/shawntierney/business-meeting
Support Shawn’s work on TheAutomationBlog.com/join!
You can now support Shawn’s work on The Automation Blog and Show with a small monthly pledge! To become a Patron, visit us at https:// TheAutomationBlog.com/join.
Eliminate commercials and gain access to my weekly full length hands-on, news, and Q&A sessions by becoming a member at The Automation Blog or on YouTube. You'll also find all of my affordable PLC, HMI, and SCADA courses at TheAutomationSchool.com.
I'm a lifelong Technology Enthusiast who began programing in the early 80's on the Apple II and VIC-20 personal computers. After earning a degree in Electronics, I worked as a Certified Controls and Information Automation Specialist for 25 years before leaving to become a full time Industrial Automation instructor and mentor at TheAutomationSchool, as well as publishing industry interviews, news, and product how-to’s at TheAutomationBlog.com. If you're interested in my training, mentoring, or becoming a sponsor, please schedule a teams meeting with me via https://calendly.com/shawntierney/business-meeting


 Well, late last year as I began the process of scripting lessons for my new CompactLogix video course,


 Once such exception was the “MicroLogix 1000 Starter Kit” which included a MicroLogix PLC, programming software, a programming cable, and CD of hands-on labs bundled together for just $125.


You must be logged in to post a comment.