In today’s article I’ll walk you through how to convert a MicroLogix 1000 program to a Micro800.
To accomplish this, we’ll use RSLogix 500 and the Connected Components Workbench “MicroLogix Library Converter” tool.
NOTE: If you don’t see the tool installed below, your can find it by following this article here.
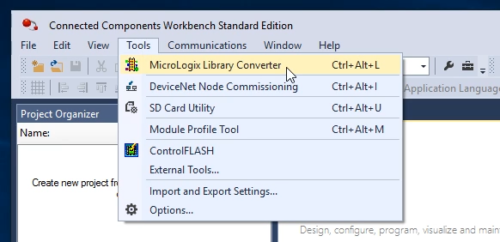
Step 1) Start by opening CCW, and selecting the “MicroLogix Library Converter” under “Tools”:
Step 2) At the top of the tool we see instructions for exporting our MicroLogix program using RSLogix 500.
NOTE: Neither RSLogix Micro Starter or Lite will work because neither support saving Programs to Library files.
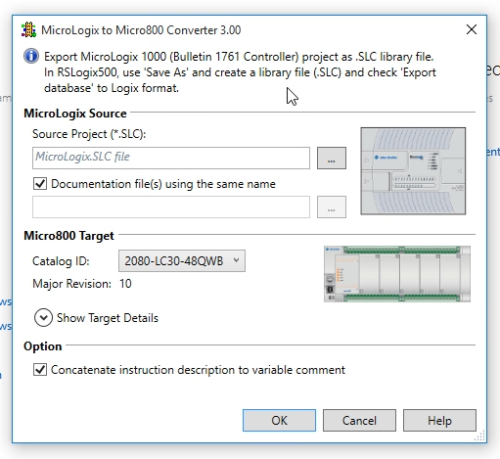 Note: Since the tool was released a few years back, it has always shown a picture of a MicroLogix 1200 (instead of a MicroLogix 1000,) however the tool clearly states it only works with MicroLogix 1000 files. That said, it’s fairly easy to change a project’s controller as shown in this article.
Update 05/03/18: With the release of CCW 11 the converter has been expanded to now work with all MicroLogix programs.
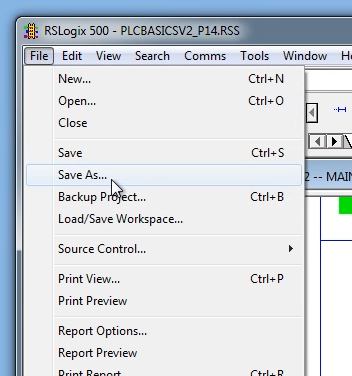
Step 3) Open RSLogix 500, and then open the MicroLogix program you’d like to convert and choose “Save As”:
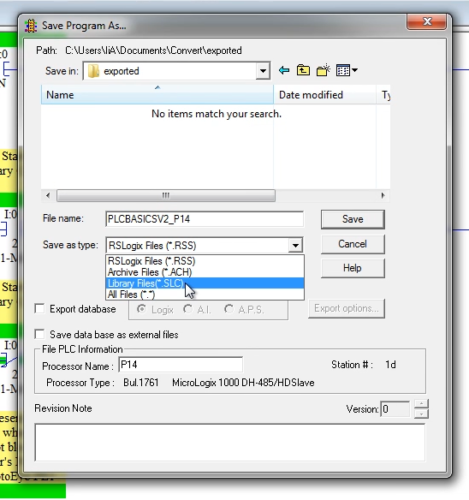
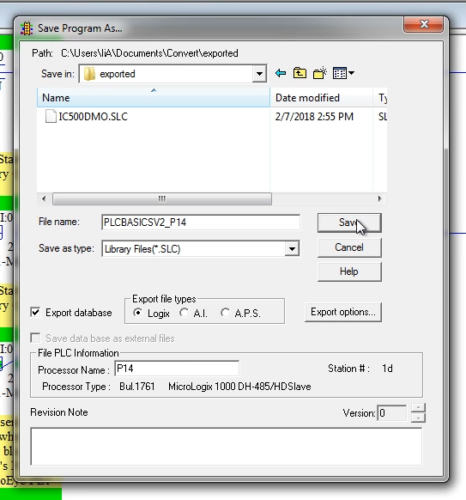
 Step 4) In the “Save As” dialog box, first choose a “save as type” of “Library Files (*.SLC)”
 Step 5) Next, select the “Export Database” box, and insure the “Export file types” is set to “Logix”:
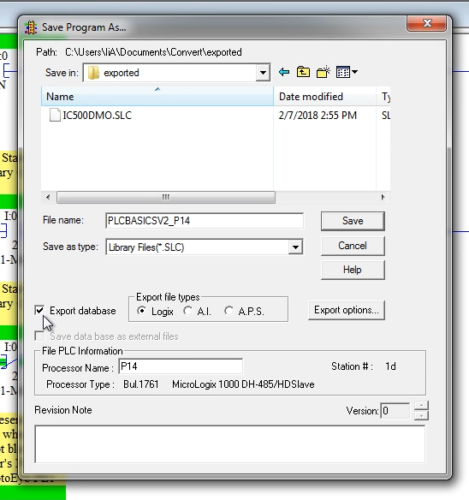 Step 6) Now choose a location to save the file to, and click on “Save”:
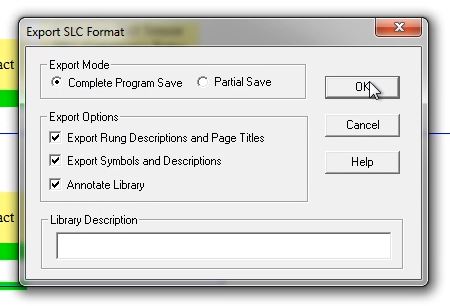
 Step 7) When the “Export SLC Format” window pops up, insure that “Complete Program Save” is selected, along with all the “Export Options,” and then click on “OK.”
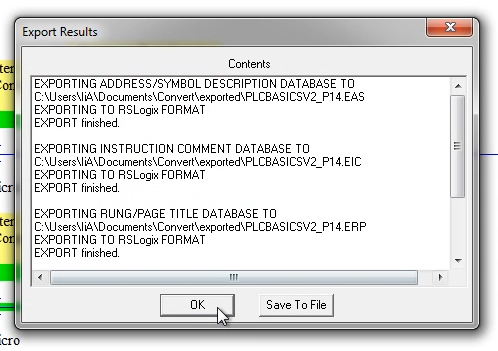
 Step 8) After a few moments you should now see the “Export Results” window, at which point you can click on “OK”:
Step 9) Back in the MicroLogix Library Converter, select your source project as the .SLC file you just exported from RSLogix 500:
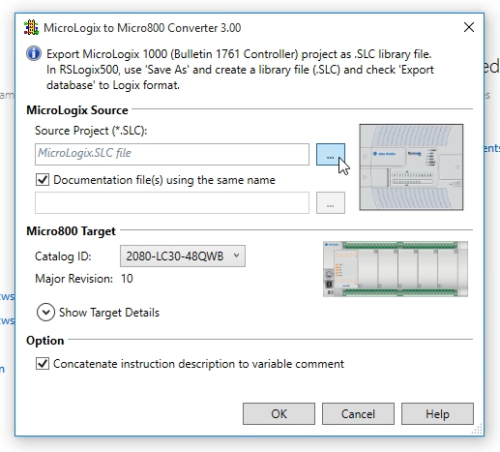
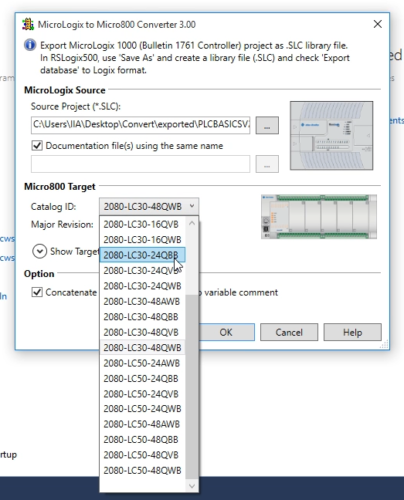
Step 10) Then select the Micro800 controller you’d like to import the project too:
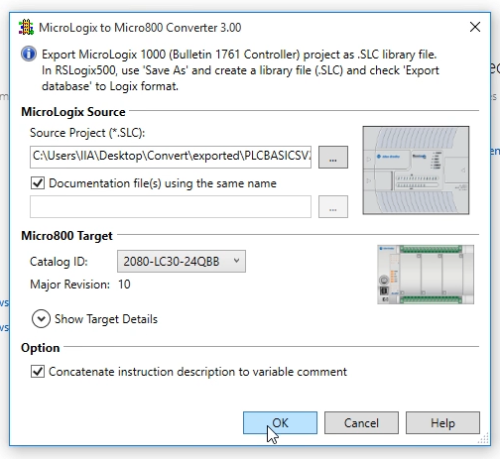
Step 11) Finally, select the “OK” button to begin the import:
Step 12) Small projects can take a minute or two to import, while larger projects can take much longer:
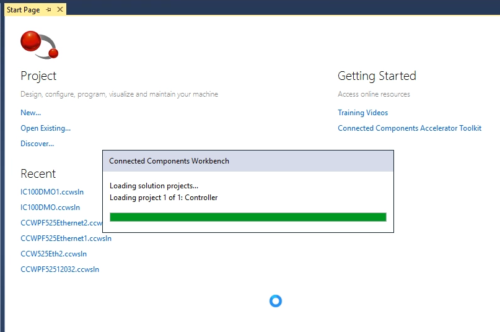 Step 13) When done, you’ll see your new Micro800 project open in CCW. At this point you’ll need to review all the import errors, as well as fully test the program to insure everything imported correctly:
 For more about converting MicroLogix projects to the Micro800 using CCW, check out our previous articles on the subject:
- Rockwell releases MicroLogix 1000 to Micro800 Migration Guide
- Rockwell releases Micrologix 1000 to Micro800 Conversion Tool
- How to get Rockwell’s Micrologix to Micro800 Conversion Tool
- MicroLogix 1000 and 1500 “end of life” date announced
- Micrologix 1000 Migration Options discussed
If you’d like to watch a video of the above, check out Episode 26 of The Automation Minute Season 4 below:
I hope the above article detailing how to import MicroLogix 1000 programs into Micro800s using the CCW conversion tool was helpful.
If you have any comments, questions, or suggestions, please feel free to leave them with us by clicking on the “post a comment or question” link below.
Until next time, Peace ✌️
If you enjoyed this content, please give it a Like, and consider Sharing a link to it as that is the best way for us to grow our audience, which in turn allows us to produce more content 🙂
Shawn M Tierney
Technology Enthusiast & Content Creator
Support our work and gain access to hundreds members only articles and videos by becoming a member at The Automation Blog or on YouTube. You’ll also find all of my affordable PLC, HMI, and SCADA courses at TheAutomationSchool.com.
- FactoryTalk Design Workbench First Look, CCW Comparison - December 19, 2025
- Drew Allen of Grace Technologies on Automation, Safety, and More (P256) - December 17, 2025
- Robotics in Warehouse Automation with Erik Nieves of Plus One Robotics (P255) - December 10, 2025

Discover more from The Automation Blog
Subscribe to get the latest posts sent to your email.


