


Recently I received a sample of the brand new MQTT Gateway from the good folks over at Real Time Automation.
To demonstrate it in this week’s episode of The Automation Show, I needed to setup my own test system, and today I’ll share what I learned in the hopes that it will help you get your test system up and running quickly.
 https://mqtt.org[/caption%5D
If you’re new to MQTT, the below image from MQTT.org does a great job explaining how a system works. In short, MQTT clients publish and/or subscribe to topics from an MQTT Broker, which is sometimes referred to as an MQTT Server:
 Image from https://mqtt.org[/caption%5D
While the RTA MQTT Gateway I’ll be testing works with AWS and Azure as well as generic MQTT gateways, I chose the latter as the first two systems require a credit card to setup an account, as well as an open internet connection (which may not be available in all test applications.)
After doing some research, it seemed like the most popular free, self-hosted MQTT Broker was Mosquitto, and that is the broker I’ll use in this example.
 https://mqtt.org[/caption%5D
Step 1) To download the Mosquitto MQTT Broker, head over to Mosquitto.org and click on the downloads page:

Step 2) Next, select the appropriate download for your system. In this example I chose the Windows x64 edition since that will be the operating system I’ll be using:

Step 3) To test your broker you’ll also need a client. In this example I’ll use the free MQTT Explorer from mqtt-explorer.com as the client:

Step 4) To download MQTT Explorer from the product’s homepage, scroll down and select the version that matches your operating system:

Step 5) Now that we have our Broker and Client software downloaded, the next step is to install both. Here I start with the installation of Mosquitto:

Note: As my test system isn’t dedicated to MQTT, I won’t be installing Mosquitto as a service as I don’t need it to run every time I boot my VM:

Step 6) And as I’ll be running Mosquitto from the command line, I’m going to replace the standard installation directory of “C:\Program Files\Mosquitto” with the shorter installation directory of “C:\mos”:

Step 7) One the installation wizard is done, just click on finish:


Step 8) Next we’ll install our client, MQTT Explorer, which is a simple as double-clicking on the installation file we downloaded earlier:
 Step 9) With our Broker and Client installed, our next step is to start up our Broker by opening a Command Prompt with Administrative Privileges, and accepting Yes if prompted:


Step 10) With our command prompt open, we first need to change to the directly we installed Mosquitto into by typing in the command “CD\mos”:

Note: To see what executables are available in this directory, you can type in the command, “Dir *.exe”:

Step 11) To start the Mosquitto broker I’ll enter in the commend “mosquitto – v” where the -v enables “verbose” mode:

Step 12) As Mosquitto starts, it lists information about its current configuration, and this is where we find that by default it will only allow “local” connections:

Note: To see the effect of this setting, open a new command line and type in the command, “netstat -a”:
The result shows that the default MQTT port of 1883 is only listening on the local machine at 127.0.0.1:

While the default setting may work for testing local software clients, the sample RTA sent me is a physical MQTT Client which will need to connect to my Mosquitto Broker over Ethernet.
Step 13) To enable Mosquitto to connect to clients on my network, I’ll edit the Mosquitto.conf file found in the installation folder with Windows Notepad:

Step 14) The first change I’ll make is to enable anonymous logins so I can avoid having to create user names and password for my test:

Step 15) The second change I’ll make is to add a listener for port 1883 on IP Address 0.0.0.0:

Step 16) With the config file edited and saved, I close down my original mosquitto command prompt and open a new one, again with administrative privileges.

Once open, I run mosquitto again, but this time using the configuration file I edited by using the command, “mosquitto -v -c mosquitto.conf”:
 Step 17) This time, because Mosquitto is trying to access the network, I get a Security Alert, and after checking both boxes I click on “allow access”:


Now in the command prompt I see confirmation that Mosquitto is running using my configuration file:
 I can also confirm it is listening to the network by opening a new command prompt and issuing the “Netstat -a” command again:


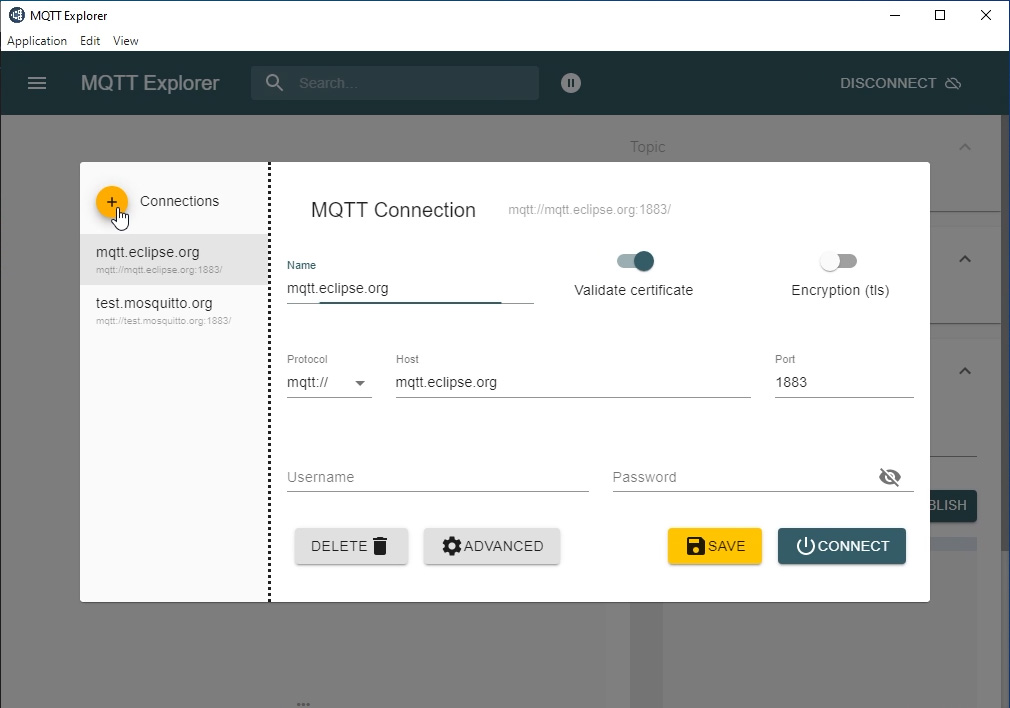
Step 18) With my Mosquitto Broker now running, next I turn to setting up my client by running MQTT Explorer, and then click on the New Connection button:

Step 19) I’ll start by giving it a name of “PC” and turning off “Certificates” so I won’t have to provide one:


Step 20) Then I’ll add the IP Address of my VM to the Host field, and leave the Port at the default 1883, then I’ll save my new connection and click on “connect”:

 Step 21) Below you can see what MQTT Explorer looks like when connected to the Mosquitto Broker I installed earlier:


For more on this topic, tune in tomorrow to see my video on setting up Mosquitto and MQTT Explorer, as well as RTA’s new MQTT Gateway.
Until next time, Peace ✌️
Shawn M Tierney
Technology Enthusiast & Content Creator
Have a question? Join my community of automation professionals and take part in the discussion! You'll also find my PLC, HMI, and SCADA courses at TheAutomationSchool.com.
If you found this content helpful, consider buying me a coffee here.
I'm a lifelong Technology Enthusiast who started programing in the early 80's on the new Apple II and VIC-20 personal computers. After earning a degree in Electronics, I worked as a Certified Automation Specialist for 25 years before leaving to focus on teaching at The Automation School, as well as publishing industry news and product how-to’s at The Automation Blog.
Latest posts by Shawn Tierney (see all)
- The State of Industrial DevOps with Copia Automation (P211) - July 24, 2024
- Automation News Roundup for July 19, 2024 (R052) - July 19, 2024
- Automation Morning Show for July 19, 2024 (N233) - July 19, 2024

")
")
")