RSLogix 500 and RSLogix Micro version 11 is out, and in today’s article we’ll take a look at what’s new in this release:
UPDATE:
My MicroLogix “Five Star” training course is now available digitally or on DVD! Learn to setup and program the Allen-Bradley MicroLogix family of Programmable Logic Controllers! Learn the details at PLC Basics Second Edition
Windows 10 Support:
I know many of us who’ve received a new PC in the last couple of years have been anxious to see CCW officially support Windows 10, and now that support comes with CCW v10.
WMicroLogix 1400 Series B Enhanced Password support:
The MicroLogix 1400 Series B “security” processor has a Password and Subroutine Protection Password, and unlike the standard 1400 the “security” version does not store the password in the project, but instead is set and authenticated wit the controller itself.
Since there’s not a whole lot going on with v11, I thought I’d add what’s new with v10 as well:
RSLogix 500 support for updated RoHS compliant SLC processors:
These include: 1747-L531 F, 1747-L532 F, 1747-L533 F, 1747-L541 D, 1747-L543 D, 1747-L551 D, 1747-L552 D, 1747-L553 D
Other RSLogix 500 and Micro v10 updates include:
RSLogix Project Migrator is included which when used with Integrated Architecture Builder helps migrate from SLC 500 or MicroLogix controllers to Logix controllers.
Web-based online help to support multi-platforms and browser as well as searching and bookmarks.
Support for the Windows 2012 OS
Update the current version of RSLinx Classic v. 3.74.00, CPR 9 SR 7.4, FactoryTalk Activation v. 3.62.11, CPR 9 SR 6.1, and Services Platform v. 2.74.00, CPR 9 SR 7.4.
For more information
For all the details about RSLogix 500 and Micro versions 10 and 11, search Rockwell’s “versions” webpage for RSlogix, and then select the PDF icon under version 10 or 11 to open this version’s release notes: (below you can see the link for Studio v27 release notes:)
So, what do you think of version 10 and 11?
Happy to now have Windows 10 support? Or disappointed that there really isn’t much development going into 500 and Micro?
If you have an opinion, feel free to share it with us using the “post a comment or question” link at the bottom of this page.
Until next time, Peace ✌️
If you enjoy this episode please give it a Like, and consider Sharing as this is the best way for us to find new guests to come on the show.
Eliminate commercials and gain access to my weekly full length hands-on, news, and Q&A sessions by becoming a member at The Automation Blog or on YouTube. You'll also find all of my affordable PLC, HMI, and SCADA courses at TheAutomationSchool.com.
I'm a lifelong Technology Enthusiast who began programing in the early 80's on the Apple II and VIC-20 personal computers. After earning a degree in Electronics, I worked as a Certified Controls and Information Automation Specialist for 25 years before leaving to become a full time Industrial Automation instructor and mentor at TheAutomationSchool, as well as publishing industry interviews, news, and product how-to’s at TheAutomationBlog.com. If you're interested in my training, mentoring, or becoming a sponsor, please schedule a teams meeting with me via https://calendly.com/shawntierney/business-meeting
Connected Components Workbench (CCW) version 10 is out and in today’s article we’ll take a look at what’s new and different in this release:
UPDATE:
My Micro800 training course is now available to order! Learn to setup and program the Allen-Bradley Micro800 family of Nano Programmable Controllers! Learn the details at Nano Basics Course
Micro800 Features
New Micro800 Instructions:
Added to help with MicroLogix program migrations (requires controller firmware 10.)
FFL (FIFO load)
FFU (FIFO unload)
PID (proportional-integral-derivative)
MODULE_INFO. Used as a diagnostic for Optional Module feature and can be used in place of PLUGIN_INFO
Micro800 Indirect bit addressing
Also added to help with MicroLogix migration, indirect bit addressing of integers has been enhanced to allow indexing using a SINT (signed 8-bit integer) or Defined Word to allow specifying of the bit number for addressing (requires controller firmware 10.)
Reset Micro800 to Factory Defaults
In Connected Components Workbench you can now set your Micro820, Micro830, or Micro850 controller back to factory defaults which removes data, programs, and passwords. Requires controller firmware 10.
Micro800 User-Defined Functions (UDF)
User-defined Functions (UDFs) can have multiple input parameters and a single output parameter (similar to MicroLogix subroutines.)
UDFs also use less memory than a user-defined function blocks (UDFBs.) but do require controller firmware version 10.
Since UDFs can access global variables but cannot not local variables, local variables must be passed into UDFs using input parameters.
Variable Auto Renaming
Now when you rename global or local variables, controller programs, and other objects, references in the entire project are instantly updated.
Deletion of Unused Variables
The Micro800’s cross reference browser now has the ability to deleted unused variables.
PanelView 800 Features
NOTE: Connected Components Workbench v10 is only compatible with PanelView 800 revision 4 firmware, and cannot be used with PanelView 800 revision 3 and earlier firmware.
PanelView 800 Upload
Projects can uploaded from the terminal over EtherNet/IP.
PanelView 800 Authentication
Terminal can now be secured using a password.
Tag Copy and Paste Support
The PanelView 800 Tag Editor now supports coping and pasting to and from MS Excel. Note that this does not reset existing references.
Other CCW v10 Features
Windows 10 Support
I know many of us who’ve received a new PC in the last couple of years have been anxious to see CCW officially support Windows 10, and now that support comes with CCW v10.
GuardShield 450L-B Safety Light Curtain Support
You can now use CCW to review hardware and USB settings, as well as monitor function and diagnostics about the units operation.
Upgrade or downgrade project firmware
In a Connected Components Workbench project you can now upgrade or downgrade a project’s firmware for Micro820, 830, 850, PanelView 800, PanelView Component, Guardmaster safety relay, and the GuardShield™ 450L safety light curtain.
Learn about other releases:
Check out our coverage of other releases of CCW below:
For all the details about CCW version 10, search Rockwell’s “versions” webpage for Connected Components Workbench, and then select the PDF icon under version 10 to open this versions release notes: (below you can see the link for v10 and 11 release notes:)
So, what do you think of version 10?
Like the fact that more and more features from RSLogix have been added? Or just happy to now have Windows 10 support?
If you have an opinion, feel free to share it with us using the “post a comment or question” link at the bottom of this page.
Until next time, Peace ✌️
If you enjoy this episode please give it a Like, and consider Sharing as this is the best way for us to find new guests to come on the show.
Eliminate commercials and gain access to my weekly full length hands-on, news, and Q&A sessions by becoming a member at The Automation Blog or on YouTube. You'll also find all of my affordable PLC, HMI, and SCADA courses at TheAutomationSchool.com.
I'm a lifelong Technology Enthusiast who began programing in the early 80's on the Apple II and VIC-20 personal computers. After earning a degree in Electronics, I worked as a Certified Controls and Information Automation Specialist for 25 years before leaving to become a full time Industrial Automation instructor and mentor at TheAutomationSchool, as well as publishing industry interviews, news, and product how-to’s at TheAutomationBlog.com. If you're interested in my training, mentoring, or becoming a sponsor, please schedule a teams meeting with me via https://calendly.com/shawntierney/business-meeting
You know, it’s been a long time since I’ve been so happy to see a week come to an end, but I have to say I’m definitely happy last week is over!
It all started ten days ago when issues at my webhost inadvertently took down all of my automation websites.
I’m sure you can imagine that as a full time online trainer and blogger that’s as close to a worse case scenario!
And while the server did come back up early Saturday morning, behind the scenes several of the sites were not fully working, hampering my publication schedule for last week (you may have noticed I didn’t publish any new lessons, videos, or blogs last week…)
So after talking to my current web host’s tech support, I came to the conclusion that this would probably be the best time to search for a new web host.
After doing some research (and shelling out a small fortune,) I began the week long process of migrating all my automation sites over to the new server.
Now that alone would have been enough to throw my week into chaos, but on top of that Windows 10 on my main PC decided to stop booting.
After hours of trying to run startup troubleshooters and attempting to revert to restore points, I was no better off and had to resort to reinstalling everything.
Unfortunately that only bought me 48 hours, after which Windows 10 again found it could no longer completely boot up, nor could it repair itself or revert to restore points.
So I assumed my SSD was going bad and I rushed in a replace and re-installed all the software I use a second time.
You would think those two issues would be enough for one week, however at the same time Google had decided to start marking every website that doesn’t use HTTPS as being “not secure” in Google Chrome.
UGH.
So with everything else going on I also spent much of the week (and half of the weekend) securing SSL certificates switching all of my automation websites over to HTTPS.
And while that work still continues on this week (any blog post or page that displays a picture using HTTP instead of HTTPS will get that page marked as insecure) the lion share of it has been completed.
Even with all of the problems that occurred last week, I’m happy to say the week wasn’t a total bust.
The newly moved websites all seem to be working well, and there is the relief that the almost every page on every site no longer shows “Not Secure” in Chrome.
And, knock on wood, the new SDD and Windows 10 seem to be getting along just fine.
I was even able to record three new lessons for my upcoming Micro800 course, Nano Basics, which I plan to launch later this week in an early access sale.
That said, I do pray that all of last week’s issues are truly behind me and I can get on with creating new affordable automation courses for all those out their who need to learn how to use these products on a budget.
Have a great week 😉
Until next time, Peace ✌️
If you enjoy this episode please give it a Like, and consider Sharing as this is the best way for us to find new guests to come on the show.
Eliminate commercials and gain access to my weekly full length hands-on, news, and Q&A sessions by becoming a member at The Automation Blog or on YouTube. You'll also find all of my affordable PLC, HMI, and SCADA courses at TheAutomationSchool.com.
I'm a lifelong Technology Enthusiast who began programing in the early 80's on the Apple II and VIC-20 personal computers. After earning a degree in Electronics, I worked as a Certified Controls and Information Automation Specialist for 25 years before leaving to become a full time Industrial Automation instructor and mentor at TheAutomationSchool, as well as publishing industry interviews, news, and product how-to’s at TheAutomationBlog.com. If you're interested in my training, mentoring, or becoming a sponsor, please schedule a teams meeting with me via https://calendly.com/shawntierney/business-meeting
Just a quick announcement than after Friday’s outage we have decided to move to a new webhost.
During the move which will take place over the next 24 to 48 hours the site may not load completely, or worse case you may need to clear your browser’s cache to load the site.
UPDATE: Our move is complete and most of the site is now up and running at our new hosting company.
We are still working on re-enabling the commenting system, so in the meantime feel free to post any comments or questions over at TheAutomationBlog.com/join.
Until next time, Peace ✌️
If you enjoy this episode please give it a Like, and consider Sharing as this is the best way for us to find new guests to come on the show.
Eliminate commercials and gain access to my weekly full length hands-on, news, and Q&A sessions by becoming a member at The Automation Blog or on YouTube. You'll also find all of my affordable PLC, HMI, and SCADA courses at TheAutomationSchool.com.
I'm a lifelong Technology Enthusiast who began programing in the early 80's on the Apple II and VIC-20 personal computers. After earning a degree in Electronics, I worked as a Certified Controls and Information Automation Specialist for 25 years before leaving to become a full time Industrial Automation instructor and mentor at TheAutomationSchool, as well as publishing industry interviews, news, and product how-to’s at TheAutomationBlog.com. If you're interested in my training, mentoring, or becoming a sponsor, please schedule a teams meeting with me via https://calendly.com/shawntierney/business-meeting
And that’s probably because it’s not the easiest question to answer.
Option 1: The Application Archive
Preferably, everyone who has to maintain a PanelView Plus would have a backup copy of the application file, better known as the application archive or .apa file.
If you have this file, most of the time you’ll be able to extract it back to a project using the Application Manager.
However, there are a few things that could stop this from working successfully.
First, if your View Studio ME software is older than the version used to create the APA, well then you’re not going to be able to open and edit that project.
In that case your best option is to get software at least as new as version used to create the .APA.
The second problem you may run into is when you try to open an old pre-6.1 project created on a Windows 32bit OS on a new Windows 64 bit OS.
Unfortunately, the old project database can’t be exported on a 64 bit OS, so if you’re in this situation you’ll want to read my previous articles on this subject:
Simply put, not all runtime files can be restored into a project.
Old runtimes files that are pre-version 5.0 just don’t have all the project components saved in the .MER file.
In other words, while there is a way to recover tags and graphics, as I discuss in this article there is no way to recover Alarms, Parameters, Macros, and the RSLinx Enterprise communications setting from these legacy .MER files.
However, if you are fortunate enough to have a .MER file created with version 5.0 or greater, there is a chance you can restore the application from the .MER file using the Application Manager.
The determining factor is whether the person who created the .MER file (1) allowed conversion, and (2) passworded the file.
If the .MER was created without allowing conversion, there’s no way to recover the project from the .MER file.
If the .MER file requires a password, you must have that password in order to recover the project from the .MER file.
NOTE: Some versions would default to passworded but with a blank password, so if you run into a .MER password issue you may want to try using a blank password.
On top of those considerations, you’ll also have the same 32 bit / 64 bit OS issue with .MER files that I mentioned above with .APA files.
So if your .MER file was created in a pre-6.1 version of View Studio on a 32 bit Windows OS, you’ll need to first use the Application Manager to recover the .MER file on a 32 bit Windows OS before following the 32 bit to 64 bit conversion process I discuss in the articles I link to above.
Questions?
I hope you’ve found today’s article helpful.
If you have any questions about what I’ve written please don’t hesitate to post them using the “post a comment or question” link below.
Until next time, Peace ✌️
If you enjoy this episode please give it a Like, and consider Sharing as this is the best way for us to find new guests to come on the show.
Eliminate commercials and gain access to my weekly full length hands-on, news, and Q&A sessions by becoming a member at The Automation Blog or on YouTube. You'll also find all of my affordable PLC, HMI, and SCADA courses at TheAutomationSchool.com.
I'm a lifelong Technology Enthusiast who began programing in the early 80's on the Apple II and VIC-20 personal computers. After earning a degree in Electronics, I worked as a Certified Controls and Information Automation Specialist for 25 years before leaving to become a full time Industrial Automation instructor and mentor at TheAutomationSchool, as well as publishing industry interviews, news, and product how-to’s at TheAutomationBlog.com. If you're interested in my training, mentoring, or becoming a sponsor, please schedule a teams meeting with me via https://calendly.com/shawntierney/business-meeting
It seems everyone today has a smart phone, and many of those phones (mine included) are Apple iOS based iPhones.
So when Peter Henderson of Control Plus reached out to me to tell me about his CLTagViewer app for the iPhone and iPad, I immediately asked him to come on my podcast and demo his app to my audience.
The result is this week’s episode of The Automation Podcast which you can watch below:
Until next time, Peace ✌️
If you enjoy this episode please give it a Like, and consider Sharing as this is the best way for us to find new guests to come on the show.
Eliminate commercials and gain access to my weekly full length hands-on, news, and Q&A sessions by becoming a member at The Automation Blog or on YouTube. You'll also find all of my affordable PLC, HMI, and SCADA courses at TheAutomationSchool.com.
I'm a lifelong Technology Enthusiast who began programing in the early 80's on the Apple II and VIC-20 personal computers. After earning a degree in Electronics, I worked as a Certified Controls and Information Automation Specialist for 25 years before leaving to become a full time Industrial Automation instructor and mentor at TheAutomationSchool, as well as publishing industry interviews, news, and product how-to’s at TheAutomationBlog.com. If you're interested in my training, mentoring, or becoming a sponsor, please schedule a teams meeting with me via https://calendly.com/shawntierney/business-meeting
This is a common question I get here on the blog and from my students at TheAutomationSchool.com.
And while Rockwell has released many different platforms since 1970, there’s one current gen and one last gen I usually recommend.
Budget Minded
First let’s assume you’re on a budget and need to get started as quickly as possible.
In that case I would recommend the MicroLogix 1100 which you can typically find under $200 here.
The advantages of the ML1100 start with the fact that it can be programed with Rockwell’s free RSLogix Micro Starter Lite software.
Next, it includes an Ethernet port so there’s no need to purchase a usb to serial converter.
And finally, it programs almost identically to the SLC-500. And while the SLC-500 is also fairly inexpensive on the used market, it doesn’t have a free or low cost software option like the MicroLogix family does.
The downside is that while the Ladder Logic in the ML1100 is very similar to Ladder Logic in the ControlLogix and CompactLogix, there are also a lot of differences between the two.
If you decide to go this route, you may also want to check out my affordable PLC Basics course which is focused on the MicroLogix at PLC Basics Second Edition
Current Gen Controllers
If you have a little more disposable income and want to focus on A-B’s current generation of ControlLogix and CompactLogix controllers, I recommend the CompactLogix L1 5370 controller which you can often find under $1,000 here.
To program it you’ll need a copy of Studio 5000 (aka RSLogix 5000) which starts around $870.
Note: It may be worth your time to ask your local Rockwell distributor for a combination “starter pack” price on the above two items. These starter pack “bundles” usually include a substantial discount.
The advantage of learning on the CompactLogix over the ControlLogix is one of cost.
While the price of the CompactLogix L16 and Studio 5000 Mini software combined is typically under $2,000, the programming software for the ControlLogix alone starts at $3,600.
If you decide to go with either the CompactLogix or ControlLogix, you may also want to check out my CompactLogix and ControlLogix courses at The Automation School
Questions?
If you have any questions about the above two recommendations, don’t hesitate to ask by clicking the “post a comment or question” link below.
Until next time, Peace ✌️
If you enjoy this episode please give it a Like, and consider Sharing as this is the best way for us to find new guests to come on the show.
Eliminate commercials and gain access to my weekly full length hands-on, news, and Q&A sessions by becoming a member at The Automation Blog or on YouTube. You'll also find all of my affordable PLC, HMI, and SCADA courses at TheAutomationSchool.com.
I'm a lifelong Technology Enthusiast who began programing in the early 80's on the Apple II and VIC-20 personal computers. After earning a degree in Electronics, I worked as a Certified Controls and Information Automation Specialist for 25 years before leaving to become a full time Industrial Automation instructor and mentor at TheAutomationSchool, as well as publishing industry interviews, news, and product how-to’s at TheAutomationBlog.com. If you're interested in my training, mentoring, or becoming a sponsor, please schedule a teams meeting with me via https://calendly.com/shawntierney/business-meeting
Learn how you can view and monitor your ControlLogix Tags on your iPhone and iPad in Episode 1 of The Automation Demo (originally episode 37 of The Automation Podcast.)
Watch the Demo:
Listen to the Demo:
You can now support the show on TheAutomationBlog.com/join!
You can now support The Automation Blog, Podcast, and Show with a small monthly pledge! To become a Patron, visit us at https:// TheAutomationBlog.com/join.
Until next time, Peace ✌️
If you enjoy this episode please give it a Like, and consider Sharing as this is the best way for us to find new guests to come on the show.
Eliminate commercials and gain access to my weekly full length hands-on, news, and Q&A sessions by becoming a member at The Automation Blog or on YouTube. You'll also find all of my affordable PLC, HMI, and SCADA courses at TheAutomationSchool.com.
I'm a lifelong Technology Enthusiast who began programing in the early 80's on the Apple II and VIC-20 personal computers. After earning a degree in Electronics, I worked as a Certified Controls and Information Automation Specialist for 25 years before leaving to become a full time Industrial Automation instructor and mentor at TheAutomationSchool, as well as publishing industry interviews, news, and product how-to’s at TheAutomationBlog.com. If you're interested in my training, mentoring, or becoming a sponsor, please schedule a teams meeting with me via https://calendly.com/shawntierney/business-meeting
So you need to know how to setup RSLinx Classic to communicate via USB over Data Highway Plus to an Allen-Bradley PLC-5 or SLC-5/04?
Well you’re in luck as in today’s article I’ll walk you step to setup through how to setup RSLinx as well as the ANC-120e USB to DH+ cable from Automation Networks:
Prerequisites: Before you begin, note that while all PLC-5s have DH+, the only SLC-500 which does is the SLC-5/04.
You’ll also need the correct version of RSLogix programming software, and for this procedure the ANC-120e from Automation Networks.
Step 1) Start by plugging your ANC-120e into the USB port on your PC, but not your DH+ network:
Step 2) Next, open Windows Device Manager and find it in the list under “Other Devices”:
Step 3) Right click on it and select “Update Driver Software”
Step 4) Then select “Browse my computer”
Step 5) Next select “Let me pick”
Step 6) Now click on “Network Adapters” and “Next”
Step 7) Then select the manufacturer of “Microsoft Corporation” and the network adapter of “Remote NDIS Compatible device” and then click on Next:
Step 8) If you get a warning click on “Yes.” Finish by clicking on “Close”:
Step 9) Now your ANC-120E should show up correctly in device manager under Network adapters:
Step 10) The next step is to assign the ANC-120e an IP address of 192.168.137.1 with a subnet mask of 255.255.255.0:
Note: If you are not familiar with setting a network adapters IP address in control panel I demonstrate how in this video:
Step 11) The next step is to access your ANC-120e to set its Data Highway Plus address. To do this, open a web browser and type in 192.168.137.2, and then login with the default user name of “admin” and default password of “password”:
Step 12) At the bottom of the main configuration page you will see the settings for the ANC-120e’s Data Highway Plus address aka node number (it is in decimal, not octal like RSLinx displays) and baud rate.
Step 13) When done click on “Apply,” and once the page reloads you can close your browser and plug the ANC-120e into your DH+ network:
Step 14) Now launch RSLinx Classic, and then under the Communications menu select Configure Drivers:
Step 15) From the “Available Driver Types” drop down list select “Remote Devices via Linx Gateway”:
Step 16) Accept the default name by clicking on OK:
Step 17) And now enter in the default address of 192.168.137.2 for the ANC-120e, and then click on OK and Close:
Step 18) Now in the RSWho, expand the “TCP-1” driver, then the Device at “192.168.137.2,” and then the “Backplane”:
Step 19) Below the backplane expand the “DHRIO” module, then “CH A,” and after a few moments you should see all the devices on your Data Highway Plus network:
NOTE: You can watch a video demonstration of this procedure below:
I hope today’s article about how to setup RSLinx Classic to communicate over USB to Data Highway Plus and PLC-5s or SLC-5/04s was helpful.
If you have any questions, comments, or suggestions, please feel free to post the by clicking on the “Click here to post a comment or question” link below.
Until next time, Peace ✌️
If you enjoy this episode please give it a Like, and consider Sharing as this is the best way for us to find new guests to come on the show.
Eliminate commercials and gain access to my weekly full length hands-on, news, and Q&A sessions by becoming a member at The Automation Blog or on YouTube. You'll also find all of my affordable PLC, HMI, and SCADA courses at TheAutomationSchool.com.
I'm a lifelong Technology Enthusiast who began programing in the early 80's on the Apple II and VIC-20 personal computers. After earning a degree in Electronics, I worked as a Certified Controls and Information Automation Specialist for 25 years before leaving to become a full time Industrial Automation instructor and mentor at TheAutomationSchool, as well as publishing industry interviews, news, and product how-to’s at TheAutomationBlog.com. If you're interested in my training, mentoring, or becoming a sponsor, please schedule a teams meeting with me via https://calendly.com/shawntierney/business-meeting
So you need to know how to setup RSLinx Classic to communicate over serial with an Allen-Bradley PLC-5 so you can download or go online with RSLogix?
Well you’re in luck as in today’s article I’ll walk you step to setup through how to setup RSLinx as well as how to download from RSLogix:
Prerequisites: Before you begin, first insure your PLC-5 has serial port (not all do.)
Specifically, the new platform PLC-5/11, 5/20, 5/30, 5/40, 5/60, and 5/80 all have a 25 Pin D-Shell Serial Port.
Note that the 9 Pin D Shell on the PLC-5/10, 5/12, 5/15, and 5/25 is not a serial port but instead internally tied to the DH+ terminal block.
Next, insure you have the RSLogix 5 programming software and either the 1784-CP10 or equivalent Null Modem Cable. If your PC does not have a built-in serial port you’ll also need a USB to Serial converter.
Step 1) Start by checking Windows Device Manager to determine your PC’s serial port COM number:
Step 2) Next launch RSLinx Classic, and then under the Communications menu select Configure Drivers:
Step 3) Then from the Available Driver Types drop down list select RS-232 DF1 Devices and then click on Add New:
Step 4) Accept the default name by clicking on OK:
Step 5) Now select the COM port you looked up earlier, and check to be sure you have plugged your PLC-5 into it:
Step 6) Now click on Auto-Configure. If your cables and PLC-5 are in working condition, and your PLC-5 is set to the default DF1 protocol, then you should see the message, “Auto Configuration Successful”:
Step 7) Now click on OK to close the RS-232 DF1 Devices driver window:
Step 8) And click on Close to close the Configure Drivers window:
Step 9) Next, double click on your new driver in the RSWho window and after a few seconds you should see your PLC-5 appear under the AB_DF1-1 driver as shown below:
Step 10 Now open RSLogix 5, and then open your program file:
Step 11) Next, from the Comms menu select System Comms:
Step 12) In the popup Communications window expand your AB_DF1-1 driver and select your PLC-5:
Step 13) Then to download your program select the Download button:
Step 14) Confirm you would like to download the current program you have open into the PLC-5 you are connected to:
NOTE: The PLC-5 can only hold one program at a time, and downloading to it will erase the PLC-5’s currently loaded program. If you do not have a copy of the current program loaded in your PLC-5 you should first perform an upload and save.
Step 15) Next, if the communications settings in your offline PLC-5 file are different than the settings you are currently using you will receive a notice asking if you want to save the current setting to your offline project file:
Step 16) At this point if the Controller in your offline project is different than the one you are downloading to you will be asked to confirm the change and resize data tables:
Step 17) And if the PLC-5 was in Run Mode you’ll be asked if you would like to put it into program mode so the download can take place.
Step 18) At this point if you made any changes to your program you may be prompted to save it:
Step 19) At the end of the download process, if you still have communications with the PLC-5 controller you will be given the option of putting the controller back into the run mode (if it was in the run mode prior to downloading,) and you’ll also receive a pop-up giving you the option of going online:
NOTE: You can watch a video demonstration of this procedure below:
I hope today’s article about how to setup RSLinx Classic to communicate to a PLC-5, and then how to download to the PLC-5 using RSLogix 5 was helpful.
If you have any questions, comments, or suggestions, please feel free to post the by clicking on the “Click here to post a comment or question” link below.
Until next time, Peace ✌️
If you enjoy this episode please give it a Like, and consider Sharing as this is the best way for us to find new guests to come on the show.
Eliminate commercials and gain access to my weekly full length hands-on, news, and Q&A sessions by becoming a member at The Automation Blog or on YouTube. You'll also find all of my affordable PLC, HMI, and SCADA courses at TheAutomationSchool.com.
I'm a lifelong Technology Enthusiast who began programing in the early 80's on the Apple II and VIC-20 personal computers. After earning a degree in Electronics, I worked as a Certified Controls and Information Automation Specialist for 25 years before leaving to become a full time Industrial Automation instructor and mentor at TheAutomationSchool, as well as publishing industry interviews, news, and product how-to’s at TheAutomationBlog.com. If you're interested in my training, mentoring, or becoming a sponsor, please schedule a teams meeting with me via https://calendly.com/shawntierney/business-meeting
So you need to know how to setup RSLinx Classic to communicate over DH-485 to an Allen-Bradley SLC-500 so you can download or go online with RSLogix?
Well you’re in luck as in today’s article I’ll walk you step to setup through how to setup RSLinx as well as how to download from RSLogix:
Prerequisites:
Before you begin, first insure your SLC-500 has a DH-485 port (not all do.) Specifically, the SLC-5/03, SLC-5/02, 5/01, fixed SLC-500 all have an RJ-45 DH-485 Port.
Next, insure you have the RSLogix 500 programming software, for which there is no free version. However, you may be able to get a Temporary Activation.
Finally, assuming you have a modern laptop (no serial port) and modern OS (Windows 7 or later) you’s need a USB to DH-485 cable (a USB to Serial converter will not work) like the Allen-Bradley 1747-UIC, or this much less expensive third party model which I found works with direct connections to the SLC, but not through AIC modules.
Step 1) Start by checking Windows Device Manager to determine what COM port number your PC assigned to your USB to DH-485 cable:
Step 2) Next launch RSLinx Classic, and then under the Communications menu select Configure Drivers:
Step 3) Then from the Available Driver Types drop down list select RS-232 DF1 Devices:
Step 4) Now click on “Add New”:
Step 5) Accept the default name by clicking on OK:
Step 6) Now select 1770-KF3/1747-KE from the Device drop down list:
Step 7) Now select the COM port you looked up earlier, and check to be sure you have plugged your SLC-500 into it:
Step 8) Next set Error Checking to CRC:
Step 9) Now click on OK to close the RS-232 DF1 Devices driver window:
Step 10) And click on Close to close the Configure Drivers window:
Step 11) Next, double click on your new driver in the RSWho window and after a few seconds you should see your SLC-500 appear under the driver as shown below:
Step 12) Now open RSLogix 500, and then open your program file:
Step 13) Next, from the Comms menu select System Comms:
Step 14) In the popup Communications window expand your AB_DF1-1, DH-485 driver and select your SLC-500:
Step 15) Then to download your program select the Download button:
Step 16) At this point if you made any changes to your program you may be prompted to save it.
Step 17) Now confirm you would like to download the current program you have open into the SLC-500 you are connected to:
NOTE: The SLC-500 PLC can only hold one program at a time, and downloading to it will erase the SLC-500’s currently loaded program. If you do not have a copy of the current program loaded in your SLC-500 you should first perform an upload and save.
Step 18) At this point if the Controller is different you will be asked to confirm the change and resize data tables:
Step 19) And if the SLC-500 was in Run Mode you’ll be asked if you would like to put it into program mode so the download can take place.
Step 20) Next, if the communications settings in your SLC-500 are different than the settings in the program you are downloading, you will receive a notice as to whether or not you want to change the SLC-500 to match the program you are downloading:
NOTE: If you change the settings of the port you are downloading to, after the download you likely will lose communications with the SLC-500. To regain comms you’ll have to edit your driver in RSLinx to match the new settings.
Step 21) At the end of the download process, if you still have communications with the SLC-500 controller you will be given the option of putting the controller back into the run mode if it was in the run mode prior to downloading. And you’ll also receive the option of going online:
NOTE: You can watch a video demonstration of this procedure below:
For instructions on how to use the 1747-UIC, Generic UIC, and Bridge Products like the 1770-KF3 see the below video:
Eliminate commercials and gain access to my weekly full length hands-on, news, and Q&A sessions by becoming a member at The Automation Blog or on YouTube. You'll also find all of my affordable PLC, HMI, and SCADA courses at TheAutomationSchool.com.
I'm a lifelong Technology Enthusiast who began programing in the early 80's on the Apple II and VIC-20 personal computers. After earning a degree in Electronics, I worked as a Certified Controls and Information Automation Specialist for 25 years before leaving to become a full time Industrial Automation instructor and mentor at TheAutomationSchool, as well as publishing industry interviews, news, and product how-to’s at TheAutomationBlog.com. If you're interested in my training, mentoring, or becoming a sponsor, please schedule a teams meeting with me via https://calendly.com/shawntierney/business-meeting
So you need to know how to setup RSLinx Classic to communicate over serial with an Allen-Bradley SLC-500 so you can download or go online with RSLogix?
Well you’re in luck as in today’s article I’ll walk you through step to setup how to setup RSLinx communications as well as how to download from RSLogix:
Prerequisites: Before you begin, first insure your SLC-500 has serial port (not all do.) Specifically, the SLC-5/03, SLC-5/04, and SLC-5/05 all have a 9 Pin D-Shell Serial Port.
Next, insure you have the RSLogix 500 programming software and either the 1747-CP3 or equivalent Null Modem Cable. If your PC does not have a built-in serial port you’ll also need a USB to Serial converter.
Step 1) Start by checking Windows Device Manager to determine your PC’s serial port COM number:
Step 2) Next launch RSLinx Classic, and then under the Communications menu select Configure Drivers:
Step 3) Then from the Available Driver Types drop down list select RS-232 DF1 Devices and then click on Add New:
Step 4) Accept the default name by clicking on OK:
Step 5) Now select the COM port you looked up earlier, and check to be sure you have plugged your SLC-500 into it:
Step 6) Now click on Auto-Configure. If your cables and SLC-500 are in working condition, and your SLC-500 is set to the default DF1 protocol, then you should see the message, “Auto Configuration Successful”:
Step 7) Now click on OK to close the RS-232 DF1 Devices driver window:
Step 8) And click on Close to close the Configure Drivers window:
Step 9) Next, double click on your new driver in the RSWho window as shown below:
Step 10) After a few seconds you should see your SLC-500 appear under the AB_DF1-1 driver:
Step 11) Now open RSLogix 500, and then open your program file:
Step 12) Next, from the Comms menu select System Comms:
Step 13) In the popup Communications window expand your AB_DF1-1 driver and select your SLC-500:
Step 14) Then to download your program select the Download button:
Step 15) At this point if you made any changes to your program you may be prompted to save it:
Step 16) Confirm you would like to download the current program you have open into the SLC-500 you are connected to:
NOTE: The SLC-500 PLC can only hold one program at a time, and downloading to it will erase the SLC-500’s currently loaded program. If you do not have a copy of the current program loaded in your SLC-500 you should first perform an upload and save.
Step 17) At this point if the Controller is different you will be asked to confirm the change and resize data tables:
Step 18) And if the SLC-500 was in Run Mode you’ll be asked if you would like to put it into program mode so the download can take place.
Step 19) Next, if the communications settings in your SLC-500 are different than the settings in the program you are downloading, you will receive a notice as to whether or not you want to change the SLC-500 to match the program you are downloading:
NOTE: If you change the settings of the port you are downloading to, after the download you likely will lose communications with the SLC-500. To regain comms you’ll have to edit your driver in RSLinx to match the new settings.
Step 20) At the end of the download process, if you still have communications with the SLC-500 controller you will be given the option of putting the controller back into the run mode if it was in the run mode prior to downloading, and also receive the option of going online:
NOTE: You can watch a video demonstration of this procedure below:
I hope today’s article about how to setup RSLinx Classic to communicate to a SLC-500, and then how to download to the SLC-500 using RSLogix was helpful.
If you have any questions, comments, or suggestions, please feel free to post the by clicking on the “Click here to post a comment or question” link below.
Until next time, Peace ✌️
If you enjoy this episode please give it a Like, and consider Sharing as this is the best way for us to find new guests to come on the show.
Eliminate commercials and gain access to my weekly full length hands-on, news, and Q&A sessions by becoming a member at The Automation Blog or on YouTube. You'll also find all of my affordable PLC, HMI, and SCADA courses at TheAutomationSchool.com.
I'm a lifelong Technology Enthusiast who began programing in the early 80's on the Apple II and VIC-20 personal computers. After earning a degree in Electronics, I worked as a Certified Controls and Information Automation Specialist for 25 years before leaving to become a full time Industrial Automation instructor and mentor at TheAutomationSchool, as well as publishing industry interviews, news, and product how-to’s at TheAutomationBlog.com. If you're interested in my training, mentoring, or becoming a sponsor, please schedule a teams meeting with me via https://calendly.com/shawntierney/business-meeting
So you need to know how to setup RSLinx Classic to communicate to an Allen-Bradley MicroLogix 1400 using Ethernet in order to download or go online with RSLogix?
Well you’re in luck as in today’s article I’ll walk you step by step through how to setup RSLinx communications, as well as how to download or go online from RSLogix:
Notes and prerequisites: Before you begin, insure you have the correct software. You’ll also want to make sure you know the Ethernet address of your MicroLogix 1400 which you can find by following this article. If you’d prefer to setup communications using serial RS232 DF1, see this article. And for images of the MicroLogix 1400 communications ports see this article.
Step 1) Ethernet Connectivity
The first step is to insure you have Ethernet connectivity between your PC and MicroLogix PLC. The easiest way to obtain this is to connect them both to the same physical network and logical network.
While many with Ethernet experience will know how to accomplish the above, for those less experienced I’ll add some additional info below:
You’ll likely find the easiest way to connect your PC to the same physical network as the MicroLogix PLC is to use an Ethernet switch. You can also connect directly using an Ethernet crossover cable. Note: If you have a newer PC your Ethernet port will likely support “Auto MDI-X,” in which case you can also use a standard Ethernet patch cable.
If you’re not going through a router, next insure your PC is on the same logical network (aka subnet) as the MicroLogix. This can be done by comparing the IP address and Subnet Mask of your PC to your MicroLogix to insure the are on the same subnet as explained here.
If you are going through a router, the default gateway will need to be set correctly in both the PLC and on your PC. If you’re not sure about this, please consult your IT personnel.
Finally, to check that your PC is able to communicate to your PLC, open a Windows Command Prompt and “Ping” your PLC’s Ethernet address (i.e. Ping 192.168.1.10) as explained in this article.
Step 2) Next launch RSLinx Classic, and then under the Communications menu select Configure Drivers:
Step 3) Now from the Available Driver Types drop down list select the Ethernet/IP driver, a driver which will attempt to automatically find your MicroLogix on Ethernet:
Step 4) Next click on Add New
Step 5) And accept the default name by clicking on OK:
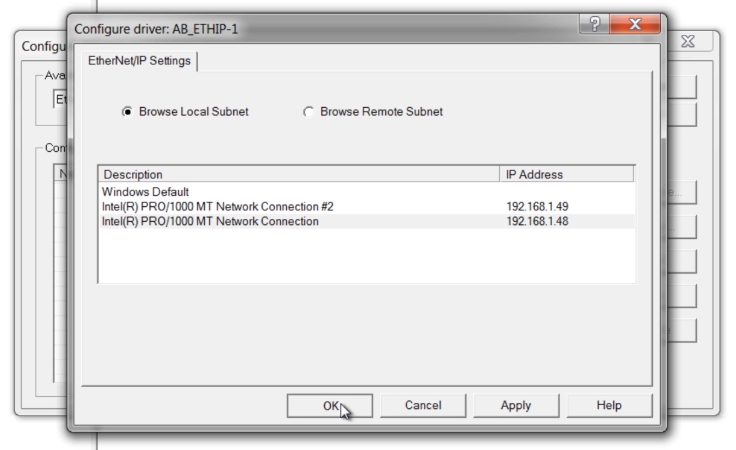
Step 6) Now select the Ethernet Port on your PC to which your MicroLogix is connected. Beware not to choose WiFi or Bluetooth network cards if your MicroLogix is not connected to them:
Step 7) Now click on OK to close the driver window:
Step 8) And click on Close to close the Configure Drivers window:
Step 9) Next, double click on your new driver in the RSWho window as shown below:
Step 10) If after ten seconds of browsing RSLinx does not find your MicroLogix, you may wish to try adding it manually by adding the Ethernet Devices driver under Communications, Configure Drivers, Available Driver Types:
Step 11) As before, select the driver, click Add New, and then click Ok:
Step 12) Here, add the Ethernet address of your MicroLogix (see notes above Step 1 for that procedure) and then click on OK:
Step 13) Now double click on your new driver in the RSWho window and after a few seconds you should see your Micro appear:
Step 14) Now open either RSLogix Micro or RSLogix 500, and then open your program file:
Step 15) Next, from the Comms menu select System Comms:
Step 16) Then in the popup Communications window expand your Ethernet driver and select your Micro:
Step 17) To download your program just select the Download button. Alternatively, you could go online by selecting the Online button:
Step 18) At this point if you made any changes to your program you may be prompted to save it:
Step 19) Next, confirm you would like to download your program into the Micro you selected:
NOTE: The MicroLogix PLC can only hold one program at a time, and downloading to it will erase the Micro’s current program. If you do not have a copy of the current program loaded in your Micro, you should first perform an upload and save.
Step 20) At this point if the Current Project Settings don’t match the System settings you’ll be asked if you would like to update the project settings:
Step 21) And then if the Controller is different you will be asked to confirm the change and resize data tables:
Step 22) If the Micro was in Run Mode you’ll be asked if you would like to put it into Program Mode so the download can take place.
Step 23) Next, if the communications settings in your Micro are different than the settings in the program you are downloading, you will receive a notice as to whether or not you want to change the Micro to match the program you are downloading:
NOTE: If you change the settings of the port you are downloading to, after the download you likely will lose communications with the Micro. To regain comms you’ll have to edit your driver in RSLinx to match the new settings.
Also, if you changed the Ethernet settings you may receive a notice that they will not take place until after a powercycle:
Step 24) At the end of the download process, if you still have communications with the MicroLogix controller you will be given the option of putting the controller back into the Run Mode if it was in the Run Mode prior to downloading, and you’ll also receive the option of going online:
NOTE: You can watch a video demonstration of this procedure below:
I hope today’s article about how to setup RSLinx Classic to communicate to a MicroLogix 1400, and then how to download to the MicroLogix using RSLogix was helpful.
If you have any questions, comments, or suggestions, please feel free to post the by clicking on the “Click here to post a comment or question” link below.
Until next time, Peace ✌️
If you enjoy this episode please give it a Like, and consider Sharing as this is the best way for us to find new guests to come on the show.
Eliminate commercials and gain access to my weekly full length hands-on, news, and Q&A sessions by becoming a member at The Automation Blog or on YouTube. You'll also find all of my affordable PLC, HMI, and SCADA courses at TheAutomationSchool.com.
I'm a lifelong Technology Enthusiast who began programing in the early 80's on the Apple II and VIC-20 personal computers. After earning a degree in Electronics, I worked as a Certified Controls and Information Automation Specialist for 25 years before leaving to become a full time Industrial Automation instructor and mentor at TheAutomationSchool, as well as publishing industry interviews, news, and product how-to’s at TheAutomationBlog.com. If you're interested in my training, mentoring, or becoming a sponsor, please schedule a teams meeting with me via https://calendly.com/shawntierney/business-meeting
Watch as I setup a PLC-5, SLC-5/05 & 5/04, MicroLogix 1100 & 1400, ControlLogix L61, L55 & L1, a FlexLogix and CompactLogix L1 in Episode 36 of The Automation Podcast.
Watch the Podcast:
Listen to the Podcast:
Until next time, Peace ✌️
If you enjoy this episode please give it a Like, and consider Sharing as this is the best way for us to find new guests to come on the show.
Eliminate commercials and gain access to my weekly full length hands-on, news, and Q&A sessions by becoming a member at The Automation Blog or on YouTube. You'll also find all of my affordable PLC, HMI, and SCADA courses at TheAutomationSchool.com.
I'm a lifelong Technology Enthusiast who began programing in the early 80's on the Apple II and VIC-20 personal computers. After earning a degree in Electronics, I worked as a Certified Controls and Information Automation Specialist for 25 years before leaving to become a full time Industrial Automation instructor and mentor at TheAutomationSchool, as well as publishing industry interviews, news, and product how-to’s at TheAutomationBlog.com. If you're interested in my training, mentoring, or becoming a sponsor, please schedule a teams meeting with me via https://calendly.com/shawntierney/business-meeting
Version 30 of Studio 5000 Logix Designer programming software has been release for Rockwell’s 5370 and 5380 CompactLogix controllers, as well as their 5570 and 5580 ControlLogix controllers.
So, what’s new in Studio 5000 version 30?
UPDATE:
My new ControlLogix training course is now available Digitally and on DVD! Become proficient with ControlLogix in just eight hours! Learn the details at PAC Basics Course
Windows 10 Support:
I know many of us who’ve received a new PC in the last couple of years have been very anxious to see Logix Designer officially support Windows 10, and now that support comes with v30.
License-Based Source Protection:
This feature allows users to add source protection as well as controls permissions like View and Edit to AOIs and Routines.
The licenses are created and administered using the CodeMeter web portal.
Component Change Detection:
For those using the 5×70 series of controllers, this feature allows them to quickly identify when “tracked” Routines, AOIs, and Constants have been changed.
No word currently on when or if support for the 5×80 series will be released.
New Routine and AOI Export Permissions:
For those users who have secured their projects using FTSecurity as the primary security authority, they can now perform AOI and Routine exports in an encrypted format.
String Literal Binary Comparison:
Now users can compare string tags and string literals using standard binary comparison instructions like EQU, NEQ, GRT, and LES.
5480 UPS Support:
The 5480 controller replaces the standard “energy storage module” of other recent controllers with a UPS, and version 30 now adds support for this UPS including a new UPS fault bit and status icon.
New Object – HardwareStatus:
Used with the new 5480 Controller, a GSV can now be used along with this new object to retrieve information about the 5480’s UPS, Fans, and Temps.
Enhanced – Structured Text:
Under the Structure Text tab of the Workstation Options, users can now enter information they would like to be auto-populated in the “comment header” of a Structured Text routine.
These fields include Company Name, Developer Name, Routine Name, Description, and Date.
For more information
For all the details about version 30, search Rockwell’s “versions” webpage for Studio 5000 Logix Designer, and then select the PDF icon under version 30.xx.xx to open this versions release notes: (below you can see the link for the v27 release notes:)
So, what do you think of version 30?
Unhappy about the limited number of new features, or the fact that the new 5×80 can’t use all of the included ones? Or are you happy to now have Windows 10 support?
If you have an opinion, feel free to share it with us using the “post a comment or question” link at the bottom of this page.
PS: Here at The Automation Blog we’ve yet to receive a copy of the update from the vendor to test, so we’ll be unable to bring you any “hands-on” impressions about the new features unless that changes, or a reader who has the new software submits a guest post.
Until next time, Peace ✌️
If you enjoy this episode please give it a Like, and consider Sharing as this is the best way for us to find new guests to come on the show.
Eliminate commercials and gain access to my weekly full length hands-on, news, and Q&A sessions by becoming a member at The Automation Blog or on YouTube. You'll also find all of my affordable PLC, HMI, and SCADA courses at TheAutomationSchool.com.
I'm a lifelong Technology Enthusiast who began programing in the early 80's on the Apple II and VIC-20 personal computers. After earning a degree in Electronics, I worked as a Certified Controls and Information Automation Specialist for 25 years before leaving to become a full time Industrial Automation instructor and mentor at TheAutomationSchool, as well as publishing industry interviews, news, and product how-to’s at TheAutomationBlog.com. If you're interested in my training, mentoring, or becoming a sponsor, please schedule a teams meeting with me via https://calendly.com/shawntierney/business-meeting
So you need to know how to setup RSLinx Classic to communicate to an Allen-Bradley MicroLogix 1100 using Ethernet in order to download or go online with RSLogix?
Well you’re in luck as in today’s article I’ll walk you step by step through how to setup RSLinx communications, as well as how to download or go online from RSLogix:
Notes and prerequisites: Before you begin, insure you have the correct software. You’ll also want to make sure you know the Ethernet address of your MicroLogix 1100 which you can find by following this article. If you’d prefer to setup communications using serial RS232 DF1, see this article. And for images of the MicroLogix 1100 communications ports see this article.
Step 1) Ethernet Connectivity
The first step is to insure you have Ethernet connectivity between your PC and MicroLogix PLC. The easiest way to obtain this is to connect them both to the same physical network and logical network.
While many with Ethernet experience will know how to accomplish the above, for those less experienced I’ll add some additional info below:
You’ll likely find the easiest way to connect your PC to the same physical network as the MicroLogix PLC is to use an Ethernet switch. You can also connect directly using an Ethernet crossover cable. Note: If you have a newer PC your Ethernet port will likely support “Auto MDI-X,” in which case you can also use a standard Ethernet patch cable.
If you’re not going through a router, next insure your PC is on the same logical network (aka subnet) as the MicroLogix. This can be done by comparing the IP address and Subnet Mask of your PC to your MicroLogix to insure the are on the same subnet as explained here.
If you are going through a router, the default gateway will need to be set correctly in both the PLC and on your PC. If you’re not sure about this, please consult your IT personnel.
Finally, to check that your PC is able to communicate to your PLC, open a Windows Command Prompt and “Ping” your PLC’s Ethernet address (i.e. Ping 192.168.1.10) as explained in this article.
Step 2) Next launch RSLinx Classic, and then under the Communications menu select Configure Drivers:
Step 3) Now from the Available Driver Types drop down list select the Ethernet/IP driver, a driver which will attempt to automatically find your MicroLogix on Ethernet:
Step 4) Next click on Add New
Step 5) And accept the default name by clicking on OK:
Step 6) Now select the Ethernet Port on your PC to which your MicroLogix is connected. Beware not to choose WiFi or Bluetooth network cards if your MicroLogix is not connected to them:
Step 7) Now click on OK to close the driver window:
Step 8) And click on Close to close the Configure Drivers window:
Step 9) Next, double click on your new driver in the RSWho window as shown below:
Step 10) If after ten seconds of browsing RSLinx does not find your MicroLogix, you may wish to try adding it manually by adding the Ethernet Devices driver under Communications, Configure Drivers, Available Driver Types:
Step 11) As before, select the driver, click Add New, and then click Ok:
Step 12) Here, add the Ethernet address of your MicroLogix (see notes above Step 1 for that procedure) and then click on OK:
Step 13) Now double click on your new driver in the RSWho window and after a few seconds you should see your Micro appear:
Step 14) Now open either RSLogix Micro or RSLogix 500, and then open your program file:
Step 15) Next, from the Comms menu select System Comms:
Step 16) Then in the popup Communications window expand your Ethernet driver and select your Micro:
Step 17) To download your program just select the Download button. Alternatively, you could go online by selecting the Online button:
Step 18) At this point if you made any changes to your program you may be prompted to save it:
Step 19) Next, confirm you would like to download your program into the Micro you selected:
NOTE: The MicroLogix PLC can only hold one program at a time, and downloading to it will erase the Micro’s current program. If you do not have a copy of the current program loaded in your Micro, you should first perform an upload and save.
Step 20) At this point if the Current Project Settings don’t match the System settings you’ll be asked if you would like to update the project settings:
Step 21) At this point if the Controller is different you will be asked to confirm the change and resize data tables:
Step 22) And if the Micro was in Run Mode you’ll be asked if you would like to put it into Program Mode so the download can take place.
Step 23) Next, if the communications settings in your Micro are different than the settings in the program you are downloading, you will receive a notice as to whether or not you want to change the Micro to match the program you are downloading:
NOTE: If you change the settings of the port you are downloading to, after the download you likely will lose communications with the Micro. To regain comms you’ll have to edit your driver in RSLinx to match the new settings.
Also, if you changed the Ethernet settings you may receive a notice that they will not take place until after a powercycle:
Step 24) At the end of the download process, if you still have communications with the MicroLogix controller you will be given the option of putting the controller back into the Run Mode if it was in the Run Mode prior to downloading, and you’ll also receive the option of going online:
NOTE: You can watch a video demonstration of this procedure below:
I hope today’s article about how to setup RSLinx Classic to communicate to a MicroLogix 1100 helpful.
If you have any questions, comments, or suggestions, please feel free to post the by clicking on the “Click here to post a comment or question” link below.
Until next time, Peace ✌️
If you enjoy this episode please give it a Like, and consider Sharing as this is the best way for us to find new guests to come on the show.
Eliminate commercials and gain access to my weekly full length hands-on, news, and Q&A sessions by becoming a member at The Automation Blog or on YouTube. You'll also find all of my affordable PLC, HMI, and SCADA courses at TheAutomationSchool.com.
I'm a lifelong Technology Enthusiast who began programing in the early 80's on the Apple II and VIC-20 personal computers. After earning a degree in Electronics, I worked as a Certified Controls and Information Automation Specialist for 25 years before leaving to become a full time Industrial Automation instructor and mentor at TheAutomationSchool, as well as publishing industry interviews, news, and product how-to’s at TheAutomationBlog.com. If you're interested in my training, mentoring, or becoming a sponsor, please schedule a teams meeting with me via https://calendly.com/shawntierney/business-meeting


 RSLogix 500 and RSLogix Micro version 11 is out, and in today’s article we’ll take a look at what’s new in this release:


 The advantages of the ML1100 start with the fact that it can be programed with Rockwell’s free


 Step 4) Now click on “Add New”:


You must be logged in to post a comment.