Eliminate commercials and gain access to my weekly full length hands-on, news, and Q&A sessions by becoming a member at The Automation Blog or on YouTube. You'll also find all of my affordable PLC, HMI, and SCADA courses at TheAutomationSchool.com.
I'm a lifelong Technology Enthusiast who began programing in the early 80's on the Apple II and VIC-20 personal computers. After earning a degree in Electronics, I worked as a Certified Controls and Information Automation Specialist for 25 years before leaving to become a full time Industrial Automation instructor and mentor at TheAutomationSchool, as well as publishing industry interviews, news, and product how-to’s at TheAutomationBlog.com. If you're interested in my training, mentoring, or becoming a sponsor, please schedule a teams meeting with me via https://calendly.com/shawntierney/business-meeting
Moving on from “Ancient Times” (covered in my previous article here) we enter what is known as the “Common Era” (CE.)
In the intervening years, humanity made slow progress for what most refer to as “The Dark Ages,” during which advances in literature, medicine, arts or anything else were slow or virtually non-existent.
Then around the beginning of the Seventeenth Century things started to change, and progress across the world began increasing as seen by the number of new inventions.
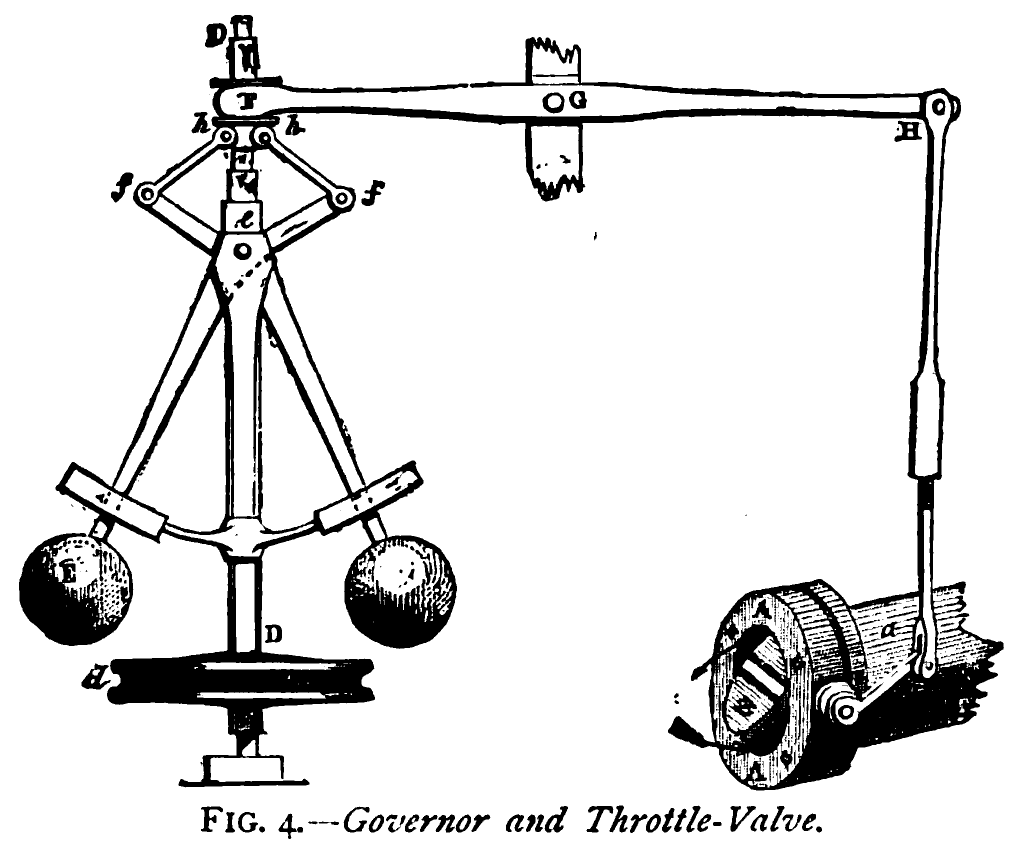
Image by R. Routledge
Temperature Control
We’ll start in England, where we find Cornelis Drebbel creating the first mercury thermostat around 1620. He designed it in order to control temperature on a chicken incubator.
As manufacturing industries had similar temperature control needs, in particular the textile mills in the 1830’s, Andrew Ure developed the bi-metallic thermostat which would bend as one of the metals expanded in response to an increase in temperature. This was then used to cutoff the supply of energy.
This simple invention would be considered by most to be the beginning of the automation of temperature control in industry. (Ref-1)
Governor Control
In 1788, James Watt adapted a centrifugal governor, that was invented by Christiaan Huygens to regulate distance and pressure between millstones and windmills, to control his steam engine where it regulates the admission of steam into the cylinders.
This development proved so important he is often regarded as the inventor. The widest use of the centrifugal governor was on steam engines during the nineteenth century often referred to as the “Steam Age”. (Ref-2)
From the late 1800’s to the early 1900’s most controls systems inventions were focused on the basic process activities of controlling temperatures, pressures, liquid levels and the speed of rotating machines.
However, with the growth in the size of naval guns, ships, and new weapons such as torpedoes, (invented in 1867,) there was an increased need for industrial controls on hydraulic, pneumatic and steam systems.
As ships got bigger, the steering controls became more complex due to the larger hydrodynamic forces on the rudder. And the larger gear ratios between the helm and the rudder resulted in slow response times to steering changes.
In 1873 Jean Joseph Léon Farcot published a book on what he called “servo-motcur” or “moteur asservi” which we now call servomechanisms and servomotors. (Ref-4).
Electrical Controls
Alessandro Volta created what was effectively the first DC (Direct Current) battery in 1800.
Over the next hundred years, there would be many inventors and inventions that would eventually give rise to AC (Alternating Current).
Genius Nikola Tesla and George Westinghouse were pioneers in the development of AC electricity, but there were also many others who contributed to the development of electricity including James Watt, Andre Ampere and George Ohm.
If you work around electricity very much, you will certainly recognize those names.
Relay-Logic was heavily implemented in the early 1900’s and the need for monitoring and controls in the manufacturing and utility industries created the “control room” areas where many automatic controls were needed to operate boilers, generators and other equipment.
All kinds of inventions were created such as the chart recorder, lights and on/off type controls were invented and implemented.
Pneumatic Controls
While we could start with air compressors going back as far as 3000 BCE, I’ll begin in the 1920’s with the development of pneumatic control equipment.
These would not be widely developed and implemented until around 1930, by Clesson Mason of the Foxboro Company.
Starting around 1932, these wideband pneumatic controllers were widely used in many control applications across industries, primarily to drive the diaphragm control valve. Industry standards such as 3-15 PSI were also implemented during this time.
Ref 3, Image by Markus Schweiss
Conclusion:
From the beginning of the Industrial Revolution, advancements in mechanical and pneumatic systems, as well as the invention of reliable electrical generation, made it possible for the manufacturing of large quantities of products automatically.
This in turn lead to the growth of large electrical utilities, bringing electrical distribution to a scale large enough for all of society to benefit from.
While we’ve only covered a fragment of the many inventions that shaped the control system world during the Industrial Revolution, it has been enough to show that it took many gifted minds working together to bring about the current technology we’re using a century later.
Written by Brandon Cooper Senior Controls Engineer and Freelance Writer
Have a question? Join our community of pros to take part in the discussion! You'll also find all of our automation courses at TheAutomationSchool.com.
Sponsor and Advertise: Get your product or service in front of our 75K followers while also supporting independent automation journalism by sponsoring or advertising with us! Learn more in our Media Guide here, or contact us using this form.
I'm a lifelong Technology Enthusiast who began programing in the early 80's on the Apple II and VIC-20 personal computers. After earning a degree in Electronics, I worked as a Certified Controls and Information Automation Specialist for 25 years before leaving to become a full time Industrial Automation instructor and mentor at TheAutomationSchool, as well as publishing industry interviews, news, and product how-to’s at TheAutomationBlog.com. If you're interested in my training, mentoring, or becoming a sponsor, please schedule a teams meeting with me via https://calendly.com/shawntierney/business-meeting
Support our site and get early access to our videos, free downloads and more!
You can now support our site with a small monthly pledge and in turn receive instant rewards! To find out more visit https:// TheAutomationBlog.com/join.
Vendors: Would you like your product featured on the Show, Podcast, and Blog? If you would, please contact me at: https://theautomationblog.com/contact
Until next time, Peace ✌️
If you enjoy this episode please give it a Like, and consider Sharing as this is the best way for us to find new guests to come on the show.
Eliminate commercials and gain access to my weekly full length hands-on, news, and Q&A sessions by becoming a member at The Automation Blog or on YouTube. You'll also find all of my affordable PLC, HMI, and SCADA courses at TheAutomationSchool.com.
I'm a lifelong Technology Enthusiast who began programing in the early 80's on the Apple II and VIC-20 personal computers. After earning a degree in Electronics, I worked as a Certified Controls and Information Automation Specialist for 25 years before leaving to become a full time Industrial Automation instructor and mentor at TheAutomationSchool, as well as publishing industry interviews, news, and product how-to’s at TheAutomationBlog.com. If you're interested in my training, mentoring, or becoming a sponsor, please schedule a teams meeting with me via https://calendly.com/shawntierney/business-meeting
We live in an astonishing period of history. As technology heightens to new levels with accelerating speed, it is vital for today’s engineer to remember the past, focus on the current and prepare for the future.
Like everything in life, we must keep balanced. In current and subsequent articles of this series, I am pursuing the evolution of controls and engineering across the ages with some thoughts about where we have been, where we are going and where it will lead us.
Ancient Engineering and Design in Present-Day India
One ancient example that deserves some attention is the Indus Valley or Harappan Culture. Earliest settlement evidence began around 7,000 BCE and the settlement reached its peak around 2600 BCE.
Engineers during that time did some very astute planning to create dozens of cities with a civilization of over five million people that contained personal and community water wells, fire-baked brick homes and buildings, water supply and bath systems, drainage and sewage systems, documented weights and measures for an elaborate trading system that included wheeled carts, boats and river ships, grain storage systems and irrigation systems.
These marvelous engineering features help us to see the importance of planning, designing, implementing and supporting infrastructure as this civilization thrived for thousands of years.
Changes in climate eventually dried up many of the crucial water sources for these people and the cities were almost completely deserted by 1300 BCE. (Ref-1)
Image by Saqib Qayyum
Unknown Answers to Engineering Marvels
Another example would be the great pyramids in Egypt in which it would take volumes to cover the mathematic codes encrypted into their features, astronomical and geographical attributes, as well as how they were built.
But for sake of space and time, lets look at just a tiny fragment of what was achieved there from Eric Dubay’s book “The Atlantean Conspiracy”:
Six million tons of stone, underground tunnels, chambers, corridors, 45/90 degree shafts, pi and phi ratios, golden rectangles and other mathematical inclusions, perfect cardinal alignments, right-angles, astrological considerations and flawless masonry.
How did ancient man the whole world over build these huge magnificent pyramids? They stacked stones so heavy, many of which cannot be lifted into place with the technology and machinery available today.
They quarried these stones from miles away and fitted them together so seamlessly that you can’t fit a blade between them.
Also, in Egypt tens of thousands of diorite bowls have been found with hieroglyphs engraved. Diorite is one of the hardest stones on the planet, harder than iron, yet intricate inscriptions have been made, not through the use of chisels or scraping but some unknown ancient technology.
Whatever it was, was capable of etching lines 1/150th of an inch wide, often in sets of parallel lines separated by a mere 1/30th of an inch.
The same kind of workmanship has been found in vases, urns, and other pottery unearthed at the Pyramid of Zoser. (Ref-2) Graham Hancock says: “There was no technology known to have been available to the Ancient Egyptians capable of achieving such results. Nor, for that matter, would any stone-carver today be able to match them, even if he were working with the best tungsten-carbide tools. The implication, therefore, is that an unknown or secret technology had been put to use in Ancient Egypt.” -Graham Hancock, “Fingerprints of the Gods” (Ref-3)
Image by Robster1983
The First Documented “Closed” Control Loop
While “open loop” water clocks were used the world over as far back as 4000 BCE, the first feedback control device (closed loop) I could find on record was Ctesibius’ water clock in Alexandria around 300 BCE.
This water clock kept time by regulating the water level in a vessel as well as the water flow from that vessel. (Ref-4)
Image by François Arago
Conclusion:
While this article could go on for volumes, I wished to create a background to a fragment of the magnificent minds and inventions that have paved the way for engineers in our current time period to build upon.
In the next article of the series, we will move to other mechanical control systems as we make our way into recent centuries.
Written by Brandon Cooper Senior Controls Engineer and Freelance Writer
Have a question? Join our community of pros to take part in the discussion! You'll also find all of our automation courses at TheAutomationSchool.com.
Sponsor and Advertise: Get your product or service in front of our 75K followers while also supporting independent automation journalism by sponsoring or advertising with us! Learn more in our Media Guide here, or contact us using this form.
I'm a lifelong Technology Enthusiast who began programing in the early 80's on the Apple II and VIC-20 personal computers. After earning a degree in Electronics, I worked as a Certified Controls and Information Automation Specialist for 25 years before leaving to become a full time Industrial Automation instructor and mentor at TheAutomationSchool, as well as publishing industry interviews, news, and product how-to’s at TheAutomationBlog.com. If you're interested in my training, mentoring, or becoming a sponsor, please schedule a teams meeting with me via https://calendly.com/shawntierney/business-meeting
I have been chasing OEE and throughput improvements my entire career; it is a way of life in manufacturing.
The first step to enable your operations team to improve OEE, is to provide the data of what the machine is producing.
After you know you are making the highest quality product possible, the next thing to tackle is machine downtime.
Image by Alicia Lomas
The uptime of a machine is generally captured by the production team, but more important than how long the machine was down is to know why the machine was down.
To find the why, companies will adopt a diverse methods of downtime tracking.
A few examples are as follows:
A fully automated system that pulls each fault code from the equipment’s PLC into a data base.
A manual process where operators mark each fault with tic marks on a sheet of paper
An export of the HMI’s alarm history into Excel for analysis.
I had the opportunity to use a very creative method of downtime tracking thanks to Covid-19 preventing me from being able to monitor a machine that was being built oversees.
I loaded a laptop with some data collection and remote desktop software and used it to help my organization in deciding on when the machine was ready to ship.
Top Faults Exported into Excel, Image by Alicia Lomas
Faults versus Warnings
Faults are generally defined as alarms that stop the machine, whereas warnings are informational only to prompt an operator to act prior to a fault.
With warnings, if there is no action that can be taken by the operator, it does not belong in an alarm banner or report.
An important step when implementing a downtime program is to clean up the data and remove any nuisance faults and unnecessary warnings.
If this is not done, operators are desensitized to alarm messages and will ignore them completely.
Not all Faults are Created Equal
It is very important to capture the first fault that shut down the machine and ignore any secondary faults.
This provides clean data that paints an actual picture of the root cause of the downtime.
For example, a servo motor might not reach its set point position in the allotted time for the cycle and then the station might time out followed by doors being opened from the operator.
I have seen many OEM’s not capture the first fault effectively, leading the facility to chase ghosts or question the data.
Another misconception is that you can automatically capture each downtime event and know exactly what happened.
Operators get good at anticipating common issues and might open a door before a jam occurs, thus the only downtime code captured is a door opened.
It is important to have an avenue for operators to report out root causes of their interventions to catch these issues.
It is all about Action
When adopting a downtime collection system do not bite off more than you can chew in the beginning.
The goal is to start chipping away at the biggest issues, resulting in the biggest uptime and throughput gains.
In the beginning, set criteria to determine the minimum time of a downtime event that you would like to capture, for example, five minutes.
Only report out stops that last five minutes; this time threshold can be configurable from an HMI or SCADA system as the downtime events decrease in length.
There is also merit in capturing items that may not have long durations but occur frequently and add up to a large chunk of throughput loss.
The continuous improvement team can then tackle the issues one by one, starting at the highest downtime and/or highest number of occurrences.
A quick way to start reducing alarm durations is to insure every displayed alarm has enough information to tell the operator where to go to address such as a tag name that corresponds to the device that the stop is associated with.
Motor with Tag, Images by Alicia Lomas
Stay Tuned
In part two, there will be tips and tricks on how to accomplish effective downtime tracking in practice via your PLC and SCADA/HMI system.
Written by Alicia Lomas Project Manager, Automation Engineer, and Freelance Blogger
Have a question? Join our community of pros to take part in the discussion! You'll also find all of our automation courses at TheAutomationSchool.com.
Sponsor and Advertise: Get your product or service in front of our 75K followers while also supporting independent automation journalism by sponsoring or advertising with us! Learn more in our Media Guide here, or contact us using this form.
I'm a lifelong Technology Enthusiast who began programing in the early 80's on the Apple II and VIC-20 personal computers. After earning a degree in Electronics, I worked as a Certified Controls and Information Automation Specialist for 25 years before leaving to become a full time Industrial Automation instructor and mentor at TheAutomationSchool, as well as publishing industry interviews, news, and product how-to’s at TheAutomationBlog.com. If you're interested in my training, mentoring, or becoming a sponsor, please schedule a teams meeting with me via https://calendly.com/shawntierney/business-meeting
Note: The above link redirects to the actual MIA 2020 website
Support our site and get early access to our videos, free downloads and more!
You can now support our site with a small monthly pledge and in turn receive instant rewards! To find out more visit https:// TheAutomationBlog.com/join.
Vendors: Would you like your product featured on the Show, Podcast, and Blog? If you would, please contact me at: https://theautomationblog.com/contact
Until next time, Peace ✌️
If you enjoy this episode please give it a Like, and consider Sharing as this is the best way for us to find new guests to come on the show.
Eliminate commercials and gain access to my weekly full length hands-on, news, and Q&A sessions by becoming a member at The Automation Blog or on YouTube. You'll also find all of my affordable PLC, HMI, and SCADA courses at TheAutomationSchool.com.
I'm a lifelong Technology Enthusiast who began programing in the early 80's on the Apple II and VIC-20 personal computers. After earning a degree in Electronics, I worked as a Certified Controls and Information Automation Specialist for 25 years before leaving to become a full time Industrial Automation instructor and mentor at TheAutomationSchool, as well as publishing industry interviews, news, and product how-to’s at TheAutomationBlog.com. If you're interested in my training, mentoring, or becoming a sponsor, please schedule a teams meeting with me via https://calendly.com/shawntierney/business-meeting
Note: The above link redirects to the actual link which is extremely long and unwieldy
Support our site and get early access to our videos, free downloads and more!
You can now support our site with a small monthly pledge and in turn receive instant rewards! To find out more visit https:// TheAutomationBlog.com/join.
Vendors: Would you like your product featured on the Show, Podcast, and Blog? If you would, please contact me at: https://theautomationblog.com/contact
Until next time, Peace ✌️
If you enjoy this episode please give it a Like, and consider Sharing as this is the best way for us to find new guests to come on the show.
Eliminate commercials and gain access to my weekly full length hands-on, news, and Q&A sessions by becoming a member at The Automation Blog or on YouTube. You'll also find all of my affordable PLC, HMI, and SCADA courses at TheAutomationSchool.com.
I'm a lifelong Technology Enthusiast who began programing in the early 80's on the Apple II and VIC-20 personal computers. After earning a degree in Electronics, I worked as a Certified Controls and Information Automation Specialist for 25 years before leaving to become a full time Industrial Automation instructor and mentor at TheAutomationSchool, as well as publishing industry interviews, news, and product how-to’s at TheAutomationBlog.com. If you're interested in my training, mentoring, or becoming a sponsor, please schedule a teams meeting with me via https://calendly.com/shawntierney/business-meeting
3D printing is the latest in a long line of technologies and innovations that have transformed and evolved the manufacturing industry. As 3D printing technology and materials have advanced, the process has expanded its footprint from primarily a prototyping technique to one that now has applications in every stage of product development and production.
Image by Crescent Industries
Uses of 3D Printing in the Product Development Process
Additive manufacturing technology has been available for decades, and was almost exclusively used for rapid prototyping applications. As the technology matured, offering higher quality and accessible pricing, it not only became more commonly used across the industry, it also expanded the potential use cases that it offers. These include:
Early-stage proof of concept:
In the initial stages of product development and ideation, the closest you could get to a high-quality 3D model has historically been a CAD drawing. It wasn’t until later in the process that you would have a real-world, tactile representation of the product.
3D printing has changed this, allowing fast and easy access to proof-of-concept modeling, providing early insight into the manufacturability, functionality and viability of the idea — key considerations in moving forward with a concept. Providing these insights earlier in the process allows for more time to fine-tune — improving quality and efficiency through all subsequent steps of design and development.
Prototyping:
Historically, the most common use of 3D printing, 3D prototyping today is more effective than ever. The advent of desktop 3D printers allows design and development personnel to create functional prototypes in-house, reducing costs, increasing speed and agility, and creating a more focused development process overall.
3D prototyping also allows for more iterations to be created at lower costs, improving quality and fostering innovation.
Production:
As 3D printing technology has improved, so have the materials used in the process. Today, 3D printing is capable of efficiently manufacturing production-quality parts for short runs. These advances have proven invaluable for startups, companies testing new products and markets, and any other scenario where short-run parts are required.
Applications of 3D Printing in Industry
In this section, we’ll examine some product- and industry-focused use cases of 3D printing in manufacturing. The below examples are ways that leading companies have used 3D printing for production-quality parts in the field:
Aerospace:
The plastic materials used in 3D printing have proven valuable in reducing the weight of components while providing the required strength and stability — key considerations in aerospace. Applications include air ducts, hinges, nozzles, panels, interior components and more. 3D printing is also excellent for quickly creating replacement parts and components, reducing turnaround times, and benefitting inventory management.
Automotive:
Much like the aerospace industry, automotive applications benefit by the lower weight that 3D-printed components can often provide, improving fuel efficiency and overall performance. Automotive applications include gear sticks, safety gloves, brackets, engine covers, interior structures such as seats and more. 3D printing is especially well-suited for luxury vehicle applications where fewer quantities are required. Though major manufacturers have used the process for longer production runs, as well.
Medical:
The ability of 3D printing to create highly intricate, detailed designs with tight tolerances has proven well-suited to the medical industry. In addition, as more biocompatible materials have been developed for use in 3D printing, use cases have expanded. 3D printing applications in the medical field include surgical instruments for use in highly specialized surgeries, prosthetics and implants, dentures, medical devices such as catheters, hearing aids, dental uses such as dentures and aligners, and more.
As you can see, 3D printing has come a long way from its origins as a prototyping tool. It continues to evolve. As it does, it is improving and advancing manufacturing as a whole.
For full details on more use cases, and the companies that have relied on 3D printing, see the accompanying infographic.
Written by Kevin Allison VP of Marketing for Crescent Industries
Have a question? Join our community of pros to take part in the discussion! You'll also find all of our automation courses at TheAutomationSchool.com.
Sponsor and Advertise: Get your product or service in front of our 75K followers while also supporting independent automation journalism by sponsoring or advertising with us! Learn more in our Media Guide here, or contact us using this form.
I'm a lifelong Technology Enthusiast who began programing in the early 80's on the Apple II and VIC-20 personal computers. After earning a degree in Electronics, I worked as a Certified Controls and Information Automation Specialist for 25 years before leaving to become a full time Industrial Automation instructor and mentor at TheAutomationSchool, as well as publishing industry interviews, news, and product how-to’s at TheAutomationBlog.com. If you're interested in my training, mentoring, or becoming a sponsor, please schedule a teams meeting with me via https://calendly.com/shawntierney/business-meeting
Eliminate commercials and gain access to my weekly full length hands-on, news, and Q&A sessions by becoming a member at The Automation Blog or on YouTube. You'll also find all of my affordable PLC, HMI, and SCADA courses at TheAutomationSchool.com.
I'm a lifelong Technology Enthusiast who began programing in the early 80's on the Apple II and VIC-20 personal computers. After earning a degree in Electronics, I worked as a Certified Controls and Information Automation Specialist for 25 years before leaving to become a full time Industrial Automation instructor and mentor at TheAutomationSchool, as well as publishing industry interviews, news, and product how-to’s at TheAutomationBlog.com. If you're interested in my training, mentoring, or becoming a sponsor, please schedule a teams meeting with me via https://calendly.com/shawntierney/business-meeting
I recently had a chance to review some of the Siemens presentations from their Manufacturing In America 2020 virtual event.
In today’s article I’ll highlight the slides that caught my attention from the presentation titled, “New Innovations in SIMATIC HMI/ IPC”
The New Siemens Unified Comfort Panel HMIs
Unified Comfort Panels – Image courtesy of Siemens
First up were several slides regarding their new Unified Comfort Panels.
Siemens HMI Capacity Comparison
This new line of HMIs builds on the solid foundation of the current line of Comfort Panel HMIs, while adding new features and increased capacity.
To start, the durable glass front now supports the same multi-touch technology found in most modern smart phones.
And all of models (7″ to 22″) support the increased performance limits of 16 connections, 8000 tags, and 600 scripts (see comparison chart for details.)
While those performance improvements are impressive, I was even more impressed with the number of ports each of the new HMIs have.
Ports on small Unified Comfort Panel – Image courtesy of Siemens
As seen in the accompanying images, these include (1) Gigabit Ethernet Port, (1) Two Port PROFINET Switch, (4) USB 3.0 ports, (2) SD Card Slots (one for system backup, one for customer use) and (1) 422/485 Serial Port supporting 3rd party PLCs.
Ports on large Unified Comfort Panel – Image courtesy of Siemens
Additionally, projects created for the Unified Comfort Panels can also be deployed on PC using a WinCC Unified PC Runtime.
Other new features include:
Unified Comfort Panel – Image courtesy of Siemens
– SVG (Scalable Vector Graphics) Support
– Remote access via a standard web browser
– Advanced scripting based on JavaScript
– Pre-installed apps including Chrome browser, VLC media player, Libre Office, and Okular PDF viewer
– Edge app support, including MQTT, Notifier, and Flow Creator apps.
New Product Note:
Two things you’ll want to keep in mind about this new HMI line:
First, to program these HMIs you’ll need a license for SIMATIC WinCC Unified, which is integrated into the new v16 release of TIA Portal V16.
And while much of the core functionality of the current Comfort Panel line comes forward, users should consult their local Siemens representative and/or distributor to see if this new line is a good fit for their current applications.
For even more details about the Siemens Unified Comfort Panels, check out Episode 56 of The Automation Podcast here (releases on 06/26/20.)
What’s New with Siemens IPCs
IOT2050
As far as the Siemens line of IPCs, first they announced the new IOT2050 as a replacement for the 2040 model.
With a 64 bit TI ARM SoC Processor, this new model has greatly enhanced performance along with two full USB interfaces.
IPC127e
The Ultra Compact IPC, the IPC127E, was also featured prominently with its 4 Core Atom Processor, 4GB of Ram, 128GB SSD, and up to three LAN ports and four interfaces.
The IPC127E can also be purchased with either Windows 10 or Siemens Industrial OS (Managed Debian based Linux, 64Bit.)
Next up was the IPC527G, a high performance panel, box, or table mounted industrial PC with plenty of ports and four expansion slots.
IPC527G – Image courtesy of Siemens
And for those looking for high end wide-screen Panel PCs, the IPC677E (also available without display) comes with an 8th generation Intel processor, 64GB RAM, NVMe SSD, USB 3.1 Gen. 2, and USB Type C ports.
IPC677E – Image courtesy of Siemens
With three graphic ports (1 DVI, 2 DP,) three Gigabit LAN ports, six USB Ports (4 USB 3.0, 2 USB-C,) two PCIe expansion slots, and a 9 Pin Serial Port, the IPC677E is designed to be flexible.
IPC677E – Image courtesy of Siemens
It’s currently available with a capacitive multi-touch widescreen color display in 19″, 22″ and 24″ display sizes.
Well, those our my highlights from this year’s Manufacturing In America‘s presentation titled, “Factory Automation – New Innovations in SIMATIC HMI/ IPC.”
If you’d like to see the entire presentation, including updates on WinCC, Industrial Edge, and Mindsphere, head over to the Manufacturing In America website and search for “New Innovations in SIMATIC HMI/ IPC”
And if you think I left something out, or you’d like to share your own thoughts and comments, I invite you to do so by clicking on the “comment” link below my signature.
Until next time, Peace ✌️
If you enjoy this episode please give it a Like, and consider Sharing as this is the best way for us to find new guests to come on the show.
Eliminate commercials and gain access to my weekly full length hands-on, news, and Q&A sessions by becoming a member at The Automation Blog or on YouTube. You'll also find all of my affordable PLC, HMI, and SCADA courses at TheAutomationSchool.com.
I'm a lifelong Technology Enthusiast who began programing in the early 80's on the Apple II and VIC-20 personal computers. After earning a degree in Electronics, I worked as a Certified Controls and Information Automation Specialist for 25 years before leaving to become a full time Industrial Automation instructor and mentor at TheAutomationSchool, as well as publishing industry interviews, news, and product how-to’s at TheAutomationBlog.com. If you're interested in my training, mentoring, or becoming a sponsor, please schedule a teams meeting with me via https://calendly.com/shawntierney/business-meeting
One of my favorite Rockwell Automation trade show sessions is “What’s New in View.”
This year, the ROKLive presentation that came closet to that classic presentation was VZ02, “VisualizationWhat’s New,” and in today’s article I’ll highlight the slides that caught my attention:
(Note: To see a complete list of products featured in the presentation, register on Rockwell’s ROKLive website and search for VZ02.)
What’s New in Visualization Hardware:
First up were a lot of slides covering Rockwell’s acquisition of Italy-based ASEM, S.p.A., and a long list of Industrial Monitors, Box PCs, Panel PC, and thin clients Rockwell will be adding to their line.
Image from ROKLive VZ02 Presentation
If you use a lot of Industrial PCs and Monitors, you’d probably find this section quite interesting.
Next up was news about the 5510 and 5310 HMIs becoming available with Conformal Coating later this summer:
Image from ROKLive VZ02 Presentation
Followed by news about the PanelView Plus 7 Performance is now available with a Stainless Steel IP69K bezel (with replaceable food grade gasket) in the 9 and 12 inch “brandless” models:
Image from ROKLive VZ02 Presentation
This is a big deal for OEMs making equipment for food processing plants, as it supports high temperature and pressure washdowns.
Following these slides was one about COVID-19 and cleaning Rockwell HMIs.
The short version being that Rockwell only recommends cleaning their HMIs with Isopropyl Alcohol in a 70% or lower concentration.
Rockwell began this section by highlighting new features coming in FactoryTalk View version 12 (due out later this summer.)
FactoryTalk View Studio’s New Features:
– A refreshed and modern look and feel that’s more consistent with Studio 5000
Image from ROKLive VZ02 Presentation
– The new ability to organize Graphic Displays in folders up to three levels deep. Note that this does not change physical location of the display files, nor does it effect the “Display” command’s syntax.
Image from ROKLive VZ02 Presentation
– On the usability side, a new searchable Toolbox and Object Explorer have been added, as well as support for quick zooming in and out using CTRL Scroll or CTRL+/- shortcuts.
– And on the monitor front, support for clearer graphics on high resolution 4K displays, and ScreenPrint command support for Multi-Monitor displays has been added.
View Site Edition New Features:
– New “Data Grid” object to display SQL Server data
Image from ROKLive VZ02 Presentation
– Server-side PowerShell script execution (similar to VBA in View32)
Image from ROKLive VZ02 Presentation
– Symbol Factory upgraded to version 3.0
Image from ROKLive VZ02 Presentation
– Added support for SVG (scaleable vector graphics) images
Machine Edition New Features:
Machine Edition is listed as getting a couple of new features, including:
– Enhanced XY Plot to allow for plotting actual values against desired values
– New audit messages to track recipe value changes in the recipe file
Additionally, Machine Edition version 12 will no longer support creating Pre-version 6.0 runtimes, so those of you who need to continue to support old PVPlus terminals will need to be sure you continue to have access to version 11 (or earlier.)
Image from ROKLive VZ02 Presentation
Studio 5000 View Designer New Features:
On the Studio 5000 View Designer side (used with the PanelView 5310 and 5510,) the top features planned for version 7 (due out later this summer) include:
– New Alarm History Viewer with support of up to 40,000 tag and/or instruction-based alarms, exportable to a zipped csv file.
Image from ROKLive VZ02 Presentation
– Support for Extended Tag Properties in Alarm Messages
– Configurable screen update rates of 100ms, 250ms, and 500ms now available for all screens.
It’s important to note that the update rate will automatically be lowered during runtime if it’s overloading the terminal. The “actual” update rate be displayed using the system tag, “CurrentScreenUpdateRate.”
Studio 5000 View Designer v7 also will be adding these features:
– Larger keypad option
– Bindable “ImageNameproperty”
– Arc drawing tool
– Clear Data Log command
– Color adjustment HMI Device tags
– FactoryTalk Linx for communications
Those our my highlights from this year’s ROKLive equivalent to the classic “What’s New in View” presentation.
If you’d like to see the entire presentation, head over to Rockwell’s ROKLive website and search for presentation VZ02 (you may need to register first.)
And if you think I left something out, or would like to share your own thoughts and comments, I invite you to do so by clicking on the “comment” link below my signature.
Until next time, Peace ✌️
If you enjoy this episode please give it a Like, and consider Sharing as this is the best way for us to find new guests to come on the show.
Eliminate commercials and gain access to my weekly full length hands-on, news, and Q&A sessions by becoming a member at The Automation Blog or on YouTube. You'll also find all of my affordable PLC, HMI, and SCADA courses at TheAutomationSchool.com.
I'm a lifelong Technology Enthusiast who began programing in the early 80's on the Apple II and VIC-20 personal computers. After earning a degree in Electronics, I worked as a Certified Controls and Information Automation Specialist for 25 years before leaving to become a full time Industrial Automation instructor and mentor at TheAutomationSchool, as well as publishing industry interviews, news, and product how-to’s at TheAutomationBlog.com. If you're interested in my training, mentoring, or becoming a sponsor, please schedule a teams meeting with me via https://calendly.com/shawntierney/business-meeting
In this episode of The Automation Show we unbox a new two port PCIe Serial Port card, install it, and then configure it in Windows 10, VMware Waorkstation, and RSLinx Classic:
For more information, check out the “Show Notes” located below the video.
The Automation Show, Episode 41 Show Notes:
Special thanks to all our Patrons – their donations made this episode possible!
Support our site and get early access to our videos, free downloads and more!
You can now support our site with a small monthly pledge and in turn receive instant rewards! To find out more visit https:// TheAutomationBlog.com/join.
Vendors: Would you like your product featured on the Show, Podcast, and Blog? If you would, please contact me at: https://theautomationblog.com/contact
Until next time, Peace ✌️
If you enjoy this episode please give it a Like, and consider Sharing as this is the best way for us to find new guests to come on the show.
Eliminate commercials and gain access to my weekly full length hands-on, news, and Q&A sessions by becoming a member at The Automation Blog or on YouTube. You'll also find all of my affordable PLC, HMI, and SCADA courses at TheAutomationSchool.com.
I'm a lifelong Technology Enthusiast who began programing in the early 80's on the Apple II and VIC-20 personal computers. After earning a degree in Electronics, I worked as a Certified Controls and Information Automation Specialist for 25 years before leaving to become a full time Industrial Automation instructor and mentor at TheAutomationSchool, as well as publishing industry interviews, news, and product how-to’s at TheAutomationBlog.com. If you're interested in my training, mentoring, or becoming a sponsor, please schedule a teams meeting with me via https://calendly.com/shawntierney/business-meeting
In a previous article I discussed setting the dip switches, applying 24 VDC power, and using a web browser to modify the configuration in an Allen Bradley E300 Module.
In this article, I want to go a bit further and discuss the steps in adding an E300 module to your RSLogix or Studio 5000 project and how to work with the module to get it functioning.
If you try to add an E300 communication module to the I/O configuration tree of your studio 5000 project, you will not find the needed part numbers.
Before you can add the module in the I/O Configuration tree, you will need to download and install the proper Add-On-Profiles for an E300 module such as “RAE300_AOP_v06.03.64_Release”:
Be sure to follow all these steps when adding the AOP:
Step 1) Download the Add-On-Profiles from Rockwell’s PCDC (Product Compatibility and Download Center)
Step 2) Shut down any and all Rockwell Applications, including RSLinx.
Step 3) Unzip and Install the Add-On-Profile(s)
Step 4) After Installation, you will be able to add the E300 module in your Studio 5000 application
Adding the E300 to the I/O Configuration Tree:
The next step is to add the E300 to you project’s I/O Tree by following these steps:
Note: In this example we have a 1756-EN2T module in our I/O Configuration Tree that will communicate with the E300 module, but in many real-world applications you will be using a 1756-EN2TR to utilize a DLR (Device Level Ring) topology.
Step 1) Right-Click on your Ethernet module (in our example, an EN2T) and select “Add-Module”:
Step 2) Select the part number for the E300 Communication Module which is “193-ECM-ETR”:
Step 3) Select “OK”
Image by Brandon Cooper
Notes:
On the “General Tab” of the E300, you can see the general information of the E300 Module.
For other module configuration, click the “Change” button on the right side of the page as shown in the screenshot below. This window contains all of the parts used in your E300 assembly.
Image by Brandon Cooper
Test Lab Setup:
In this lab, I am using the following part numbers (this will most likely be different with your setup.)
Sensing Module – 193-ESM-IG-30A-C23
Control Module – 193-EIO-63-24D
Image by Brandon Cooper
Controller Tags:
As with adding any I/O module in ControlLogix, the tags for your E300 will automatically be added to the controller tag database.
If you are familiar with other I/O Modules, you will notice that the E300 will have three types of tags: “C”, “I” and “O” – they respectively stands for “Configuration”, “Inputs” and “Outputs”.
Configuration Tags:
Use these tags to set parameters such as FLA (Full Load Amps) of your motor.
This screenshot is only a section of the tags and is only a small example of the many configuration parameters available.
Image by Brandon Cooper
Input Tags:
These are the parameter monitoring tags from the E300 device.
This screenshot is only a section of the tags and is only a small example of the many monitoring parameters available. There is an abundance of information here that you will want to forward to your HMI displays.
Image by Brandon Cooper
Output Tags:
These are the writable commands to the E300 device for things such as start/stop and reset faults. This is only a small section of the available writes to the device that are available.
Image by Brandon Cooper
A typical Motor Control Application in Ladder Logic:
While there are many steps and options available, the basic setup of an E300 in your control system can be accomplished in a matter of minutes.
Hopefully this guide will help you with the basic setup and configuration options of an Allen-Bradley E300 Overload Module.
Written by Brandon Cooper Senior Controls Engineer and Freelance Writer
Have a question? Join our community of pros to take part in the discussion! You'll also find all of our automation courses at TheAutomationSchool.com.
Sponsor and Advertise: Get your product or service in front of our 75K followers while also supporting independent automation journalism by sponsoring or advertising with us! Learn more in our Media Guide here, or contact us using this form.
I'm a lifelong Technology Enthusiast who began programing in the early 80's on the Apple II and VIC-20 personal computers. After earning a degree in Electronics, I worked as a Certified Controls and Information Automation Specialist for 25 years before leaving to become a full time Industrial Automation instructor and mentor at TheAutomationSchool, as well as publishing industry interviews, news, and product how-to’s at TheAutomationBlog.com. If you're interested in my training, mentoring, or becoming a sponsor, please schedule a teams meeting with me via https://calendly.com/shawntierney/business-meeting
In Episode 3 of The Automation Demo (originally episode 55 of The Automation Podcast,) we sit down with Bryan Auz and take a look at his new product, Mech-Lock:
For more information, check out the “Show Notes” located below the video.
Watch the Podcast:
The Automation Podcast is also available on most Video and Podcasting platforms, and direct links to each can be found here.
Eliminate commercials and gain access to my weekly full length hands-on, news, and Q&A sessions by becoming a member at The Automation Blog or on YouTube. You'll also find all of my affordable PLC, HMI, and SCADA courses at TheAutomationSchool.com.
I'm a lifelong Technology Enthusiast who began programing in the early 80's on the Apple II and VIC-20 personal computers. After earning a degree in Electronics, I worked as a Certified Controls and Information Automation Specialist for 25 years before leaving to become a full time Industrial Automation instructor and mentor at TheAutomationSchool, as well as publishing industry interviews, news, and product how-to’s at TheAutomationBlog.com. If you're interested in my training, mentoring, or becoming a sponsor, please schedule a teams meeting with me via https://calendly.com/shawntierney/business-meeting
I recently had a chance to sit down and check out some of the Siemens presentations from their Manufacturing In America 2020 virtual event.
In today’s article I’ll highlight the slides that caught my attention from the presentation titled, “FA1: The Latest Advancements in SIMATIC PLC, IO, and Motion”
(Note: To see a complete list of products featured in the above mentioned presentation, visit the Siemens Manufacturing In America website.)
First are the innovations that came to the S7-1500 with CPU FW 2.8.
This includes a new feature that allows the CPU to send secure emails with file attachments, allowing sensitive data to be protected via encryption.
It also includes support for overlapping IP routing with forwarding, as well Device overlapping project traces.
The OPC UA Server feature was also upgraded with extended diagnostics functions, online diagnostic and connection views, and more relevant restart criteria.
And a new OPC UA Client feature was added to facilitate method calls, reading and writing of data, as well as controller to controller communications.
Next is a slide covering redundant and high availability PLCs, the S7-1500R and 1500H.
While we covered these products previousky, this is the first slide I’ve seen comparing the two offerings.
On the Redundant side, when using the S7-1500R CPUs the synchronization occurs on the same PROFINET Ring which the system I/O (ET 200SP and/or ET 200MP) resides on, and this system has a typical switchover time of between 200 to 500 ms.
Images from Siemens free MIA presentation, FA-1
On the High Availability side, the slide show when using the S7-1500H CPU, the two CPUs are connected together via their Sync Modules and the system’s I/O (ET 200SP and/or ET 200MP) resides on a PROFINET Ring (MRP.) This configuration results in a much faster switchover time of less than 100ms.
What’s new with both systems with FW 2.8 is support of additional blocks, including:
Program_Alarm (generates a program alarm with associated values)
Get_AlarmState (outputs an alarm state)
Gen_UsrMsg (generates user diagnostic messages)
Get_Alarm (reads pending alarm)
Ack_Alarms (acknowledge alarms)
PID_Compact (universal PID controller with integrated optimization)
PID_3Step (PID controller with integrated optimization for valves)
PID_Temp (PID controller for temperature)
GETIO / GETIO_PART (reads process image)
SETIO / SETIO_PART (transfers process image)
GetStationInfo (reads information of an IO device)
DeviceStates (reads module state information in an IO system)
GEN_DIAG (generates diagnostics information)
In addition, Profitnet S1-Devices like the ET 200pro DQ and ET 200pro DQ HF are also now supported.
Another slide that caught my attention was the one covering a mechanical design change to the SIMATIC S7-1500 Advanced Controllers.
Image from Siemens free MIA presentation, FA-1
The display on these CPUs has been integrated into the base CPU itself, instead of on the flip up panel as it was previously.
But while the display’s location has moved, it’s not only still removable, but also uses the same spare part as the previous design.
The PROFINET plugs have also shifted 90 degrees, and the Run/Stop switch has been replaced with Run/Stop buttons.
Image from Siemens free MIA presentation, FA-1
The SIMATIC S7 1500 T CPU also has seen several added features in FW 2.8.
Highlights include the Kinematic function, which supported up to 4 interpolating axes, now also includes Conveyor tracking.
Additionally, the ability to synchronize between axes on different CPUs has been added, along with coordination of traces in different CPUs.
As far as the S7-1200 Basic Controllers, firmware 4.4 brings the same Secure Email with file attachment enhancement that 2.8 brought to the Advanced Controllers.
Image from Siemens free MIA presentation, FA-1
It also brings OPC UA Server capabilities to the S7-1200 for the first time, however in this first release there’s not yet support for Structured Data Types, Alarms/Conditions, or Methods.
Two new 16 point Digital Output modules were also released, bringing Sinking Outputs to the line (6ES7222-1BH32-1XB0 and 6ES7223-1BL32-1XB0)
Additionally, Push-In terminal blocks can now be purchased separately for those who prefer them over the Screw type that come pre-installed.
Image from Siemens free MIA presentation, FA-1
There were also details of several new SIMATIC S7-1500 and ET 200MP I/O products.
First up are new 64 channel digital modules, and 16 channel analog modules coming this fall, including:
DI 64 x24VDC BA (p-/m-reading)
DQ 64x24VDC / 0.3A BA
DQ 64x24VDC / 0.3A SNK BA (m-switching)
DI 32x24VDC / DQ 32x24VDC / 0.3A SNK BA
AI 16xU BA
AI 16xI BA
Users should note that these new high destiny modules do require the use of external terminal blocks and the interconnecting cables as well.
Image from Siemens MIA presentation FA-1
New ET 200MP modules include the AI 8xU/I/R/RTD BA, which is a cost effective 8 channel analog input module for measuring current, voltage, resistance, and temperature.
There’s also a new CM 8xIO-LINK 8 Port IO Link Master (V1.1) which supports up to 32 Byte In-/Output data per port.
Image from Siemens free MIA presentation, FA-1
In addition to new I/O, there is also a new ET 200MP active backplane bus available which supports “hot swapping” of modules.
This allows users to “hot swap” modules even when the CPU is in the RUN mode.
But probably the most interesting new I/O products are the MultiFieldbus Interfaces for the ET 200MP, ET 200SP, and ET 200eco.
These new interfaces include support for PROFINET, EtherNET/IP and Modbus TCP. All three protocols can be used individually or simultaneously.
Well, those our my highlights from this year’s Manufacturing In America‘s presentation titled, “Factory Automation – The Latest Advancements in SIMATIC PLC, IO, and Motion.”
If you’d like to see the entire presentation, head over to the Manufacturing In America website and search for “The Latest Advancements in SIMATIC PLC, IO, and Motion.“
And if you think I left something out, or would like to share your own thoughts and comments, I invite you to do so by clicking on the “comment” link below my signature.
Until next time, Peace ✌️
If you enjoy this episode please give it a Like, and consider Sharing as this is the best way for us to find new guests to come on the show.
Eliminate commercials and gain access to my weekly full length hands-on, news, and Q&A sessions by becoming a member at The Automation Blog or on YouTube. You'll also find all of my affordable PLC, HMI, and SCADA courses at TheAutomationSchool.com.
I'm a lifelong Technology Enthusiast who began programing in the early 80's on the Apple II and VIC-20 personal computers. After earning a degree in Electronics, I worked as a Certified Controls and Information Automation Specialist for 25 years before leaving to become a full time Industrial Automation instructor and mentor at TheAutomationSchool, as well as publishing industry interviews, news, and product how-to’s at TheAutomationBlog.com. If you're interested in my training, mentoring, or becoming a sponsor, please schedule a teams meeting with me via https://calendly.com/shawntierney/business-meeting
Image from Rockwell's free ROKLive presentation, CL03
One of my favorite Rockwell Automation trade show sessions has always been “What’s New in Logix.”
This year, the ROKLive presentation that came closet to that classic presentation was CL03, “What’s New and Notable in the Integrated Architecture System,” and in today’s article I’ll highlight the slides that caught my attention:
(Note: To see a complete list of products featured in the presentation, register on Rockwell’s ROKLive website and search for CL03.)
First up is a slide promoting ControlLogix 5580 Redundancy in version 33 of Studio 5000 Logix Designer.
Image from Rockwell’s free ROKLive presentation, CL03
The slide listed it as having the following features in common with 5570 Redundancy:
Dual Chassis Design
Uses same 1756-RM2 redundancy modules
Supports Ethernet based I/O
Transparent switchover
Supports up to seven comm modules
Node count dictated by controller model/size
Additionally, improvements over the 5570 include:
Controller Memory not reduced when using Redundancy
Added support for the 5094 platform
No longer has a separate firmware release (xx.5x) to support redundancy
Supports use of new Process controller (P Controller)
In future releases, Rockwell aims to support the below new features with 5580 Redundancy:
Multiple Controllers
Sequence Manager
5069 I/O
Gigabit Ethernet
CIP Security
Redundant Ethernet Modules in Remote Chassis
Next up are three new controllers being release with version 33 of Studio 5000 Logix Designer.
First is the 5580-NSE, which is a “No Stored Energy” version of the 5580 line targeted at Hazardous Zone applications such as refineries and mines.
Then we have the 5580 eXtreme controllers which have an operating range of -25 C to +70 C, and meet ISA Class GX standards.
Images from CL03
Finally we have the new “Process Controllers,” which come in both a ControlLogix (5580) and CompactLogix (5380) version.
These new controllers support Rockwell’s PlantPAx 5.0 release, as well as all the features found in the standard versions of the controllers (non-P versions.)
The advantages of using these controllers include the addition of a “Process Tasking Model,” as well as new, native “Process Objects” library built directly into the controllers.
Several new Flex 5000 modules were also featured in the presentation, including:
5094-IB32 (32 DC Inputs)
5094-OB32 (32 DC Outputs)
5094-OB8 (8 DC Outputs)
5094-IA16 (16 AC Inputs)
5094-OA16 (16 AC Outputs)
5094-IM8 (8 AC Inputs)
5094-IF8IH (8 Isolated, Channel Configurable, Analog In with Hart)
5094-OF8IH (8 Isolated, Channel Configurable, Analog Out with Hart)
5094-SERIAL (Serial ASCII & Modbus. Available this summer)
Image from Rockwell’s free ROKLive presentation, CL03. Click on image to go to the ROKLive website for more information.
For OEMs that require both Safety and Motion capabilities, the new SIL 3 variant of the 5380 will likely be of interest.
Image from Rockwell’s free ROKLive presentation, CL03.
Available this summer, the 5069-L3xxERMS3 models feature scalable safety including SIL CL 3 support up to PLe.
These controllers include dual 1-Gb Ethernet/IP ports which can be configured for dual IPs or DLR.
On the low end, the 5069-L306ERMS3 will come with 300kb of safety memory, and will support 2 axes and 16 nodes.
On the high end, the 5069-L3100ERMS3 will come with 5mb of safety memory, and will support 32 axes and 180 nodes.
And last on my list is the new Stratix5800 switch line, which is Rockwell’s next generation modular switch.
Image from Rockwell’s free ROKLive presentation, CL03. Click on image to go to the ROKLive website for more information.
Each modular Stratix5800 system starts with a Fixed Base which includes 10 gigabit ports, 8 of which are copper, and 2 of which are SFP slots.
These bases can be purchase as either a Fixed Layer 2 switch, a Modular Layer 2 Switch, or a Modular Layer 3 switch.
The Modular Bases can then be expanded using one of several different expansion modules, ranging from 6 to 16 Copper, POE, or Fiber ports.
Well, those our my highlights from this year’s ROKLive equivalent to the classic “What’s new in Logix” presentation.
If you’d like to see the entire presentation, head over to Rockwell’s ROKLive webpage and search for presentation CL03 (you may need to register first.)
And if you think I left something out, or would like to share your own thoughts and comments, I invite you to do so by clicking on the “comment” link below my signature.
Until next time, Peace ✌️
If you enjoy this episode please give it a Like, and consider Sharing as this is the best way for us to find new guests to come on the show.
Eliminate commercials and gain access to my weekly full length hands-on, news, and Q&A sessions by becoming a member at The Automation Blog or on YouTube. You'll also find all of my affordable PLC, HMI, and SCADA courses at TheAutomationSchool.com.
I'm a lifelong Technology Enthusiast who began programing in the early 80's on the Apple II and VIC-20 personal computers. After earning a degree in Electronics, I worked as a Certified Controls and Information Automation Specialist for 25 years before leaving to become a full time Industrial Automation instructor and mentor at TheAutomationSchool, as well as publishing industry interviews, news, and product how-to’s at TheAutomationBlog.com. If you're interested in my training, mentoring, or becoming a sponsor, please schedule a teams meeting with me via https://calendly.com/shawntierney/business-meeting
When I was hired at my first professional job in September of 2000, I would soon learn that the facility I was being hired at would undergo a very large expansion in the next nine months.
One aspect of that startup was an experience that was invaluable to learning about Rockwell Automation Systems. Most of the motor controls in the facility had DeviceNet communication, and I was fortunate to be able to configure hundreds of E3 Overload modules and 1336 PII drives during that time.
But if you are installing smart overloads in your facility today, it will likely not be the old E3 module, but rather the E300 module that uses EtherNet/IP communication (like shown below) that would be installed:
Image by Brandon Cooper
Getting Started With A New Allen Bradley E300 Overload Module
Part 1 – Setting the Dip Switches:
The front cover of the E300 Slides down to provide access to the Dip Switches that are located on the front of the module, and which have the following functions:
Admin Mode – Enabled by setting Dip Switches to “0”, “0”, “0”
Setting the Dip Switches to Admin Mode and cycling power will allow you to access the web browser to permanently enable the web browser if you choose to utilize this option.
IP Address – Enabled by setting the Dip Switches to represent a “valid” last Octet (001 to 254) of the product’s default private Ethernet Address of 192.168.1.XXX.
In this example our Dip Switch Setting is “0”, “1”, “2,” which will set the IP Address of the device to 192.168.1.12.
Be sure to cycle power after setting these dip switches.
Reset to Factory Defaults – Enabled by setting Dip Switches to “8”, “8”, “8”
By setting the switches to this setting, cycle power and the device will return to factory defaults.
Part 2- Applying Initial Power:
On the terminal strip of the E300, terminal A1 is 24 VDC (+) and terminal A2 is 24 VDC( -)
Image by Brandon Cooper
Part 3 – Accessing the Web Browser:
If you have chosen a static address as we did in this example, you need to be sure you also set your computer’s Subnet Mask to match (255.255.255.0,) while giving your PC an unique IP Address (like 192.168.1.10)
Once done, open a web browser and type in the IP address of the E300 device (http://192.168.1.12 in our example.)
Under “Administrative Settings” you can change network configuration, the password, and add device location and other information under the device identity tab using the default username of Administrator, and default password which is the serial number of the E300 (located on the Home Screen of the E300’s web page)
Image by Brandon Cooper
To enable the web server, you can go to the “Network Configuration” Tab and change the “Web Server Control” parameter to “Enable” and then “Apply Changes”
Image by Brandon Cooper
Part 4 – Parameters:
The E300 Device Parameters are accessible in the web browser, and settings such as the FLA Setting as shown here can be modified.
Simply, click the “EDIT” button, modify the parameter and then the “APPLY” button to write the changes to the device:
Image by Brandon Cooper
For more information, see the below Rockwell publications:
Depending on the model, there is also a backup /restore function in the web browser that is not available in this model, but is in the series “B” version.
Configuration settings can also be written to the device from your Studio 5000 project, but that is a topic for another time.
With straight forward configuration, the elimination of I/O (Input/Output) wiring, and the ability to have important data monitoring available to you, the E300 is a product I recommend looking at if you are checking the market for smart overloads for your MCC’s.
Written by Brandon Cooper Senior Controls Engineer and Freelance Writer
Have a question? Join our community of pros to take part in the discussion! You'll also find all of our automation courses at TheAutomationSchool.com.
Sponsor and Advertise: Get your product or service in front of our 75K followers while also supporting independent automation journalism by sponsoring or advertising with us! Learn more in our Media Guide here, or contact us using this form.
I'm a lifelong Technology Enthusiast who began programing in the early 80's on the Apple II and VIC-20 personal computers. After earning a degree in Electronics, I worked as a Certified Controls and Information Automation Specialist for 25 years before leaving to become a full time Industrial Automation instructor and mentor at TheAutomationSchool, as well as publishing industry interviews, news, and product how-to’s at TheAutomationBlog.com. If you're interested in my training, mentoring, or becoming a sponsor, please schedule a teams meeting with me via https://calendly.com/shawntierney/business-meeting
In this episode of The Automation Show we unbox a brand new Siemens S7-1500 Compact PLC Starter Kit:
For more information, check out the “Show Notes” located below the video.
The Automation Show, Episode 40 Show Notes:
Special thanks to Siemens for sending us a sample of the S7-1500 Compact PLC Starter Kit!
Support our site and get early access to our videos, free downloads and more!
You can now support our site with a small monthly pledge and in turn receive instant rewards! To find out more visit https:// TheAutomationBlog.com/join.
Vendors: Would you like your product featured on the Show, Podcast, and Blog? If you would, please contact me at: https://theautomationblog.com/contact
Until next time, Peace ✌️
If you enjoy this episode please give it a Like, and consider Sharing as this is the best way for us to find new guests to come on the show.
Eliminate commercials and gain access to my weekly full length hands-on, news, and Q&A sessions by becoming a member at The Automation Blog or on YouTube. You'll also find all of my affordable PLC, HMI, and SCADA courses at TheAutomationSchool.com.
I'm a lifelong Technology Enthusiast who began programing in the early 80's on the Apple II and VIC-20 personal computers. After earning a degree in Electronics, I worked as a Certified Controls and Information Automation Specialist for 25 years before leaving to become a full time Industrial Automation instructor and mentor at TheAutomationSchool, as well as publishing industry interviews, news, and product how-to’s at TheAutomationBlog.com. If you're interested in my training, mentoring, or becoming a sponsor, please schedule a teams meeting with me via https://calendly.com/shawntierney/business-meeting
In this article I’ll introduce you to the basics of a ControlLogix Function Block Routine Totalizer Instruction.
Image by Brandon Cooper
If you have ever used any Allen-Bradley software, you are familiar with their ladder logic programming. In many of the earlier systems such as PLC-5 or SLC 500, you only had ladder logic to work with.
While many programming scenarios are efficient in ladder, the introduction of Function Block, Sequential Flow Charts and Structured Text programming in ControlLogix made the software much more versatile and friendly for programmers of many different backgrounds.
We all have our own preferences we like to use, or we may use all types of programming depending on what we are trying to accomplish. I tend to be one to use whatever works best for me with what I am trying to accomplish.
Suppose you have a goal with a given water flow to measure the total amount of water that has passed the flowmeter.
To me, the most efficient choice would be to use a “Totalizer” (TOT) Instruction in a Function Block Routine.
As shown in the following screenshot, you connect the incoming water flowmeter signal to the “.In” parameter of the TOT instruction.
Image by Brandon Cooper
TOT Parameter Review:
As with any Function Block Instruction, the most important things to learn is what the instruction does and how to accomplish it given the parameters that it contains.
Learning the parameters of each instruction that you use will make you a better programmer. Here are a few that are important with the TOT instruction
.ProgProgReq – Program Mode
Turn this bit “ON” if you want to have the totalizer start/stop controlled from within the PLC program. This is generally more commonly used than ProgOperReq.
.ProgOperReq – Operator Mode
Turn this bit “ON” if you want an operator or manual start/stop of the TOT instruction from an HMI.
.ProgStartReq –Start Request
If you are starting and stopping the TOT instruction in program mode (aka .ProgProgReq = ON), then use this bit to Start the TOT counting
.ProgStopReq –Stop Request
If you are starting and stopping the TOT instruction in program mode (aka .ProgProgReq = ON), then use this bit to Stop the TOT from counting
.ProgResetReq – Reset Request
If you are starting and stopping the TOT instruction in program mode (aka .ProgProgReq = ON), then use this bit to Reset the TOT .Total value and move the .Total value to .OldTotal
.TimeBase – Time Base
For your totalized value to be accurate, the .TimeBase parameter must be set correctly. 0=Seconds, 1 = Minutes, 2 = Hours. For example, if your flowmeter is in gal/min, then you will set the .TimeBase parameter to “1” for minutes.
There is also a parameter .Gain where you can use a multiplier for converting between units of measure. Most of the time it is set to 1.0, but if you are converting gallons to some other unit of measure, then you could do that with the .Gain parameter.
.Target – Target
Giving the totalizer a .Target Value allows the instruction to set a flag (.TargetFlag) when the totalized value (.Total) >= .Target value
Displaying Parameters and Finding Descriptions:
To expose or display one of the many TOT parameters on the instruction itself, start by clicking on the ellipsis (three dots) on the instruction to open its properties.
Then find the parameters you’d like to be visible, and click on the Vis (Visibility) box next to those parameters so that they will be displayed with connectors on the Function Block:
Image by Brandon CooperImage by Brandon Cooper
And to learn more about any parameter, hver over its description with your mouse to see the entire description in a popup window:
Image by Brandon Cooper
Conclusion
While just one very small piece of a programming option, if you are new to Function Block Programming in ControlLogix, hopefully you have picked up a tip or two here.
If you take the time to learn each instruction, their parameters and use, then you will be setting yourself up for success in your automation and controls career.
Written by Brandon Cooper Senior Controls Engineer and Freelance Writer
Have a question? Join our community of pros to take part in the discussion! You'll also find all of our automation courses at TheAutomationSchool.com.
Sponsor and Advertise: Get your product or service in front of our 75K followers while also supporting independent automation journalism by sponsoring or advertising with us! Learn more in our Media Guide here, or contact us using this form.
I'm a lifelong Technology Enthusiast who began programing in the early 80's on the Apple II and VIC-20 personal computers. After earning a degree in Electronics, I worked as a Certified Controls and Information Automation Specialist for 25 years before leaving to become a full time Industrial Automation instructor and mentor at TheAutomationSchool, as well as publishing industry interviews, news, and product how-to’s at TheAutomationBlog.com. If you're interested in my training, mentoring, or becoming a sponsor, please schedule a teams meeting with me via https://calendly.com/shawntierney/business-meeting
In this episode of The Automation Podcast, Diego Mesen Arguedas from Vester Business provides us with an overview of vNode Automation Industrial IoT Gateway:
For more information, check out the “Show Notes” located below the video.
Watch the Podcast:
The Automation Podcast is also available on most Video and Podcasting platforms, and direct links to each can be found here.
Eliminate commercials and gain access to my weekly full length hands-on, news, and Q&A sessions by becoming a member at The Automation Blog or on YouTube. You'll also find all of my affordable PLC, HMI, and SCADA courses at TheAutomationSchool.com.
I'm a lifelong Technology Enthusiast who began programing in the early 80's on the Apple II and VIC-20 personal computers. After earning a degree in Electronics, I worked as a Certified Controls and Information Automation Specialist for 25 years before leaving to become a full time Industrial Automation instructor and mentor at TheAutomationSchool, as well as publishing industry interviews, news, and product how-to’s at TheAutomationBlog.com. If you're interested in my training, mentoring, or becoming a sponsor, please schedule a teams meeting with me via https://calendly.com/shawntierney/business-meeting


You must be logged in to post a comment.