Home Blog Page 94

PanelView Plus – Twenty Five Things You Need To Know, Part 5

Every-Thing-You-Need-To-Know-About-The-PVPlus-5


Twenty Five things you need to know about using the PanelView Plus and View Studio

Part 5 of 5

Downloading runtime files to your PanelView Plus

Every-Thing-You-Need-To-Know-About-The-PVPlus-521) The PanelView Plus IP address is set via its configuration mode screen.

The PanelView Plus IP address is set via its configuration mode screen. By default, it’s set to DHCP.

You can use the “RSLinx Boot-P/DHCP server” utility to give it an address, but remember to change it “Static” or upon reboot it will request a new IP via DHCP.

22)  Using an Ethernet cross over cable to upload/download is much faster than serial

Using an Ethernet cross over cable to upload/download is much faster than serial upload/downloads.

However, if your PanelView Plus is newer than your copy of ViewStudio, the Transfer Utility may not recognize the new PanelView Plus hardware. In these cases you may wish to transfer the file using a USB flash drive.

23) Manually add your PVPlus if it doesn’t show up in the Transfer Utility

If your PanelView Plus does not show up in Transfer Utility’s network browse, manually add it to the network driver you’re using inside of ViewStudio on the communications tab (found at bottom left of ViewStudio.) Then re-launch the Transfer Utility and you should see your PanelView Plus.

24) The PanelView Plus supports standard Compact Flash memory cards, and most USB Flash Drives.

The PanelView Plus supports standard Compact Flash memory cards, and most USB Flash Drives. The first time a user browses the CF card or USB Flash Drive from the file manager in the PVPlus configuration mode menu, it will create the correct path for runtime files if the path does not yet exist.

Note: Keep in mind Rockwell recommends always moving runtime files from the external CF card or USB Flash Drives to the internal memory before running.

Update: The PanelView Plus 6 now supports standard SD cards in place of CF cards, and also supports loading and running runtime files from these SD cards.

Backing up and archiving your ViewStudio Project

25) Use the Application Manager utility to backup and restore your projects.

When you are ready to make a back-up or archive of your project (or if you wish to rename or copy your project,) use the included “Application Manager” utility to zip your project up into an .APA (APplication Archive) file.

This is the best means to share projects with other developers, as the .MER (Machine Edition Runtime) files can not always be recovered into an editable project.

Update: With Version 6.1+ running on Windows 7 64 bit, older projects can not be opened until the database is exported on a 32bit OS.


NOTE: Links to all of the articles in this series are below


Well that’s it for today’s article and the final five things you need to know before using a PanelView Plus. Please let us know what you think about this week’s series by leaving a reply at the bottom of this page.

And for more articles about the PanelView Plus, check out our PanelView Plus Blog Index.

Until next time, Peace ✌️ 

If you enjoy this episode please give it a Like, and consider Sharing as this is the best way for us to find new guests to come on the show.

Shawn M Tierney
Technology Enthusiast & Content Creator

Eliminate commercials and gain access to my weekly full length hands-on, news, and Q&A sessions by becoming a member at The Automation Blog or on YouTube. You'll also find all of my affordable PLC, HMI, and SCADA courses at TheAutomationSchool.com.

shawntierney avatar

PanelView Plus – Twenty Five Things You Need To Know, Part 4

Every-Thing-You-Need-To-Know-About-The-PVPlus-4


Twenty Five things you need to know about using the PanelView Plus and View Studio

Part 4 of 5

Browsing for Tags

Every-Thing-You-Need-To-Know-About-The-PVPlus-416) When your Shortcut shows up as a Tag

When browsing for Tags, if your RSLinx Enterprise shortcut shows up on the right side as a tag, your RSLinx Enterprise shortcut has not been “applied” to a valid processor. This is typically seen in early versions of the software.

Graphic Display Design

17) Always check your project resolution setting before creating graphic displays

Always check the resolution of your PanelView Plus and set this in your ViewStudio project settings to match before creating graphic displays.

Also, when using the PanelView Plus 400 and 600 you will need to increase the font sizes of the objects on the pre-made “pop-up” screens ([ALARMS],  [INFORMATION], etc)

18) Use pre-loaded fonts to maintain the same look in Runtime as Development

Not every font on your PC is installed on the PanelView Plus. So if you use or other fonts besides the defaults, you may want to install these additional fonts onto your PanelView Plus to  maintain the same look and feel as in ViewStudio (see the PVPlus manual for more info.)

19) The default graphic display update rate is too slow.

When designing screens, for a quick snappy response I recommend editing the default Display Settings screen update rate property from a 1 second update to .25 or .1.

20) Always add a “goto config” button to your project

Always put a “goto config” button on at least one graphic display screen in your project. If you forget to, you can typically re-download a new project that has one (as long as you still know the communication settings.)


NOTE: Links to all of the articles in this series are below


Well that’s it for today’s article and five more things you need to know before using a PanelView Plus. Come back tomorrow to find out what the final five are.

And for more articles about the PanelView Plus, check out our PanelView Plus Blog Index.

Until next time, Peace ✌️ 

If you enjoy this episode please give it a Like, and consider Sharing as this is the best way for us to find new guests to come on the show.

Shawn M Tierney
Technology Enthusiast & Content Creator

Eliminate commercials and gain access to my weekly full length hands-on, news, and Q&A sessions by becoming a member at The Automation Blog or on YouTube. You'll also find all of my affordable PLC, HMI, and SCADA courses at TheAutomationSchool.com.

shawntierney avatar

PanelView Plus – Twenty Five Things You Need To Know, Part 3

Every-Thing-You-Need-To-Know-About-The-PVPlus-3


Twenty Five things you need to know about using the PanelView Plus and View Studio

Part 3 of 5

Exporting and Importing Tags

Every-Thing-You-Need-To-Know-About-The-PVPlus-311) ViewStudio HMI Tags can be exported and imported

ViewStudio HMI tags can be exported and imported to / from CSV files using the “Tag Import/Export” utility that comes with FactoryTalk ViewStudio.

Browsing for Tags

12) SLC-500 and PLC-5 users can browse online through RSLinx Enterprise

SLC-500 and PLC-5 users can browse for tag addresses online through RSLinx Enterprise, but not offline. And while you can directly reference these legacy PLC tags from graphic objects, creating HMI tags with descriptive tag names often eases development and troubleshooting of displays.

For a step by step video guide on how to browse for SLC and PLC tags check out our video below:

 13) RSLogix 5000 users can both “online” and “offline” browse for tags

RSLogix 5000 users can both “online” and “offline” browse for tags through RSLinx Enterprise.

To offline browse, the RSLogix 5000 file must reside on the same PC as ViewStudio (files on network shares are not supported,) and they must be referenced in the RSLinx Enterprise Local (aka Design) configuration’s “offline file” section.

Note: In early versions of ViewStudio (and by some accounts in v7 as well,) to get offline tag browsing to work you also need to have a Local (aka Design) communication path for your PLC configured and applied to your shortcut (even if no PLC is attached to your system.)

For a step by step video guide on how to browse for Logix tags check out our video below:

14) Showing Server Names in the Tag Browser

When browsing for Tags, you can right click on the root folder and select “show server names” to display tag folders beneath their source – this helps to better distinguish between different Data Servers and HMI tags.

15) Refreshing the Tag Browser

When browsing for Tags, if you’ve recently added new tags or shortcuts and don’t see them in the list, right click on root folder and select “refresh all folders.”

Update: Version 7 has also added a refresh button under the folders list which has the same function.


NOTE: Links to all of the articles in this series are below


Well that’s it for today’s article and five more things you need to know before using a PanelView Plus. Come back tomorrow to find out what the next five are.

And for more articles about the PanelView Plus, check out our PanelView Plus Blog Index.

Until next time, Peace ✌️ 

If you enjoy this episode please give it a Like, and consider Sharing as this is the best way for us to find new guests to come on the show.

Shawn M Tierney
Technology Enthusiast & Content Creator

Eliminate commercials and gain access to my weekly full length hands-on, news, and Q&A sessions by becoming a member at The Automation Blog or on YouTube. You'll also find all of my affordable PLC, HMI, and SCADA courses at TheAutomationSchool.com.

shawntierney avatar

PanelView Plus – Twenty Five Things You Need To Know, Part 2

Every-Thing-You-Need-To-Know-About-The-PVPlus-2


Twenty Five things you need to know about using the PanelView Plus and View Studio

Part 2 of 5

Setting up communications

Every-Thing-You-Need-To-Know-About-The-PVPlus-26) Never create RSLinx Enterprise shortcut names with spaces or non-alpha characters

Never create RSLinx Enterprise shortcut names with spaces or any character besides alpha, numeric and underscores (“_”)

Also, never create RSLinx Enterprise shortcut names with the same name as HMI tag folders (i.e. “PLC”) as in some versions this will cause your shortcuts not to work, and when it does it will be confusing when browsing for tags.

For a step by step video guide on how to setup RSLinx Enterprise communications, check out our videos below:

7) If your shortcut is modified, you may need to restart ViewStudio

If you initially setup your RSLinx Enterprise Shortcut incorrectly, and later correct it, you may have to close and re-open ViewStudio in order for it to use the new shortcut path.

If closing and opening ViewStudio doesn’t fix the issue, double check your communications setup (#4) and if you’re sure it’s correct you can either (a) stop and re-start the RSLinx Enterprise service using the Services applet in  Window’s Control Panel or (b) reboot your PC (v3.1 typically requires a complete reboot.)

8) RSLinx Enterprise’s Serial Port Driver continues to run after ViewStudio is closed

If you add a “DF1 Point to Point” driver in RSLinx Enterprise’s Local (aka Desgin) tab, keep in mind this is using the serial port on your PC and only one software package can use a particular serial port at a time.

If you leave this driver in RSLinx Enterprise when you close ViewStudio, RSLinx Classic and  other software packages will not be able to use the same serial port until you open ViewStudio and delete the driver.

This is because RSLinx Enterprise runs as a Windows Service and therefore it will continue to run your drivers even after you close ViewStudio.

9) Enable serial downloads by adding the DF1 driver to the Target Tab.

If you’re not using the PanelView Plus serial port with a KEPware driver, I suggest adding a “DF1  Point to Point” driver to your RSLinx Enterprise Target (aka Runtime) tab definition. This will allow you to use the PVPlus serial port to upload or download projects in a pinch. If you forget to do this (and also forget your IP address) you can reset your PVPlus communication settings to the default out of box settings (which includes the “DF1 Point to Point” serial port driver) from the configuration mode  screen.

Update: PanelView Plus 6 models now support transferring files using the “Transfer Utility” via USB and a standard USB cable.

For a step by step video guide on how enable the serial port in the RSLinx Enterprise Target Tab check out our video below:

Exporting and Importing Tags

10) HMI Tags can be imported from SLC and PLC program files

SLC-500 and PLC-5 users can use the “Tag Import/Export” utility which comes with FactoryTalk ViewStudio to import their RSLogix 5 or 500 addresses, symbols and descriptions as HMI Tags.

This can also be done inside the HMI tag database by clicking on (or selecting from the menu) the “Other DB Tag browser” button and importing selected tags.

For a step by step video guide on how to import SLC and PLC tags check out our video below:


NOTE: Links to all of the articles in this series are below


Well that’s it for today’s article and five more things you need to know before using a PanelView Plus. Come back tomorrow to find out what the next five are.

And for more articles about the PanelView Plus, check out our PanelView Plus Blog Index.

Until next time, Peace ✌️ 

If you enjoy this episode please give it a Like, and consider Sharing as this is the best way for us to find new guests to come on the show.

Shawn M Tierney
Technology Enthusiast & Content Creator

Eliminate commercials and gain access to my weekly full length hands-on, news, and Q&A sessions by becoming a member at The Automation Blog or on YouTube. You'll also find all of my affordable PLC, HMI, and SCADA courses at TheAutomationSchool.com.

shawntierney avatar

MicroLogix 1100 Expansion I/O (M39)


In The Automation Minute: Episode 39, Shawn Tierney walks you through adding expansion I/O to the Allen-Bradley MicroLogix 1100 Programmable Controller.

Note: To find out how you can get a copy of my Micro Programmable Controller training video, please visit http://www.TheAutomationSchool.com


Check out our Video Collection #1 here, which includes the first five seasons of our shows (over 280 episodes and 29 hours!) for just $30!

Until next time, Peace ✌️ 

If you enjoy this episode please give it a Like, and consider Sharing as this is the best way for us to find new guests to come on the show.

Shawn M Tierney
Technology Enthusiast & Content Creator

Eliminate commercials and gain access to my weekly full length hands-on, news, and Q&A sessions by becoming a member at The Automation Blog or on YouTube. You'll also find all of my affordable PLC, HMI, and SCADA courses at TheAutomationSchool.com.

shawntierney avatar

PanelView Plus – Twenty Five Things You Need To Know, Part 1

Every-Thing-You-Need-To-Know-About-The-PVPlus-1


NOTE: If you’d like to learn about the PanelView Plus 7 Standard, check out this article.
NOTE: If you’d like to learn about the PanelView Plus 7 Performance, check out this article.

Twenty Five things you need to know about using the PanelView Plus and View Studio

Part 1 of 5

NOTE: Check out the newest version of this article HERE.

Installation:

Every-Thing-You-Need-To-Know-About-The-PVPlus-11) Always install the software in order

Always install the software in the order found in the CD menu. Then reboot your PC  after you have installed at a minimum these three packages:

  • FactoryTalk Application Platform (FTAP)
  • FactoryTalk ViewStudio
  • RSLinx Enterprise

Update: Version 7+ of ViewStudio has a new installation routine which automates much of this process.

2) After installation, check for available patches.

After installation, check Rockwell’s Knowledgebase at http://www.rockwellautomation.com/knowledgebase/ for any patches or patch roll-ups for your version of software. Some versions have serious bugs which are addressed in these updates. Note: v4 had painfully slow tag browsing speeds without installation of a patch

Starting a new project:

3) Keep project names under 28 characters

Always keep your project names under 28 characters, and never user any characters in the project name besides alpha, numeric, and underscores (i.e. don’t use spaces.) This is to avoid compatibility issues with some versions of ViewStudio and the Application Manager.

Setting up communications

4) Setting up RSLinx Enterprise

Steps to setting up RSLinx Enterprise communications to your Allen-Bradley Programmable Controller:

  1. Start by opening your project in ViewStudio
  2. Expand RSLinx Enterprise and double click on Communications Setup.
  3. Create at least one shortcut by clicking the ADD button and typing in a name:
    • This is the name which represents your PLC.
  4. Next, create your communication path to your PLC for both tabs (local & target)
    • Right click in right hand pane to add drivers and devices
  5. If your local and target paths will be the same, you can use the “copy” button to copy the local communications setup to the target.
  6. “Apply” your shortcut to your PLC in both tabs (local & target)
    • This is done by clicking on your Shortcut, then on your PLC, then clicking “Apply” (do in each tab.)

Note: To rename your shortcut, double click it slowly. However, if you do this after you have used the shortcut in your project, you’ll also need to manually edit all references to the shortcut (I don’t recommend changing shortcut names after development has started to avoid this.) For a step by step video introduction to ViewStudio and RSLinx Enterprise communications, check out our video below:

5) LOCAL (aka Design) versus TARGET (aka Runtime)

There are TWO communication paths you can configure in RSLinx Enterprise: LOCAL (aka Design) is the path to the PLC in ViewStudio which used for testing. TARGET (aka Runtime) is the path to the PLC from the PanelView Plus which is used at runtime. These two paths don’t have to be the same as you may wish to test your project by connecting your laptop to your PLC via your serial port, but the PanelView Plus may connect to the PLC via a network like Data Highway Plus. However, each path you wish to use must be “Applied” to your shortcut (see #4.) For a step by step video guide on how to setup RSLinx Enterprise communications, check out our videos below:


NOTE: Links to all of the articles in this series are below


Well that’s it for today’s article and the first five things you need to know before using a PanelView Plus. Come back tomorrow to find out what the next five are. And for more articles about the PanelView Plus, check out our PanelView Plus Index.

Until next time, Peace ✌️ 

If you enjoy this episode please give it a Like, and consider Sharing as this is the best way for us to find new guests to come on the show.

Shawn M Tierney
Technology Enthusiast & Content Creator

Eliminate commercials and gain access to my weekly full length hands-on, news, and Q&A sessions by becoming a member at The Automation Blog or on YouTube. You'll also find all of my affordable PLC, HMI, and SCADA courses at TheAutomationSchool.com.

shawntierney avatar

Flashback Friday! RSView32 Menu Bar Demo

Flashback-Friday-RSView32-Menu-Bar


Flashback-Friday-RSView32-Menu-BarWelcome to The Automation Blog’s “Flashback Friday!”

Today I’m highlighting an RSView32 project I wrote to demo different ways to create top and bottom menu bars in RSView32.

In 2001, long before FactoryTalk View would be upgrade with the “docking” feature, I received many questions on how to best implement a persistent top and/or bottom menu bar in RSView32.

Since there were a few different ways to accomplish this, I put together the following project to demonstrate the pros and cons of each.

To read the original story and download the project, see the reposted article HERE on The Automation Blog:

And if you have any questions, comments, or suggestions please don’t hesitate to share them with us by using the “post a comment or question” link below.

Until next time, Peace ✌️ 

If you enjoy this episode please give it a Like, and consider Sharing as this is the best way for us to find new guests to come on the show.

Shawn M Tierney
Technology Enthusiast & Content Creator

Eliminate commercials and gain access to my weekly full length hands-on, news, and Q&A sessions by becoming a member at The Automation Blog or on YouTube. You'll also find all of my affordable PLC, HMI, and SCADA courses at TheAutomationSchool.com.

shawntierney avatar

Using the MicroLogix 1400′s LCD To Set Its IP Address

MicroLogix-1400-LCD-ENETcfg-Menu-IP-Static-Entry-1


The MicroLogix 1400’s LCD, unlike the MicroLogix 1100’s, can be used to set the unit’s IP Address.

In today’s article we’ll show you the steps to do just that.

Setting the IP Address of a MicroLogix 1400 using the built-in LCD:

1) When the MicroLogix 1400 is powered on, it displays the I/O Status screen as shown below:

MicroLogix-1400-LCD-IO-Status2) To set the Micro’s IP and MAC address using the LCD,  we need to access it’s menu. To do this, press the ESC button and you should see the menu below:

MicroLogix-1400-LCD-Main-Menu-Status-Sel3) Next, press the down arrow button four times to select “Advanced Set,” then press the OK button:

MicroLogix-1400-LCD-Main-Menu-Advanced-Sel

4) Here, press the down arrow button twice to select “ENET CFG,” then press the OK button:

MicroLogix-1400-LCD-Advanced-Menu-ENETcfg-Sel5) Now press the down arrow button once to select IP Address and press the OK button.

MicroLogix-1400-LCD-ENETcfg-Menu-IP-Sel6) To enter the Ethernet Setup you must provide the password t. However if the unit is new, or no password has been set, you can press the OK button to bypass this screen.

MicroLogix-1400-LCD-ENETcfg-Menu-IP-Pass7) New MicroLogix 1400’s come setup to automatically obtain an IP Address using BOOT-P, as shown below:

MicroLogix-1400-LCD-ENETcfg-Menu-IP-Mode-Bootp8) To manually assign an IP Address, press the Down Arrow button twice to change the ENET Mode option to “static,” and then press the OK button.

NOTE: The display will not show a message stating that for this change to take effect the Micro will need to be power cycled. We will do this after entering our IP Address.

MicroLogix-1400-LCD-ENETcfg-Menu-IP-Mode-Static9) You can now use the Arrow buttons to change the IP Address to your desired value. When done, press the OK button.

MicroLogix-1400-LCD-ENETcfg-Menu-IP-Static-Entry-110) Now use the Arrow buttons to change the Subnet Mask Address to your desired value. When done, press the OK button.

MicroLogix-1400-LCD-ENETcfg-Menu-IP-Static-SN-Entry-111) If you wish to enter a Gateway address, use the Arrow buttons to change the address to your desired value. When done, press the OK button.

MicroLogix-1400-LCD-ENETcfg-Menu-IP-Static-GW-Entry-012) If you wish to enter a Primary DNS address, use the Arrow buttons to change the address to your desired value. When done, press the OK button.

MicroLogix-1400-LCD-ENETcfg-Menu-IP-Static-PDNS-Entry-013) If you wish to enter a Secondary DNS address, use the Arrow buttons to change the address to your desired value. When done, press the OK button.

MicroLogix-1400-LCD-ENETcfg-Menu-IP-Static-SDNS-Entry-014) Now you’re finished setting up the MicroLogix 1400’s IP Address. As noted above, for the changes to take place you will need to cycle power to your Micro.

15) If you prefer to return to the I/O Status display, press the ESC button until you see the main menu, and then select “I/O Status” and press the OK button:

MicroLogix-1400-LCD-Main-Menu-Status-SelI hope the above procedure on how to set a MicroLogix 1400’s IP address using the LCD was helpful.

If you have any comments, questions, suggestions, or corrections, please feel free to leave them with us by filling out the “post a comment or question” link below.

Until next time, Peace ✌️ 

If you enjoy this episode please give it a Like, and consider Sharing as this is the best way for us to find new guests to come on the show.

Shawn M Tierney
Technology Enthusiast & Content Creator

Eliminate commercials and gain access to my weekly full length hands-on, news, and Q&A sessions by becoming a member at The Automation Blog or on YouTube. You'll also find all of my affordable PLC, HMI, and SCADA courses at TheAutomationSchool.com.

shawntierney avatar

Using the MicroLogix 1400′s LCD To View and Edit Data File Values

MicroLogix-1400-LCD-Monitor-Menu-N7-0-Set


The MicroLogix 1400’s LCD display allows access to many of it’s features and functions.

In today’s article, we show you how to use it to view and change Data File values.

Enabling Default Comms on the MicroLogix 1400

1) When the MicroLogix 1400 is powered on, it displays the I/O Status screen as shown below:

MicroLogix-1400-LCD-IO-Status2) To view or edit Data Files, we need to access the LCD menu. To do this, press the ESC button and you should see the display below:

MicroLogix-1400-LCD-Main-Menu-Status-Sel


3) Next, press the Down Arrow button once to select “Monitoring,” then press the OK button:

MicroLogix-1400-LCD-Main-Menu-Monitor-Sel4) File number 3 is selected by default. To view or edit bits in file 3 press the OK button.

MicroLogix-1400-LCD-Monitor-Menu-3-Sel5) Below you can see the value of B3:0/0. To change to another Bit use the Up Arrow button.

MicroLogix-1400-LCD-Monitor-Menu-B3-0-06) We pressed the Up Arrow button four times in order to view B3:0/4, as seen below:

MicroLogix-1400-LCD-Monitor-Menu-B3-0-4-Off7) To turn this bit on, start by pressing the OK button. Next, press the Up Arrow button once to change the value from OFF to ON.

MicroLogix-1400-LCD-Monitor-Menu-B3-0-4-sel-on8) To return to B3 bit selection, press the OK button

MicroLogix-1400-LCD-Monitor-Menu-B3-0-4-On9) To return to the file selection menu, press the ESC button.

10) To view or edit another file, press the Up Button. As you can see below, only S, B, N, L, and F files are supported.

MicroLogix-1400-LCD-Monitor-Menu-4-Sel11) We pressed the Up Arrow button four times to change the file number to 7.

MicroLogix-1400-LCD-Monitor-Menu-7-Sel12) To view N7, press the OK button. To edit N7:0, press the OK button again.

MicroLogix-1400-LCD-Monitor-Menu-N7-0-sel-013) To change the value of N7:0, use the Left and Right Arrow buttons to select a digit, and the Up and Down Arrow buttons to change its value.

MicroLogix-1400-LCD-Monitor-Menu-N7-0-sel-114) Once you have the value entered, press the OK button to return to the N7 word selection.

MicroLogix-1400-LCD-Monitor-Menu-N7-0-Set15) To return to the I/O Status display, press the ESC button until you see the main menu, and then select “I/O Status” and press the OK button:

MicroLogix-1400-LCD-Main-Menu-Status-SelI hope the above procedure on how to use the MicroLogix 1400’s LCD display to view and change data files values was helpful.

If you have any comments, questions, suggestions, or corrections, please feel free to leave them with us by filling out the “post a comment or question” link below.

Until next time, Peace ✌️ 

If you enjoy this episode please give it a Like, and consider Sharing as this is the best way for us to find new guests to come on the show.

Shawn M Tierney
Technology Enthusiast & Content Creator

Eliminate commercials and gain access to my weekly full length hands-on, news, and Q&A sessions by becoming a member at The Automation Blog or on YouTube. You'll also find all of my affordable PLC, HMI, and SCADA courses at TheAutomationSchool.com.

shawntierney avatar

Using the MicroLogix 1400′s LCD To Enable Default Comms

MicroLogix-1400-LCD-DCOMM-Menu-Enable-Conf


The MicroLogix 1400’s LCD display allows access to many of it’s features and functions.

In today’s article, we show you how to use it to enable channel 0’s default communication settings.

NOTE: When “Default Comms” is enabled, the MicroLogix 1400’s Channel 0 serial port is toggled back to the factory default settings. These settings include the DF1 Full Duplex protocol, a baud rate of 19.2K, and CRC error checking. When “Default Comms” is disabled, Channel 0 returns to the currently loaded program’s settings.

Enabling Default Comms on the MicroLogix 1400

1) When the MicroLogix 1400 is powered on, it displays the I/O Status screen as shown below:

MicroLogix-1400-LCD-IO-Status2) To enable “Default Comms,” we need to access the LCD menu. To do this, press the ESC button and you should see the display below:

MicroLogix-1400-LCD-Main-Menu-Status-Sel


3) Next, press the down arrow button four times to select “Advanced Set,” then press the OK button:

MicroLogix-1400-LCD-Main-Menu-Advanced-Sel4) Here, press the down arrow button once to select “DCOMM CFG,” then press the OK button:

MicroLogix-1400-LCD-Advanced-Menu-DCOMM-Sel5) Now press the up arrow button once to select “Enable,” and press the OK button.

MicroLogix-1400-LCD-DCOMM-Menu-Enable-Sel6) You should now see the message, “Comms config set to DF1 default.” You should also see the DCOMM indicator displayed near the top left of the LCD.

MicroLogix-1400-LCD-DCOMM-Menu-Enable-Conf7) Press the OK button to clear the message and return to the menu.

8) To disable DCOMM,  select Disable and press the OK button. You will then see the following confirmation message:

MicroLogix-1400-LCD-DCOMM-Menu-Disable-Conf9) To return to the I/O Status display, press the ESC button until you see the main menu, and then select “I/O Status” and press the OK button:

MicroLogix-1400-LCD-Main-Menu-Status-SelI hope the above procedure on how to use the MicroLogix 1400’s LCD display to enable “Default Comms” was helpful.

If you have any comments, questions, suggestions, or corrections, please feel free to leave them with us by filling out the “post a comment or question” link below.

Until next time, Peace ✌️ 

If you enjoy this episode please give it a Like, and consider Sharing as this is the best way for us to find new guests to come on the show.

Shawn M Tierney
Technology Enthusiast & Content Creator

Eliminate commercials and gain access to my weekly full length hands-on, news, and Q&A sessions by becoming a member at The Automation Blog or on YouTube. You'll also find all of my affordable PLC, HMI, and SCADA courses at TheAutomationSchool.com.

shawntierney avatar

RSTechED 2014 Post Show Thoughts (P30)

In The Automation Podcast: Episode 30, I discuss my post show thoughts on RSTechED 2014 with a fellow attendee.

Listen to the Podcast:


Until next time, Peace ✌️ 

If you enjoy this episode please give it a Like, and consider Sharing as this is the best way for us to find new guests to come on the show.

Shawn M Tierney
Technology Enthusiast & Content Creator

Eliminate commercials and gain access to my weekly full length hands-on, news, and Q&A sessions by becoming a member at The Automation Blog or on YouTube. You'll also find all of my affordable PLC, HMI, and SCADA courses at TheAutomationSchool.com.

shawntierney avatar

Using the MicroLogix 1400′s LCD To Change Trim Pot Values

MicroLogix-1400-LCD-Trim-Menu-Trim1-Sel


The MicroLogix 1400’s LCD display allows access to many of it’s features and functions.

In today’s article, we show you how to use it to change the Micro’s Digital Trim Pot values:

Changing Trim Pot values on the MicroLogix 1400

1) When the MicroLogix 1400 is powered on, it displays the I/O Status screen as shown below:

MicroLogix-1400-LCD-IO-Status2) To change the Micro’s Trim Pot values, we need to access the LCD menu. To do this, press the ESC button and you should see the display below:

MicroLogix-1400-LCD-Main-Menu-Status-Sel


3) Next, press the down arrow button four times to select “Advanced Set,” then press the OK button:

MicroLogix-1400-LCD-Main-Menu-Advanced-Sel4)  Now press the down arrow button three times to select “TrimPot Set,” then press the OK button:

MicroLogix-1400-LCD-Advanced-Menu-Trim-Sel5) Now select either “LCD:0.POT0” or “LCD:0.POT1,” and press the OK button.

MicroLogix-1400-LCD-Trim-Menu-Trim1-Sel6) Here you see the Trim Pot Min and Max values (TMIN and TMAX) as well as the value for POT0 (or POT1) flashing:

MicroLogix-1400-LCD-Trim1-Set-07) Use the Left and Right Arrow buttons to select a POT digit. Then use the Up and Down Arrow buttons to change the selected digit’s value. When done press the OK button.

MicroLogix-1400-LCD-Trim1-Set-18) To return to the I/O Status display press the ESC button until you see the main menu. Then select “I/O Status” and press the OK button:

MicroLogix-1400-LCD-Main-Menu-Status-SelI hope the above procedure on how to use the MicroLogix 1400’s LCD display to change it’s Trim Pot values was helpful.

If you have any comments, questions, suggestions, or corrections, please feel free to leave them with us by filling out the “post a comment or question” link below.

Until next time, Peace ✌️ 

If you enjoy this episode please give it a Like, and consider Sharing as this is the best way for us to find new guests to come on the show.

Shawn M Tierney
Technology Enthusiast & Content Creator

Eliminate commercials and gain access to my weekly full length hands-on, news, and Q&A sessions by becoming a member at The Automation Blog or on YouTube. You'll also find all of my affordable PLC, HMI, and SCADA courses at TheAutomationSchool.com.

shawntierney avatar

MicroLogix 1100 Programming Cables (M38)


In The Automation Minute: Episode 38, we look at the programming cables for and communications ports of the Allen-Bradley MicroLogix 1100 Programmable Controller

Note: To find out how you can get a copy of my Micro Programmable Controller training video, please visit http://www.TheAutomationSchool.com


Check out our Video Collection #1 here, which includes the first five seasons of our shows (over 280 episodes and 29 hours!) for just $30!

Until next time, Peace ✌️ 

If you enjoy this episode please give it a Like, and consider Sharing as this is the best way for us to find new guests to come on the show.

Shawn M Tierney
Technology Enthusiast & Content Creator

Eliminate commercials and gain access to my weekly full length hands-on, news, and Q&A sessions by becoming a member at The Automation Blog or on YouTube. You'll also find all of my affordable PLC, HMI, and SCADA courses at TheAutomationSchool.com.

shawntierney avatar

ViewSE- v8.0 Released!

FTView_8_Splash_Fi


FTView_8_SplashRockwell Automation just released the latest version of its FactoryTalk View product.

Without any fanfare FactoryTalk View Site Edition Version 8 became available for download last week. This was a pleasant surprise to many of Rockwell’s own employees and distributors who had expected the product to come out much later in the year.

But even better than an early release are the new features included in version 8.

While both View Machine Edition and View Site Edition were released simultaneously, today we’ll focus on what’s new with Site Edition as we covered Machine Edition on Friday.


What’s new in FactoryTalk View Site Edition v8.0

Here’s the new features in ViewSE 8.0 which I found the most interesting:

FTView_SE_8_ConfirmationAdditional Operating System Support

We finally get Windows 8, 8.1, and Server 2012 support. Of the three, I think Windows Server 2012 is the most essential as 2008 is beginning to show it’s age.

Client Install Portal

A new optional component on the ViewSE server which allows remote client installation through a web portal.

Confirmation Popup Before Action

Now you can choose to enable a confirmation popup dialog before executing actions from buttons, numeric and string inputs, and objects with touch animation.

FTView_SE_8_DisableButtonButton enable and disable

A feature sorely missing since, well forever. No more placing fake grayed out buttons under actual buttons which we previously disabled using visibility animation.

Log value before change

It’s always been easy to log a value when it changes, but the software never captured what the value was prior to the change. Now the previous value is show and logged in the Diagnostics List.


Well, those are the new features in ViewSE v8.0 that caught my eye . For the complete list, check out the release notes that comes with the software.

And if you have any thoughts you’d like to share on ViewSE 8.0, please let us know by submitting the “post a comment or question” link below.

Until next time, Peace ✌️ 

If you enjoy this episode please give it a Like, and consider Sharing as this is the best way for us to find new guests to come on the show.

Shawn M Tierney
Technology Enthusiast & Content Creator

Eliminate commercials and gain access to my weekly full length hands-on, news, and Q&A sessions by becoming a member at The Automation Blog or on YouTube. You'll also find all of my affordable PLC, HMI, and SCADA courses at TheAutomationSchool.com.

shawntierney avatar

FactoryTalk View Machine Edition Version 8 Released!

FTView_8_Splash_Fi


FTView_8_SplashRockwell Automation just released the latest version of its FactoryTalk View product.

Without any fanfare, FactoryTalk View Machine Edition version 8 became available for download earlier this week. This was a pleasant surprise to many of Rockwell’s own employees and distributors who had expected it to come out much later in the year.

But even better than an early release are the new features included in version 8.

While View Machine Edition and View Site Edition were released simultaneously, today we’ll focus on what’s new with Machine Edition, and we’ll cover View Site Edition on Monday.

What’s new in FactoryTalk View Machine Edition v8.0

Here’s my own take of the most important new features in ViewME 8.0:

Additional Operating System Support

We finally get official Windows 8 (and 8.1, and Server 2012) support! Not that I plan to ditch Windows 7 anytime soon, but it’s essential for successful software products to support the latest Microsoft operating systems.

PanelView Plus 7 Support

Huh? Yeah, we were just talking about this last week. Now we finally have a public acknowledgement that the PanelView Plus 7 is coming. But it’s not just that. The release notes also confirm that the PVPlus 7 will come in a standard and enhanced version, and will support new resolutions including widescreen aspect ratios.

Project based security

This is great news for anyone out there who has been frustrated with ViewME FT Local Directory Security which debuted in version 4. Now in FTViewME 8.0 security is project based, and no longer tied to the local PC’s FactoryTalk Directory. This will make sharing projects with users, groups, and passwords much much easier.

FTView_ME_8_User_ManagementRuntime Use Management

With version 8 you can now add, delete, modify, unlock, enable, disable, and change users during runtime! You can also add, delete, and modify groups too.

In addition, support for domain authentication using Windows 2012, 2008, and 2003 via LDAP or LDAP over SSL has been added.

Additional Enhancements

Many smaller enhancements are also included in this release. One is a warning if the resolution of the project being run is different than the terminal. Another is a warning if a shortcut is applied to an unsupported device.

But my favorite miscellaneous update is with the new application manager. It now no longer closes after completing a task. Instead (like many Rockwell utilities) at the end of a task (like backing up a project) it will return to its start page. This is definitely going to make managing libraries of projects much easier.


Well that’s all I know right now about FactoryTalk View Machine Edition and View Studio version 8.0. In the coming days and weeks as I begin to use it I’ll bring you any additional changes I encounter.

Until then, if you have some thoughts you’d like to share on ViewME 8.0 please let us know by filling out the “post a comment or question” link below.

Until next time, Peace ✌️ 

If you enjoy this episode please give it a Like, and consider Sharing as this is the best way for us to find new guests to come on the show.

Shawn M Tierney
Technology Enthusiast & Content Creator

Eliminate commercials and gain access to my weekly full length hands-on, news, and Q&A sessions by becoming a member at The Automation Blog or on YouTube. You'll also find all of my affordable PLC, HMI, and SCADA courses at TheAutomationSchool.com.

shawntierney avatar

Remote Access Options (P29)

In The Automation Podcast: Episode 29, we discuss Remote Access Options for Control Systems.

Note – You’ll find more information about control system remote access options in our companion article below:

Listen to the Podcast:


Until next time, Peace ✌️ 

If you enjoy this episode please give it a Like, and consider Sharing as this is the best way for us to find new guests to come on the show.

Shawn M Tierney
Technology Enthusiast & Content Creator

Eliminate commercials and gain access to my weekly full length hands-on, news, and Q&A sessions by becoming a member at The Automation Blog or on YouTube. You'll also find all of my affordable PLC, HMI, and SCADA courses at TheAutomationSchool.com.

shawntierney avatar

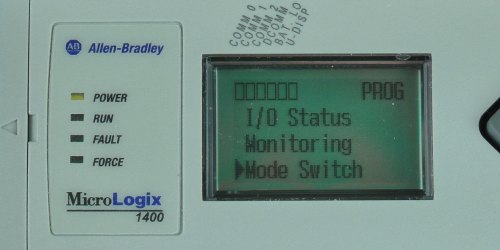
Using the MicroLogix 1400′s LCD To Change Modes

MicroLogix-1400-LCD-Mode-Menu-Run-Sel-Running


The MicroLogix 1400’s LCD display allows access to many of its features and functions.

In today’s article we show you how to use it to change this Micro’s Run mode:

Changing the MicroLogix 1400’s mode

1) When the MicroLogix 1400 is powered on, it powers up displaying I/O Status seen below:

MicroLogix-1400-LCD-IO-StatusIn the above picture you can see this Micro is in the “Program” mode as the RUN LED to the left of the LCD is off, and on the top right of the LCD Display you can see the word “PROG”

2) To change this Micro’s “Mode,” we first need to access the LCD menu. To do this, press the ESC button and the menu below will be displayed:

MicroLogix-1400-LCD-Main-Menu-Status-Sel

3) Now press the Down Arrow button twice to select “Mode Switch,” and press the OK button:

MicroLogix-1400-LCD-Main-Menu-Mode-Sel4) Here, select the “Mode” you would like to change MicroLogix 1400 to. We will choose “Run” in this example.

MicroLogix-1400-LCD-Mode-Menu-Run-Sel5) Now that you have selected the RUN mode, you must press the OK button for it to change to this mode.

MicroLogix-1400-LCD-Mode-Menu-Run-Sel-Running6) Above you see the RUN LED indicator to the left of the LCD is now on. And the text in the top right of the LCD has changed to “RUN.” This indicates we have successfully change our MicroLogix 1400’s mode from “Program” to “Run” using its LCD display.

7) To return to the “I/O Status display,” press the ESC button until you see the main menu, and then select “I/O Status” and press the OK button:

MicroLogix-1400-LCD-Main-Menu-Status-SelI hope the above procedure on how to use the MicroLogix 1400’s LCD display to change it’s mode was helpful.

If you have any comments, questions, suggestions, or corrections, please feel free to leave them with us by filling out the “post a comment or question” link below.

Until next time, Peace ✌️ 

If you enjoy this episode please give it a Like, and consider Sharing as this is the best way for us to find new guests to come on the show.

Shawn M Tierney
Technology Enthusiast & Content Creator

Eliminate commercials and gain access to my weekly full length hands-on, news, and Q&A sessions by becoming a member at The Automation Blog or on YouTube. You'll also find all of my affordable PLC, HMI, and SCADA courses at TheAutomationSchool.com.

shawntierney avatar

MicroLogix 1100 Wiring Terminals (M37)


In The Automation Minute: Episode 37, we look at the wiring terminals of the Allen-Bradley MicroLogix 1100 Programmable Controller

Note: To find out how you can get a copy of my Micro Programmable Controller training video, please visit http://www.TheAutomationSchool.com


Check out our Video Collection #1 here, which includes the first five seasons of our shows (over 280 episodes and 29 hours!) for just $30!

Until next time, Peace ✌️ 

If you enjoy this episode please give it a Like, and consider Sharing as this is the best way for us to find new guests to come on the show.

Shawn M Tierney
Technology Enthusiast & Content Creator

Eliminate commercials and gain access to my weekly full length hands-on, news, and Q&A sessions by becoming a member at The Automation Blog or on YouTube. You'll also find all of my affordable PLC, HMI, and SCADA courses at TheAutomationSchool.com.

shawntierney avatar

Finding a MicroLogix 1400′s IP and MAC Address

MicroLogix-1400-LCD-Advanced-Menu-ENETcfg-Sel


The MicroLogix 1400 includes an Ethernet port with a fixed MAC address, as well as a settable Ethernet IP address. In today’s article we’ll show you how to find both.

Finding the MAC address on a MicroLogix 1400:

1) Thankfully, each MicroLogix 1400 comes with its unique MAC address stenciled on it. To find it, remove the battery compartment cover on the right side of the Micro:

MicroLogix-1400-MAC2) At the very bottom of the compartment, directly under where the battery goes, you’ll see the MicroLogix 1400’s MAC address. The MAC Address of the unit pictured below is: 00:1D:9C:A4:92:97.

MicroLogix-1400-MAC-Closeup

Finding the IP and MAC address of a MicroLogix 1400 using the built-in LCD:

1) When the MicroLogix 1400 is powered on, it displays the I/O Status screen as shown below:

MicroLogix-1400-LCD-IO-Status2) To find the Micro’s IP and MAC address using the LCD,  we need to access its menu. To do this, press the ESC button and you should see the display below:

MicroLogix-1400-LCD-Main-Menu-Status-Sel3) Next, press the Down Arrow button four times to select “Advanced Set,” then press the OK button:

MicroLogix-1400-LCD-Main-Menu-Advanced-Sel4) Here, press the Down Arrow button twice to select “ENET CFG,” then press the OK button:

MicroLogix-1400-LCD-Advanced-Menu-ENETcfg-Sel5) Now in the Ethernet Configuration menu select “Status,” and press the OK button.

MicroLogix-1400-LCD-ENETcfg-Menu-Status-Sel6) Now you will see displayed the MAC address followed by the IP address of your MicroLogix 1400. The model below shows no IP Address as it’s brand new and is set to automatically obtain an address via BOOT-P.

MicroLogix-1400-LCD-ENETcfg-Status7) To return to the I/O Status display, press the ESC button until you see the main menu, and then select “I/O Status” and press the OK button:

MicroLogix-1400-LCD-Main-Menu-Status-SelI hope the above procedure on how to find a MicroLogix 1400’s IP and MAC address was helpful.

If you have any comments, questions, suggestions, or corrections, please feel free to leave them with us by filling out the “post a comment or question” link below.

Until next time, Peace ✌️ 

If you enjoy this episode please give it a Like, and consider Sharing as this is the best way for us to find new guests to come on the show.

Shawn M Tierney
Technology Enthusiast & Content Creator

Eliminate commercials and gain access to my weekly full length hands-on, news, and Q&A sessions by becoming a member at The Automation Blog or on YouTube. You'll also find all of my affordable PLC, HMI, and SCADA courses at TheAutomationSchool.com.

shawntierney avatar

The PanelView Plus 7: What We Know So Far

PVPlus Comapct Questionmarks


PVPlus Comapct QuestionmarksFrustratingly, I can not find ANYTHING about a possible “PanelView Plus 7” published publically by Rockwell Automation.

I’m frustrated not only because I’m a big PanelView Plus fan, but also because the rumors state it’s suppose to be releasing around the first of the year.

Yeah, I know: Once bitten twice shy, right? But while the PanelView 5000 was publically “previewed” extremely early in it’s development cycle, from what I’m hearing the PVPlus 7 development is all done.

So, why the hush hush?

Edit 08-29-14: With the release of ViewStudio 8.0 we finally have a public acknowledgement that the PanelView Plus 7 is coming. The release notes confirm that the PVPlus 7 will come in a standard and enhanced versions, and will support new resolutions including widescreen aspect ratios.

Rumors and Speculation

Not finding any public information available, all I can share with your are the rumors and speculation I’ve heard outside of official channels, and not covered by non-disclosures:

  • The PanelView Plus 7 will program with ViewStudio version 8.

No, you read that right. While the PanelView Plus 6 required a minimum of ViewStudio version 6, the PVPlus 7 is said to require v8. This actually seems credible to me, as the last version of ViewStudio was version 7, and it came out several months ago.

  • It will be backward compatible with runtime files (.mer) back to version 3.2

This is very good news. Just like the PVPlus 6, the rumor is the PVPlus 7 will also support old .mer files.

  • PanelView 5000 QuestionmarksIt will be based on the PanelView 5000 hardware and have higher resolution that the same size PVPlus 6.

What? Um, ok it would be pretty cool if the engineers at Rockwell were able to get View Machine Edition to work on the same hardware designed for the PanelView 5000. In fact, I think this is pretty plausible as the hardware seemed quite stable when I used it at RSTechED back in 2012.

  • It will only support Ethernet and Serial communications

Hmm. Kind of a bummer, but it’s understandable they aren’t adding support for Data Highway which hails from the 1980’s.

  • It will begin shipping in the December 14 / January 15 time frame.

Ok, this one has me concerned. While that is the same release timeframe I’ve heard for the next ViewStudio, since we have no public information on the PVPlus 7 it’s kind of hard to believe this is accurate…

  • It will be launched at Automation Fair 2014

Well, if everything else above is true, then this would make a lot of sense. At this point, barring any public announcement from Rockwell, I guess we’ll just have to wait and see.

That is, unless you heard something about the PanelView Plus 7? If you have, I’d love to hear what you heard – just reply to this blog post by filling in the “post a comment or question” link below.

Until next time, Peace ✌️ 

If you enjoy this episode please give it a Like, and consider Sharing as this is the best way for us to find new guests to come on the show.

Shawn M Tierney
Technology Enthusiast & Content Creator

Eliminate commercials and gain access to my weekly full length hands-on, news, and Q&A sessions by becoming a member at The Automation Blog or on YouTube. You'll also find all of my affordable PLC, HMI, and SCADA courses at TheAutomationSchool.com.

shawntierney avatar