Home Blog Page 74

PanelView Plus – Setting The Screen Saver


So you have a PanelView Plus and want to set or change its screen saver settings ?

Well in today’s article I’ll show you step-by-step how to use the PanelView Plus Configuration Menu to do just that.


Step 1) Power on your PanelView Plus and return to the main configuration menu as shown below:

Note: If you don’t know how to get back to the PanelView Plus’s configuration menu, check out my previous article on that topic:

Step 2) Select Terminal Settings from the main menu, then select Display and then Enter:

Step 3) Now select Screen Saver and Enter:

Step 4) And now make any changes you wish to the Screen Saver’s timing, intensity, and even advanced settings.

NOTE: For your changes to be saved you must exit this screen by clicking on the OK button.

Note: This is what the Advanced Settings screen looks like:

 Question: Did you Find this article helpful? If so, please share it with co-workers and colleagues, and for more articles about the PanelView Plus click on the link below:


You can watch a video of the above procedure in the below video(s):


I hope you found this article helpful. If you have any questions please feel free to post them at TheAutomationBlog.com/join

Until next time, Peace ✌️ 

If you enjoy this episode please give it a Like, and consider Sharing as this is the best way for us to find new guests to come on the show.

Shawn M Tierney
Technology Enthusiast & Content Creator

Eliminate commercials and gain access to my weekly full length hands-on, news, and Q&A sessions by becoming a member at The Automation Blog or on YouTube. You'll also find all of my affordable PLC, HMI, and SCADA courses at TheAutomationSchool.com.

shawntierney avatar

PanelView Plus – Setting The Screen Saver (M3E28)


Learn how to setup the PanelView Plus Screen Saver in Episode 28A of The Automation Minute Season 3:


If you’ve found this video helpful, checkout my training courses here.

Check out our Video Collection #1 here, which includes the first five seasons of our shows for just $30!

Until next time, Peace ✌️ 

If you enjoy this episode please give it a Like, and consider Sharing as this is the best way for us to find new guests to come on the show.

Shawn M Tierney
Technology Enthusiast & Content Creator

Eliminate commercials and gain access to my weekly full length hands-on, news, and Q&A sessions by becoming a member at The Automation Blog or on YouTube. You'll also find all of my affordable PLC, HMI, and SCADA courses at TheAutomationSchool.com.

shawntierney avatar

PanelView Plus 7 – How To View or Edit your RSLinx Enterprise Settings, Shortcuts (M3E27B)


Learn how to view and edit PanelView Plus 7 communications as well as view Shortcut Targets in Episode 27B of The Automation Minute Season 3:


If you’ve found this video helpful, checkout my training courses here.

Check out our Video Collection #1 here, which includes the first five seasons of our shows for just $30!

Until next time, Peace ✌️ 

If you enjoy this episode please give it a Like, and consider Sharing as this is the best way for us to find new guests to come on the show.

Shawn M Tierney
Technology Enthusiast & Content Creator

Eliminate commercials and gain access to my weekly full length hands-on, news, and Q&A sessions by becoming a member at The Automation Blog or on YouTube. You'll also find all of my affordable PLC, HMI, and SCADA courses at TheAutomationSchool.com.

shawntierney avatar

PanelView Plus – How To View or Edit your RSLinx Enterprise Settings, Shortcuts


So you have a PanelView Plus, PanelView Plus 6, or PanelView Plus 7, and want to view or edit project communications, or find out which PLC a shortcut points to?

Well in today’s article I’ll show you step-by-step how to use the PanelView Plus Configuration Menu to do just that.


Step 1) Power on your PanelView Plus and return to the main configuration menu as shown below:

Note: If you don’t know how to get back to the main configuration menu, check out my previous article on that topic:

Step 2) Select Terminal Settings from the main menu, then select Networks and Communications, and then Enter:

Step 3) Now select RSLinx Enterprise Communications, and then Enter:

Step 4) And now you will see your PanelView Plus’s current communications configuration, which may look similar to mine below:

And this is my PanelView Plus 7’s current communications configuration:

Step 5) Next, to see a list of Shortcuts and Targets, return to the main menu and insure an application is loaded. Then select Application Settings:

Step 6) Next select Device Shortcuts, and then Enter:

Step 7) Now select the Shortcut from the list that you want to see the Target for. Then select Enter:

Note: You may not have more than one Shortcut, but you will have at least one if your project communicates to an A-B PLC.

Step 8) And here you will see the Shortcut’s Target PLC highlighted. In this example it’s a MicroLogix 1000:

And below you can see another example of a Target PLC taken from my PanelView Plus 7:

Question: Did you Find this article helpful? If so, please share it with co-workers and colleagues, and for more articles about the PanelView Plus click on the link below:


You can watch a video of the above procedure in the below video(s):


I hope you found this article helpful. If you have any questions please feel free to post them at TheAutomationBlog.com/join

Until next time, Peace ✌️ 

If you enjoy this episode please give it a Like, and consider Sharing as this is the best way for us to find new guests to come on the show.

Shawn M Tierney
Technology Enthusiast & Content Creator

Eliminate commercials and gain access to my weekly full length hands-on, news, and Q&A sessions by becoming a member at The Automation Blog or on YouTube. You'll also find all of my affordable PLC, HMI, and SCADA courses at TheAutomationSchool.com.

shawntierney avatar

PanelView Plus – How To View or Edit your RSLinx Enterprise Settings, Shortcuts (M3E27A)


Learn how to view and edit PanelView Plus communications as well as view Shortcut Targets in Episode 27A of The Automation Minute Season 3:


If you’ve found this video helpful, checkout my training courses here.

Check out our Video Collection #1 here, which includes the first five seasons of our shows for just $30!

Until next time, Peace ✌️ 

If you enjoy this episode please give it a Like, and consider Sharing as this is the best way for us to find new guests to come on the show.

Shawn M Tierney
Technology Enthusiast & Content Creator

Eliminate commercials and gain access to my weekly full length hands-on, news, and Q&A sessions by becoming a member at The Automation Blog or on YouTube. You'll also find all of my affordable PLC, HMI, and SCADA courses at TheAutomationSchool.com.

shawntierney avatar

PanelView Plus 7 – .MER Runtime: Load, Set Default Runtime Application (M3E26B)

Learn how to load and set the default runtime application on the PanelView Plus 7 in Episode 26B of The Automation Minute Season 3:


If you’ve found this video helpful, checkout my training courses here.

Check out our Video Collection #1 here, which includes the first five seasons of our shows for just $30!

Until next time, Peace ✌️ 

If you enjoy this episode please give it a Like, and consider Sharing as this is the best way for us to find new guests to come on the show.

Shawn M Tierney
Technology Enthusiast & Content Creator

Eliminate commercials and gain access to my weekly full length hands-on, news, and Q&A sessions by becoming a member at The Automation Blog or on YouTube. You'll also find all of my affordable PLC, HMI, and SCADA courses at TheAutomationSchool.com.

shawntierney avatar

PanelView Plus – .MER Runtime: Load, Set Default Application


So you have a PanelView Plus, PanelView Plus 6, or PanelView Plus 7, and want to set a .MER runtime application file to be the default to run when the terminal powers on?

Well in today’s article I’ll show you step-by-step how to use the PanelView Plus Configuration Menu to do just that.


Step 1) Power on your PanelView Plus and return to the main configuration menu as shown below:

Note: If you don’t know how to get back to the main configuration menu, check out my previous article on that topic:

Step 2) Next, select Load Application from the main menu, and then select the application from the list that you wish to make the default application. Then select the Load button:

NOTE: Only load the application from External Storage if you have a newer PanelView Plus 6 or 7, however doing so will also require you to leave the external storage plugged into the PVPlus. In most cases it is better to first copy the runtime file to internal storage so no external storage must be left plugged into the PanelView Plus 6 or 7.

Step 3) If you are asked if you want to use the communications settings from the file you are loading, in most cases you will want to answer yes:

Step 4) Now that we have the desired application loaded, to set it to be the default application select Terminal Settings:

Step 5) Next select Startup Options, and then select Enter:

Step 6) Now select FTView ME Station Startup, and then select Enter:

Step 7) Here insure “Run Current Application” is selected and then you must exit this screen by selecting “OK”:

NOTE: Many people see the setting already selected and exit the screen by selecting cancel, however that does not set the newly loaded application as the default application, so be sure to exit this screen by selecting OK, and then your current application will be the default application to run when you cycle power to your PanelView Plus.

Question: Did you Find this article helpful? If so, please share it with co-workers and colleagues, and for more articles about the PanelView Plus click on the link below:


You can watch a video of the above procedure in the below video(s):


I hope you found this article helpful. If you have any questions please feel free to post them at TheAutomationBlog.com/join

Until next time, Peace ✌️ 

If you enjoy this episode please give it a Like, and consider Sharing as this is the best way for us to find new guests to come on the show.

Shawn M Tierney
Technology Enthusiast & Content Creator

Eliminate commercials and gain access to my weekly full length hands-on, news, and Q&A sessions by becoming a member at The Automation Blog or on YouTube. You'll also find all of my affordable PLC, HMI, and SCADA courses at TheAutomationSchool.com.

shawntierney avatar

PanelView Plus – .MER Runtime: Load, Set Default Application (M3E26A)

Learn how to load and set the default runtime application on the PanelView Plus in Episode 26A of The Automation Minute Season 3:


If you’ve found this video helpful, checkout my training courses here.

Check out our Video Collection #1 here, which includes the first five seasons of our shows for just $30!

Until next time, Peace ✌️ 

If you enjoy this episode please give it a Like, and consider Sharing as this is the best way for us to find new guests to come on the show.

Shawn M Tierney
Technology Enthusiast & Content Creator

Eliminate commercials and gain access to my weekly full length hands-on, news, and Q&A sessions by becoming a member at The Automation Blog or on YouTube. You'll also find all of my affordable PLC, HMI, and SCADA courses at TheAutomationSchool.com.

shawntierney avatar

PanelView Plus – .MER Runtime: Transfer To Terminal using Memory Card


So you have a PanelView Plus, PanelView Plus 6, or PanelView Plus 7, and want to copy a new .MER runtime file to it using a memory card or USB flash drive?

Well in today’s article I’ll show you step-by-step how to use the PanelView Plus Configuration Menu to do just that.


Step 1) Power on your PanelView Plus and return to the main configuration menu as shown below:

Note: If you don’t know how to get back to the main configuration menu, check out my previous article on that topic:

Step 2) Now Select “Terminal Settings”:

Step 3) Next, scroll down and select “File Management”:

Step 4) Now select the Enter button:

Step 5) Next select “Copy Files”:

Step 6) Select the Enter button again:

Step 7) Now select “Copy Applications”:

Step 8) And select the Enter button:

Step 9) Now you’re in the “Copy Applications” screen, and you need to chose where to copy your .MER runtime file from.

“External Storage 1” would be a memory card, while “External Storage 2” would be a USB Flash Drive.

Below you’ll see both those options available as I have installed compatible devices into both ports:

Step 10) Select the location of your memory deivce and you should see a list of .MER runtime files.

NOTE: Your runtime files must be located in the following directory for the PanelView Plus to find them: “Rockwell Software\RsViewME\Runtime

Step 11) Now select the file you wish to copy to your PanelView Plus:

Step 12) And then select “Destination”:

Step 13) Next choose “Internal Storage”:

Step 14) Then choose “Copy”:

Note: The copy process can take 2 seconds to 2 minutes, depending on the size of your MER runtime file and the devices being used.

Step 15) If a file with the same name already exists on the PanelView Plus you’ll be prompted to confirm if you would like to overwrite it:

Step 16) Once done, you will be returned to the “Copy Applications” screen and can select “Cancel,” then “Close” three times to return to the main menu:

For more information about which PanelView Plus models support which features, check out my previous article:


You can watch a video of the above procedure in the below video:


I hope you found this article helpful. If you have any questions please feel free to post them at TheAutomationBlog.com/join

Until next time, Peace ✌️ 

If you enjoy this episode please give it a Like, and consider Sharing as this is the best way for us to find new guests to come on the show.

Shawn M Tierney
Technology Enthusiast & Content Creator

Eliminate commercials and gain access to my weekly full length hands-on, news, and Q&A sessions by becoming a member at The Automation Blog or on YouTube. You'll also find all of my affordable PLC, HMI, and SCADA courses at TheAutomationSchool.com.

shawntierney avatar

PanelView Plus – .MER Runtime: Transfer To Terminal using Memory Card (M3E25)

Learn how to copy .MER Runtime files to your PanelView Plus using a memory card or USB flash drive in Episode 25 of The Automation Minute Season 3:


If you’ve found this video helpful, checkout my training courses here.

Check out our Video Collection #1 here, which includes the first five seasons of our shows for just $30!

Until next time, Peace ✌️ 

If you enjoy this episode please give it a Like, and consider Sharing as this is the best way for us to find new guests to come on the show.

Shawn M Tierney
Technology Enthusiast & Content Creator

Eliminate commercials and gain access to my weekly full length hands-on, news, and Q&A sessions by becoming a member at The Automation Blog or on YouTube. You'll also find all of my affordable PLC, HMI, and SCADA courses at TheAutomationSchool.com.

shawntierney avatar

PanelView Plus – Setting Ethernet Address


So you have a new PanelView Plus, PanelView Plus 6, or PanelView Plus 7, and need to set its Ethernet Address?

Or maybe you’re moving an existing PanelView Plus to a new network?

Well in today’s article I’ll show you step-by-step how to set the Ethernet address of any PanelView Plus that has Ethernet.


Step 1) Power on your PanelView Plus and return to the main configuration menu as shown below:

Note: If you don’t know how to get back to the main configuration menu, check out my previous article on that topic:

Step 2) Now Select “Terminal Settings”:

Step 3) Next, scroll down and select “Networks and Communications”:

Step 4) Now select the Enter button:

Step 5) Next select “Network Connections”:

Step 6) Select the Enter button again:

Step 7) Now select “Network Adapters”:

Step 8) And select the Enter button:

Step 9) Finally select “Built-in Ethernet Controller”:

Step 10) And then select “IP Address”:

Step 11) Be sure to enter in an IP Address and Subnet mask for your PanelView Plus that is on the same subnet of the PLCs (or other Devices) you need your PanelView Plus to communicate to:

Step 12) Once done, select “OK”:

Step 13) Here you will receive a notice that you need to reboot or cycle power to your PanelView Plus for the new IP address to take effect:

Step 14) Next select “Close” four times to return to the main menu, and then you can select “Reset” to reboot your PanelView Plus:

For more information about which PanelView Plus models support which features, check out my previous article:


You can watch a video of the above procedure in the below video:


PanelView Plus – Setting Ethernet Address (M3E24)

Learn how to set your PanelView Plus Ethernet Address in Episode 24 of The Automation Minute Season 3:


If you’ve found this video helpful, checkout my training courses here.

Check out our Video Collection #1 here, which includes the first five seasons of our shows for just $30!

Until next time, Peace ✌️ 

If you enjoy this episode please give it a Like, and consider Sharing as this is the best way for us to find new guests to come on the show.

Shawn M Tierney
Technology Enthusiast & Content Creator

Eliminate commercials and gain access to my weekly full length hands-on, news, and Q&A sessions by becoming a member at The Automation Blog or on YouTube. You'll also find all of my affordable PLC, HMI, and SCADA courses at TheAutomationSchool.com.

shawntierney avatar

PanelView Plus – Firmware: Finding The Terminal’s Version


So you downloaded a runtime application to a PanelView Plus only to get an “incompatible version” error message?

This is often caused by downloading an .MER file of a version newer than the firmware installed on the PanelView Plus in question.

To avoid this problem, insure you’re creating runtimes that are compatible with your PanelView Plus terminal’s firmware.

And to do that you’ll need to know (1) what version your PanelView Plus firmware is and (2) what the version is compatible with, both of which I cover in today’s article.


Step 1) Power on your PanelView Plus and return to the main configuration menu as shown below:

Note: If you do not know how to get to the main configuration menu check out yesterday’s article on that topic:

Step 2) Now Select “Terminal Settings”:

Step 3) Next, scroll down and select “System Information”:

Step 4) Now select the Enter button:

Step 5) Next select “About FactoryTalk View ME Station”

Step 6) Select the Enter button again:

Step 7) Finally, you will now see the Firmware version of your terminal:

Notes:

In most cases it does make sense to flash your PanelView Plus to the latest supported firmware. Newer firmware is backward compatible, so for instance version 5.1 will run a version 3.1 MER runtime file.

If you have a PanelView Plus, you can upgrade your firmware all the way to version 5.1.x.

NOTE: If you have the original 3.0 firmware you may need the 3.1 upgrade disc from your local representative before you can upgrade to any other version as it also contains a Windows CE upgrade as well.

If you have an original PanelView Plus 6 or 7, you can upgrade your firmware to the latest version (at the time this article was written,) however keep in mind these models do not support all of the communications drivers and expansion modules that the original PanelView Plus did.

For more information about which PanelView Plus models support which features, check out my previous article:


You can watch a video of the above procedure in the below video:


I hope you found this article helpful. If you have any questions please feel free to post them at TheAutomationBlog.com/join

Until next time, Peace ✌️ 

If you enjoy this episode please give it a Like, and consider Sharing as this is the best way for us to find new guests to come on the show.

Shawn M Tierney
Technology Enthusiast & Content Creator

Eliminate commercials and gain access to my weekly full length hands-on, news, and Q&A sessions by becoming a member at The Automation Blog or on YouTube. You'll also find all of my affordable PLC, HMI, and SCADA courses at TheAutomationSchool.com.

shawntierney avatar

PanelView Plus – Firmware: Finding The Terminal’s Version (M3E23)

Learn how to find your PanelView Plus firmware version as well as which versions are compatible in Episode 23 of The Automation Minute Season 3:


If you’ve found this video helpful, checkout my training courses here.

Check out our Video Collection #1 here, which includes the first five seasons of our shows for just $30!

Until next time, Peace ✌️ 

If you enjoy this episode please give it a Like, and consider Sharing as this is the best way for us to find new guests to come on the show.

Shawn M Tierney
Technology Enthusiast & Content Creator

Eliminate commercials and gain access to my weekly full length hands-on, news, and Q&A sessions by becoming a member at The Automation Blog or on YouTube. You'll also find all of my affordable PLC, HMI, and SCADA courses at TheAutomationSchool.com.

shawntierney avatar

PanelView Plus – Configuration Mode Menu: How To Access

PanelView Plus Configuration Mode

So you need to update your PanelView Plus time, date, screensaver, IP address, or other setting but can’t figure out how to access it’s configuration menu?

Well don’t feel too bad as Rockwell hasn’t always made this an easy task.

The basics…

1 PanelView Plus Configuration Mode
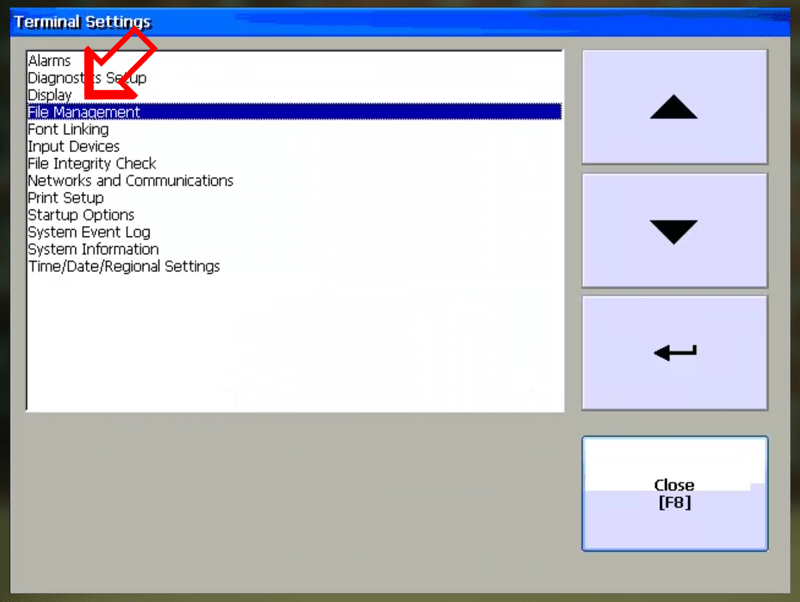
The PanelView Plus’s configuration menu is where you setup the terminal, including the clock, network settings, default application, and so on.

And when you power up a PanelView Plus for the first time, this is the screen you see displayed on the terminal.

That said, when a ViewME runtime is downloaded and set to “auto-run,” it becomes the default display in place of the configuration menu.

And while most programmers know they should always include a “goto config” button in their project, when they forget just getting back into the configuration menu can be a real chore with certain PanelView Plus versions.

Back in the day…

When the PanelView Plus first came out (version 3.0,) if a project was set to autorun and had no “goto config” button anywhere in the project, I would typically just download a new project that had a “goto config” button.

PanelView Plus Open Internal Memory CardHowever, that simple solution required knowing the existing communications settings.

When those weren’t available, I would resort to disassembling the unit, pulling out the internal compactflash card, and then moving all the .MER application files from the card to my computer.

This way, when the reassembled PVPlus booted and didn’t find the .MER file set to autorun, it was forced to return to the configuration menu.

Firmware 3.20.09 Made things easier, at least up to 5.1…

Thankfully when Rockwell released firmware 3.20.09, they added in an easy way to get into the configuration mode on boot.

PanelView Plus 3.20.09 Patch Release Notes

With this and subsequent firmware versions all the way to 5.1, when you powered on (or reset) your PVPlus, during the boot process you would see a small white square on the bottom left of the screen appear for two seconds.

And if on a touch screen you touched the white square, or on a keyboard model you pressed the F1 key while the square was present, the terminal would bypass the default .MER application and go directly into the configuration menu.

If the story ended here, it would’ve been a happy ending…

Then came the PanelView Plus 6 with version 6.0 firmware, in which Rockwell removed the white square and F1 functionality.

In its place they added a procedure which required plugging a USB keyboard into the back of the terminal.

Needless to say, not too many users were enamored with the idea of having to open the electrical enclosure to plug in a keyboard just to change the settings of their HMI.

PanelView Plus 6 Manual Boot OptionThankfully, Rockwell heard the feedback and in version 6.1 added back in the option to have the white square or F1 interrupt the boot process.

Unfortunately, this feature is not turned on by default.

To enable it, you must first exit the configuration menu, and open the system app in the control panel of the PanelView Plus’s Windows CE operating system.

Then on the startup options tab you need to enable the detection of safe mode, and save your setting by pressing ok.

As you can imagine, this setting often goes unchanged.

A simpler way…

If you find your PanelView Plus doesn’t display the white square during boot, and simply adding a “goto config” button to the project and re-downloading it is not an option, you may want to use an autorun.bat script.

Sandisk Memory Stick
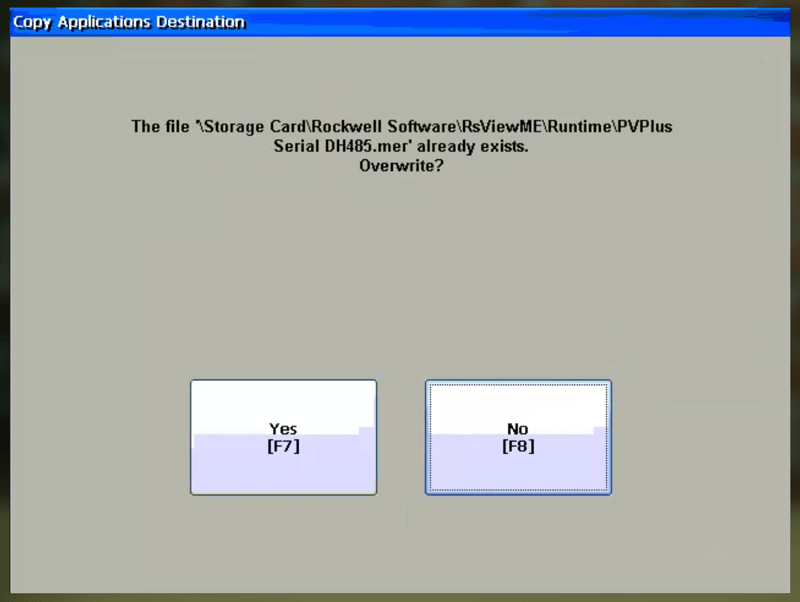
Using some simple command line text commands, you can create a text script that will copy all your .MER applications off of your PanelView Plus to your USB flash drive, so when you cycle power the terminal and it doesn’t find any applications it is forced to return to the configuration menu.

The script simply has to be named autorun.bat, and be placed in the root folder of a supported USB Thumb Drive that is then inserted into the PVPlus in question.

To find out more about writing your own autorun.bat file, see my previous article:

And for a video version of this article, see the below episode of The Automation Minute:


Until next time, Peace ✌️ 

If you enjoy this episode please give it a Like, and consider Sharing as this is the best way for us to find new guests to come on the show.

Shawn M Tierney
Technology Enthusiast & Content Creator

Eliminate commercials and gain access to my weekly full length hands-on, news, and Q&A sessions by becoming a member at The Automation Blog or on YouTube. You'll also find all of my affordable PLC, HMI, and SCADA courses at TheAutomationSchool.com.

shawntierney avatar

PanelView Plus – Configuration Mode Menu: How To Access (M3E22)

Learn how to access the PanelView Plus Configuration Menu in Episode 22 of The Automation Minute Season 3:


If you’ve found this video helpful, checkout my training courses here.

Check out our Video Collection #1 here, which includes the first five seasons of our shows for just $30!

Until next time, Peace ✌️ 

If you enjoy this episode please give it a Like, and consider Sharing as this is the best way for us to find new guests to come on the show.

Shawn M Tierney
Technology Enthusiast & Content Creator

Eliminate commercials and gain access to my weekly full length hands-on, news, and Q&A sessions by becoming a member at The Automation Blog or on YouTube. You'll also find all of my affordable PLC, HMI, and SCADA courses at TheAutomationSchool.com.

shawntierney avatar

How to install EDS Files (Electronic Data Sheets) (M3E21)

Learn how to install EDS files (Electronic Data Sheets) in Episode 21 of The Automation Minute Season 3:


NOTE: The EDS Tool was renamed the Device Description File Installation Tool in FTLinx v6.40 and RSLinx Classic v4.40. For more information, see this free tech note.


If you’ve found this video helpful, checkout my training courses here.

Check out our Video Collection #1 here, which includes the first five seasons of our shows for just $30!

Until next time, Peace ✌️ 

If you enjoy this episode please give it a Like, and consider Sharing as this is the best way for us to find new guests to come on the show.

Shawn M Tierney
Technology Enthusiast & Content Creator

Eliminate commercials and gain access to my weekly full length hands-on, news, and Q&A sessions by becoming a member at The Automation Blog or on YouTube. You'll also find all of my affordable PLC, HMI, and SCADA courses at TheAutomationSchool.com.

shawntierney avatar

How to install EDS files and eliminate yellow question marks in RSLinx

It’s not uncommon for new products to show up in RSLinx’s RSWho as “yellow question marks.”

And in most cases to connect to the device in question you’ll need to install the appropriate EDS file.

With that in mind, in today’s article I’ll cover how to install EDS Files to enable communications and eliminate “yellow question marks” in RSLinx.


NOTE: If you try to use a very old version of RSLinx Classic with new hardware, the below procedure may not work.

But, since all versions of RSLinx Classic Lite are free (link: how to download Rockwell Software updates) there’s typically no reason to use an old version with new hardware.


Step 1) The first step is to right click on the device in question to see if it has it’s EDS file embedded and ready to be uploaded.

If it does, you’ll see the below option to upload the EDS file from the device which you’ll want to select:

Note: If you don’t see this option, skip to the next section of this article.

Step 2) If prompted by Windows select Yes to allow the program to run:

Step 3) When the EDS Wizard runs select Next:

Step 4) Then select Next:

Step 5) Review the EDS files listed and then click on Next:

Step 6) If you would like to change the default icons do so on this screen. When done click on Next:

Step 7) On the next screen click on Next:

Step 8) And now click on Finish:

Step 9) Now in RSLinx you should see the “yellow question mark” replaced with a picture of the device.

If the device also supports browsing through to it’s backplane (like the L1 used in this example) you should now be able to do so:


Download and Install EDS files from Rockwell’s Website

Step 1) If you don’t get the option to upload the EDS file from the device when you right click on it, instead click on the Device Properties option:

Step 2) Next, note the product information including the EDS file name so you can get the correct EDS file from the vendor:

Step 3) If it’s a Rockwell product, head up to http://www.ab.com and from the Downloads link choose Electronic Data Sheets:

Step 4) On this page enter in the Network, Device Type, and the first four characters of the catalog number:

Step 5) From the resulting list find your product.

Then hover over the download link to insure the EDS file it links to matches the EDS file from the device properties in Step 2 above.

If it does, go ahead and download the EDS file to your PC:

Step 6) Once you’ve downloaded the EDS file, launch the EDS Hardware Installation Tool* which is installed by default when you install RSLinx Classic:

NOTE: The EDS Tool was renamed the Device Description File Installation Tool in FTLinx v6.40 and RSLinx Classic v4.40. For more information, see this free tech note.

Step 7) Once the tool launches, select Add:

Step 8) Next select “Register A Single File,” then browse and select the EDS file you just downloaded, and click on Next:

Step 9) Review the information in the next window and then click on Next:

Step 10) Review the default image for the device and make any changes you wish to make, then click on Next:

Step 11) Review the summary information and then click on Next:

Step 12) Once the wizard finishes click on Finish:

Step 13) Now in RSlinx’s RSWho you should see the devices picture in place of the “yellow question mark:”


Watch a video of the above procedure:


If you’ve found today’s article helpful and would like to help up publish more articles please consider making a small pledge at TheAutomationBlog.com/join.

You can also take our affordable training courses on PLCs and HMIs at TheAutomationSchool.com.

Until next time, Peace ✌️ 

If you enjoy this episode please give it a Like, and consider Sharing as this is the best way for us to find new guests to come on the show.

Shawn M Tierney
Technology Enthusiast & Content Creator

Eliminate commercials and gain access to my weekly full length hands-on, news, and Q&A sessions by becoming a member at The Automation Blog or on YouTube. You'll also find all of my affordable PLC, HMI, and SCADA courses at TheAutomationSchool.com.

shawntierney avatar

CCW – How to Download a free copy of Connected Components Workbench in 2017 (M3E20)

Learn where and how to download a free copy of Connected Components Workbench in Episode 20 of The Automation Minute Season 3:


If you’ve found this video helpful, checkout my training courses here.

Check out our Video Collection #1 here, which includes the first five seasons of our shows for just $30!

Until next time, Peace ✌️ 

If you enjoy this episode please give it a Like, and consider Sharing as this is the best way for us to find new guests to come on the show.

Shawn M Tierney
Technology Enthusiast & Content Creator

Eliminate commercials and gain access to my weekly full length hands-on, news, and Q&A sessions by becoming a member at The Automation Blog or on YouTube. You'll also find all of my affordable PLC, HMI, and SCADA courses at TheAutomationSchool.com.

shawntierney avatar

CCW – Where can you download a free copy of Connected Components Workbench?

So you’ve heard about Rockwell’s new line of low cost Micro PLCs, and now want to get your hands on the free software to check it out?

Well it’s as simple as following these steps:

Step 1) Navigate your web browser to http://www.ab.com, which will redirect you to ab.rockwellautomation.com:

Step 2) Then click on the Compatibility & Downloads link:

Step 3) In the search box type in Connected, and from the search list select Connected Components Workbench:

Step 4) Scroll down until you find Connected Components Workbench, and then select Downloads:

Step 5) Now select the download icon for the version of CCW you would like to download:

Step 6) Then select the link for your download:

Step 7) At this point you’ll be asked to sign in with (or create) a free Rockwell Automation account:

Step 8) Next select the accept button:

Step 9) At this point I typically choose manual download:

Step 10) And then select each link to download both parts of the CCW download:

If you’d like to learn how to use CCW to program a Micro800, check out my affordable training course, Nano-Basics.

Until next time, Peace ✌️ 

If you enjoy this episode please give it a Like, and consider Sharing as this is the best way for us to find new guests to come on the show.

Shawn M Tierney
Technology Enthusiast & Content Creator

Eliminate commercials and gain access to my weekly full length hands-on, news, and Q&A sessions by becoming a member at The Automation Blog or on YouTube. You'll also find all of my affordable PLC, HMI, and SCADA courses at TheAutomationSchool.com.

shawntierney avatar