My last post left off just short of how the script files were implemented and/or tied together to complete the system… so here we go.
Links to previous parts of this series:
-
Industrial Raspberry Pi Project, Part 1
-
Industrial Raspberry Pi Project, Part 2
-
Industrial Raspberry Pi Project, Part 3
With separate script files all able to run the individual components (including the two fans), it was relatively easy to merge them all into one main script file. But the system needed more functionality than just the internal components.
The scope of this project called for data not only saved to the attached USB drive (easily configured to a network drive if desired), but also to communicate specific data to a web-based dashboard (used Adafruit IO) and locally to an industrial controller (PLC) or display via Modbus TCP.
Modbus is a serial fieldbus communications protocol. It is a master/Slave protocol that can be handled by wiring from device to device with the typical transmit and receive wiring of a 9-pin d-sub connector or sometimes with two-wires daisy-chained between screw terminals.
For this application, and a growing use of it these days, it can be implemented over ethernet.
With industrial equipment made by OEMs such as Keyence (i.e., camera controllers) and Mitsubishi (PLCs, VFDs, and HMIs), it can be referred to as ModTCP or Modbus TCP.
One author refers to it as the “grandfather of modern fieldbus,” and states that it is still doing the job after four decades.
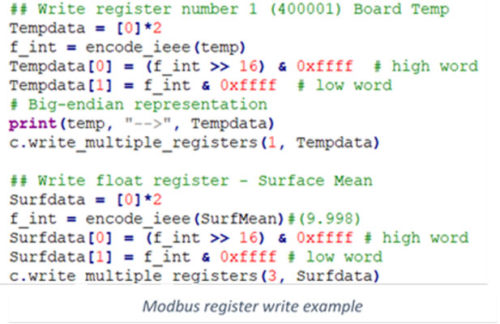
With Modbus, you read and write from holding registers. These registers are then transmitted internally to tags or data registers determined by the manufacturer but are still within industry standards.
For the two prototypes discussed here, there are pyModbusTCP API and Modbusclient declarations that are declared in the setup portion of the script.
From there, it is some simple connection open and monitoring commands in partnership with the connection write or read commands.
The final script configuration utilized 4 script files (Modbus TCP used in Comms script, Data Logging, System Operations, and a MQTT connection script for the URL dashboard connection) that all started on power up.
I decided it was best to break up the main script file as well as the others for them to operate asynchronously.
I utilized the autostart file setup (/home/pi/.config/autostart) I found while researching the best way to start up a script automatically on Pi boot up.
It worked just as I had hoped and would be easily setup even by the greenest of coders.
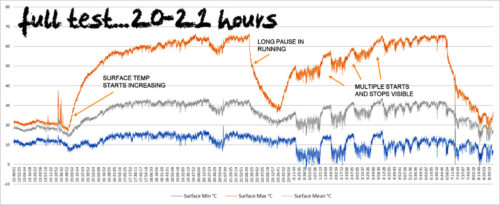
With an additional fan and some vent holes made in the enclosure necessary for needed air flow and reducing backpressure, both prototype systems were able to run for many hours (full workdays on several instances) at my desk.
The field test went smoothly with both prototypes for a good three-hour run. Then a final overnight test was run with the #1 prototype.
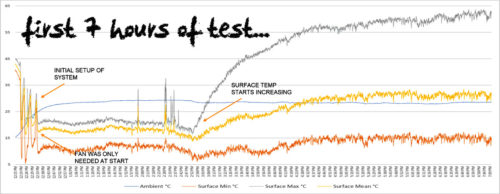
When analyzing the captured data file, it went very smooth. The ambient temperature was even low enough on the factory floor to keep the processor temp down and the fans only turned on and off a couple times to start. They then remained off for the remainder of the trial (22 hours).
Creating the CSV file (for data logging) was just as simple to implement as other components of this system.
With some simple examples and tutorials online and even YouTube, the format was somewhat simple and straightforward.
### Print to a CSV for recording data or system info ###
file = open(“/media/pi/USB_Drive_Name/file location if desired/filename.csv”, “a”)
file.write(“Message to write to file”+”\n”) #file write of message plus a carriage return
file.flush() #clear writing cache
file.close() #close file
The “a” option at the end of the command line specifies the file will be opened and entries will be appended at the end of the file. The file write would look a little different depending on if writing to the data log file or the system message file (as is shown here).
If a new file is needed or the datafile is a single line that gets written over, the “a” would change to a “w”. This same setup was used for the system log, data logging, and output to the Modbus TCP script.
The main file would write (and overwrite) a single line in the modbus.csv file. The script would then read that one line and output the corresponding values out to the Modbus registers.
Conclusion
This project was fun as well as challenging to work through to completion. Watching the two prototypes simultaneously communicate over VNC to a laptop, Wi-Fi to the dashboard, and over Modbus TCP to a Mitsubishi HMI was very rewarding.
I can obviously never include every little detail in a writeup like this, so feel free to post questions or email me ( cntrlengr at hotmail dot com ) and I will do my best to answer the questions or help in any way I can.
Don’t be discouraged to try your own Raspberry Pi industrial project. I feel it has a great niche in respect to some R&D prototyping, automating a single process, or even a complete shop floor. There are so many examples of currently running projects but go ahead and try something new!
Thanks for reading this short series I created during and after my Senior Design project made as part of completing my B.Sc. in EET at Purdue Fort Wayne (completed as of May 12th, 2021).
I would like to say a special thanks to Fort Wayne Metals for making it possible to return to school, for some of the funding of the project, and allowing me to run the prototypes on the shop floor to help monitor an existing process.
#DONEIN21
Written by Paul Hunt
Senior Automation Engineer and Freelance Writer
Have a question? Join our community of pros to take part in the discussion! You'll also find all of our automation courses at TheAutomationSchool.com.
Sponsor and Advertise: Get your product or service in front of our 75K followers while also supporting independent automation journalism by sponsoring or advertising with us! Learn more in our Media Guide here, or contact us using this form.
- Mitsubishi PLCs: Brief History and Hardware Overview - August 2, 2022
- Mitsubishi PLCs: FX5 vs iQ-R - February 10, 2022
- How To Register and Use a Device Profile in GX Works3 - November 9, 2021

Discover more from The Automation Blog
Subscribe to get the latest posts sent to your email.


