In my last article I discussed why you might want connect your PLC to a IoT device like a Raspberry Pi, as well as the software we use to accomplish this connection with A-B PLCs (Node-Red with the free node-contrib-pccc driver.)
In today’s article I’ll walk you through configuring node-contrib-pccc to read data from your A-B PLC into a Raspberry Pi.
Part 1: Network Connections
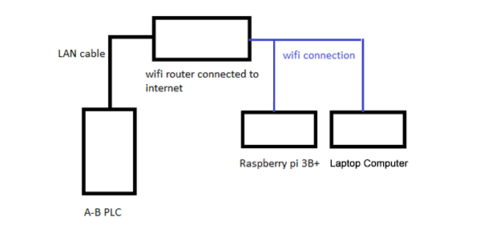
In this example I have a A-B PLC (MicroLogix 1400) connected to my WiFi Router via a standard LAN cable. I also have my Raspberry Pi and laptop computer connected to the same WiFi router via wireless connection.
While you can access your Raspberry Pi directly by connecting a USB keyboard, mouse, and HMDI display (TV, Monitor, etc.) to it, I’ve found that doing so consumes a lot of processing power in the Raspberry Pi which substantially slows down the system.
To avoid this, I prefer to connect to my Raspberry Pi remotely over the same local network using my laptop computer and a VNC client application like VNC Viewer.
Part 2: Node-Red PCCC Configuration
Once you’ve connected to your Raspberry Pi, start your Node-Red server and open the PCCC Input Node.
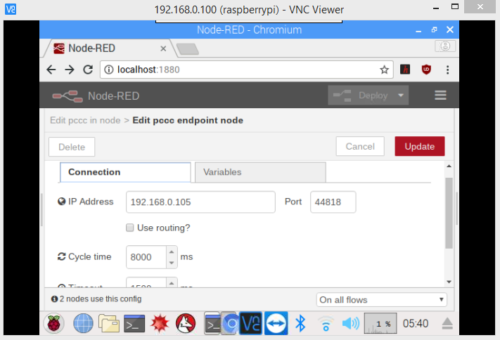
Next, navigate to the Connections section enter your AB PLC’s IP Address and Port Number, and set Cycle Time and Time Out per your requirements.
Note: In my experience, A-B PLCs generally use Port 44818
Next we need to configure the PLC variables that we want to fetch data from. To do this, you’ll need to know where in your PLC’s memory this data is.
With a legacy A-B PLC, it will be an “Address,” while with newer A-B PACs it will be a “Tag.”
In our example we are using a MicroLogix 1400, so we’ll need to provide the PLC Addresses for each piece of data we want to fetch.
For testing purposes we’ll use N7 integer values which we can change manually in the PLC using RSLogix, and then check within Node-Red to see if we are getting the same values or not.
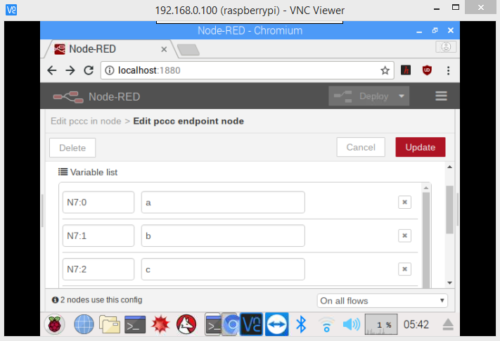

Part 3: Testing Communications
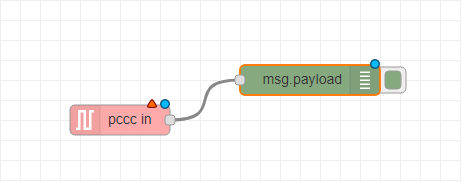
Now that we have completed our configuration, we can connect our Input Node to the Output Debug Node to see the incoming data from PLC.
To do this, drag the Debug Node from the Output Nodes and drop it into your work space, then connect (wire) the Input Node to the Output Debug Node:
Next, click on the Deploy Button (on the top right corner of the window) to see the incoming data from PLC in the Debug Area:
Next Step: Data Processing
Now that we have our data coming to Raspberry Pi’s Node-Red server, there are basically three kinds of operations we perform with data:
- Store data in a database
- Compare the data with reference values to provide a result or trigger an operations
- Display the data to the client in some visual form
Although the Node-Red server on the Raspberry Pi has several nodes to Store, Process, and Display data, there are many reason why you may not want to use a Raspberry Pi computer to do this, including:
- Raspberry Pi computers have limited processing capabilities and ram
- Multiple Raspberry Pis may be needed to connect to all the PLCs in the facility, but we often need all the data for calculations and displays.
- Remote locations may need access to historical data and complicated screens, which is more bandwidth intensive than reading raw values at set intervals.
Because of these reasons it’s more comment to use the Raspberry Pi computers to fetch the data we need from our PLCs, and then using MQTT (uses minimum bandwidth to transmit data, even works over 2G connections) to transmit the raw data to a server to be stored and processed.
Conclusion:
In this article we learned how to setup our Node-Red PCCC configuration running on our Raspberry Pi computer to read data in from an A-B PLC.
We also covered why you typically won’t use a Raspberry Pi computer to process, store, and display that data, but instead send that data to a Server Computer (like AWS IOT) for processing.
In my next article I’ll cover MQTT, and how to use it to Transmit data from a Raspberry Pi computer to an AWS IOT system.
Written by Nilesh Soni
Provider of custom ERP solutions and Freelance Writer
Edited by Shawn Tierney
Have a question? Join our community of pros to take part in the discussion! You'll also find all of our automation courses at TheAutomationSchool.com.
Sponsor and Advertise: Get your product or service in front of our 75K followers while also supporting independent automation journalism by sponsoring or advertising with us! Learn more in our Media Guide here, or contact us using this form.
- How To Register A Thing In AWS IoT - June 4, 2020
- IoT Architecture: Allen-Bradley PLCs to Amazon AWS - April 30, 2020
- Getting A-B PLC Data Into A Raspberry Pi - October 23, 2019

Discover more from The Automation Blog
Subscribe to get the latest posts sent to your email.


