
Recently a reader posted on The Automation Forums asking how he could set or change the I/O base selected in his RSLogix Micro program.
Since it’s not completely straight forward, I thought I’d post a short article with screenshots showing how to make this change.
Step 1) Open your MicroLogix program in RSLogix Micro Starter, Micro, or 500. Then from the Project tree on the left, expand the Controller folder and double-click on ‘”IO Configuration”:

Step 2) Next, in the IO Configuration window double click on the MicroLogix Base in “Slot #0”:
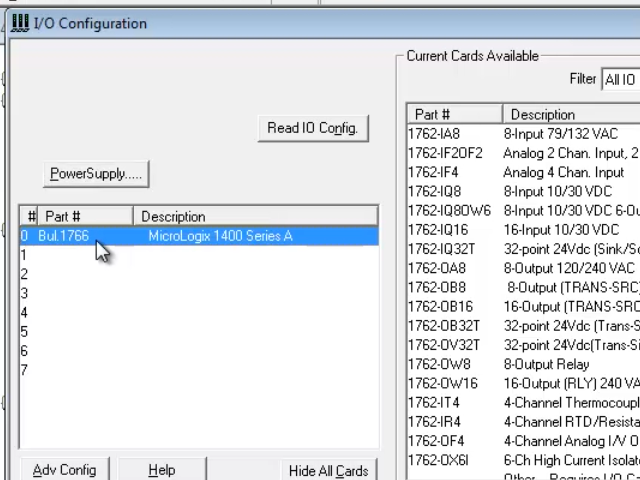
Step 3) Here 0n the default “Embedded General Configuration” tab, select the base that matches the hardware you have and click on “OK”:

Step 4) Now close the IO Configuration window, save your project, and when you’re ready download it to your MicroLogix.
Watch me demonstrate the above procedure live in Episode 2 of The Automation Minute Season 4:
Have a question or comment on the above? Please feel free to leave them with us HERE.
Until next time, Peace ✌️
If you enjoyed this content, please give it a Like, and consider Sharing a link to it as that is the best way for us to grow our audience, which in turn allows us to produce more content 🙂
Shawn M Tierney
Technology Enthusiast & Content Creator
Support our work and gain access to hundreds members only articles and videos by becoming a member at The Automation Blog or on YouTube. You’ll also find all of my affordable PLC, HMI, and SCADA courses at TheAutomationSchool.com.
Shawn Tierney is a lifelong Technology Enthusiast who began programing in the early 80's on the Apple II and VIC-20 personal computers. After earning a degree in Electronics, he worked as a Certified Controls and Information Automation Specialist for 25 years before launching The Automation Blog and School in 2013.
Latest posts by Shawn Tierney (see all)
- A.I. Tech Talk with Emil Soerensen of Kapa.ai (12/04/25) - December 4, 2025
- Innovation Summit Las Vegas 2025 Recap (P254) - December 3, 2025
- New Features of Ignition 8.3 with Travis Cox (S2E37) - December 2, 2025


 (M5E41)")