“Everything must be connected”. That is pretty much the philosophy in the manufacturing environment because every sensor, every data point needs to be captured, monitored and utilized for decision making.
There is no such excuse that “we can’t bring that data point into the control system”. The need for networking skills has been on a steady increase for the last couple of decades and it will be much more needed in the next one.
Image by Brandon Cooper
Today I want to start a series of getting to know your Cisco IOS (operating systems) via the CLI (Command Line Interface).
The Cisco IOS is also utilized in the Stratix line of switches by Rockwell, so whether you are using Cisco or Stratix switches in your IT or OT environment, then hopefully you will pick up a few things here.
Connecting to your Cisco Switch:
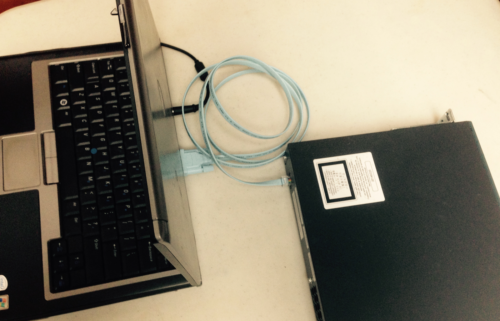
- Use the blue serial cable that comes with the switch to connect to the “Console” Port of the Switch. If your laptop has a serial port, it will connect directly to your laptop, but likely you will not and will need a USB-Serial Converter.
- You can obtain a program like “PUTTY” to do the initial configuration via the serial port. Whatever program you use, there will be serial port settings that will have to be correct to connect to the switch:
- Baud Rate/Speed: 9600
- Data Bits: 8
- Stop Bits: 1
- Parity: None
- Flow Control: None
- In addition, you will have a COM Port Setting that will be for the USB or Serial Port that you are using on your laptop. You can check “Device Manager” on your laptop to see where the device is set up. Most of the time a direct serial port will be set as COM 1 and an external USB-Serial adapter will be COM 3 or COM 4.
An “out of the box” switch will have almost no configuration. It will be essentially an unmanaged switch. When you connect, you will only get a prompt “switch>”
Image by Brandon Cooper

Modes
- Unprivileged Mode – Switch> – In the unprivileged mode, you are connected to the switch, but you have no authorization to monitor the switch or make changes to the switch.
- Privileged Mode – Switch# – In the privileged mode, you can monitor the switch (usually the #show commands), but also you can write to the switch’s configuration and backup the switch configuration as we will explore further in the coming articles. To access the Privileged Mode, simply type the command “enable”
- Configuration Mode – Switch(config)# – In configuration mode, you can modify the switch configuration such as ports, vlans and a myriad of other configuration pieces that we will begin to explore in the coming articles. To access the Configuration Mode, simply type the command “configure terminal” after you are in the Privileged Mode.
Image by Brandon Cooper
Accessing the “Help” menu:
- At any time during configuration you can type the “?” to access the list of available commands
Privileged Mode “Show” commands:
- There are many commands available to monitor the parameters and configuration of the switch.
- Show commands are accessible in privileged mode by typing the command “Switch#show (command)”. Tip: the commands are also available in the configuration mode, but you have to type the word “do” in front of the command as follows: Switch(config)# do show (command).
- To view the current running configuration of the switch: switch# show running-config
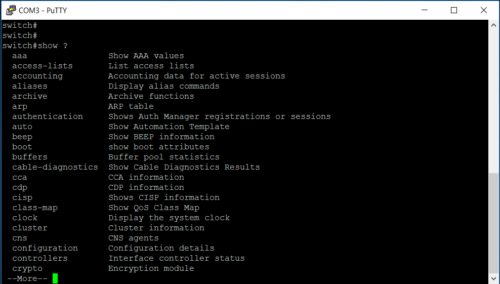
- For a list of all show commands : switch# show ?
Image by Brandon Cooper
TIP: Hit the Spacebar to see more commands.
Conclusion
This article is starting from the beginning and may be too basic for some engineers, however, for some it will also spark an interest that will take them to many years of learning ahead, because it is essential to the skillset to be able to perform these functions in the life of a controls engineer.
Getting connected is the first step and as we progress further, there are many things that must be set up in a switch to have the desired configuration needed for a switch that can be placed into production with the necessary security measures and bells and whistles.
And, by all means, this could never be a “one size fits all” application and every network will have similar but different configurations. This will be a generic configuration that will help you to become familiar with the configuration in general.
Written by Brandon Cooper
Senior Controls Engineer and Freelance Writer
Have a question? Join our community of pros to take part in the discussion! You'll also find all of our automation courses at TheAutomationSchool.com.
Sponsor and Advertise: Get your product or service in front of our 75K followers while also supporting independent automation journalism by sponsoring or advertising with us! Learn more in our Media Guide here, or contact us using this form.
- Things I’ve Learned Travelling for Work (2) - July 17, 2025
- Things I’ve Learned Travelling for Work (1) - July 10, 2025
- Emulating an Allen-Bradley E3 or E3 Plus - June 30, 2025

Discover more from The Automation Blog
Subscribe to get the latest posts sent to your email.


